Links Manager helps you scan your website links and find link-related problems.
Open:
SEO Repair Kit → Links Manager
Links Manager contains several tabs:
Links Scan
404 Monitor
Auto Scan
Notifications
Smart Redirects
Internal Linking
Links Scan Tab
The Links Scan tab checks internal and external links on your site.
Use it to:
Scan pages for broken links
Check HTTP status codes
Find redirected links
Find unhealthy or failed links
Export scan results
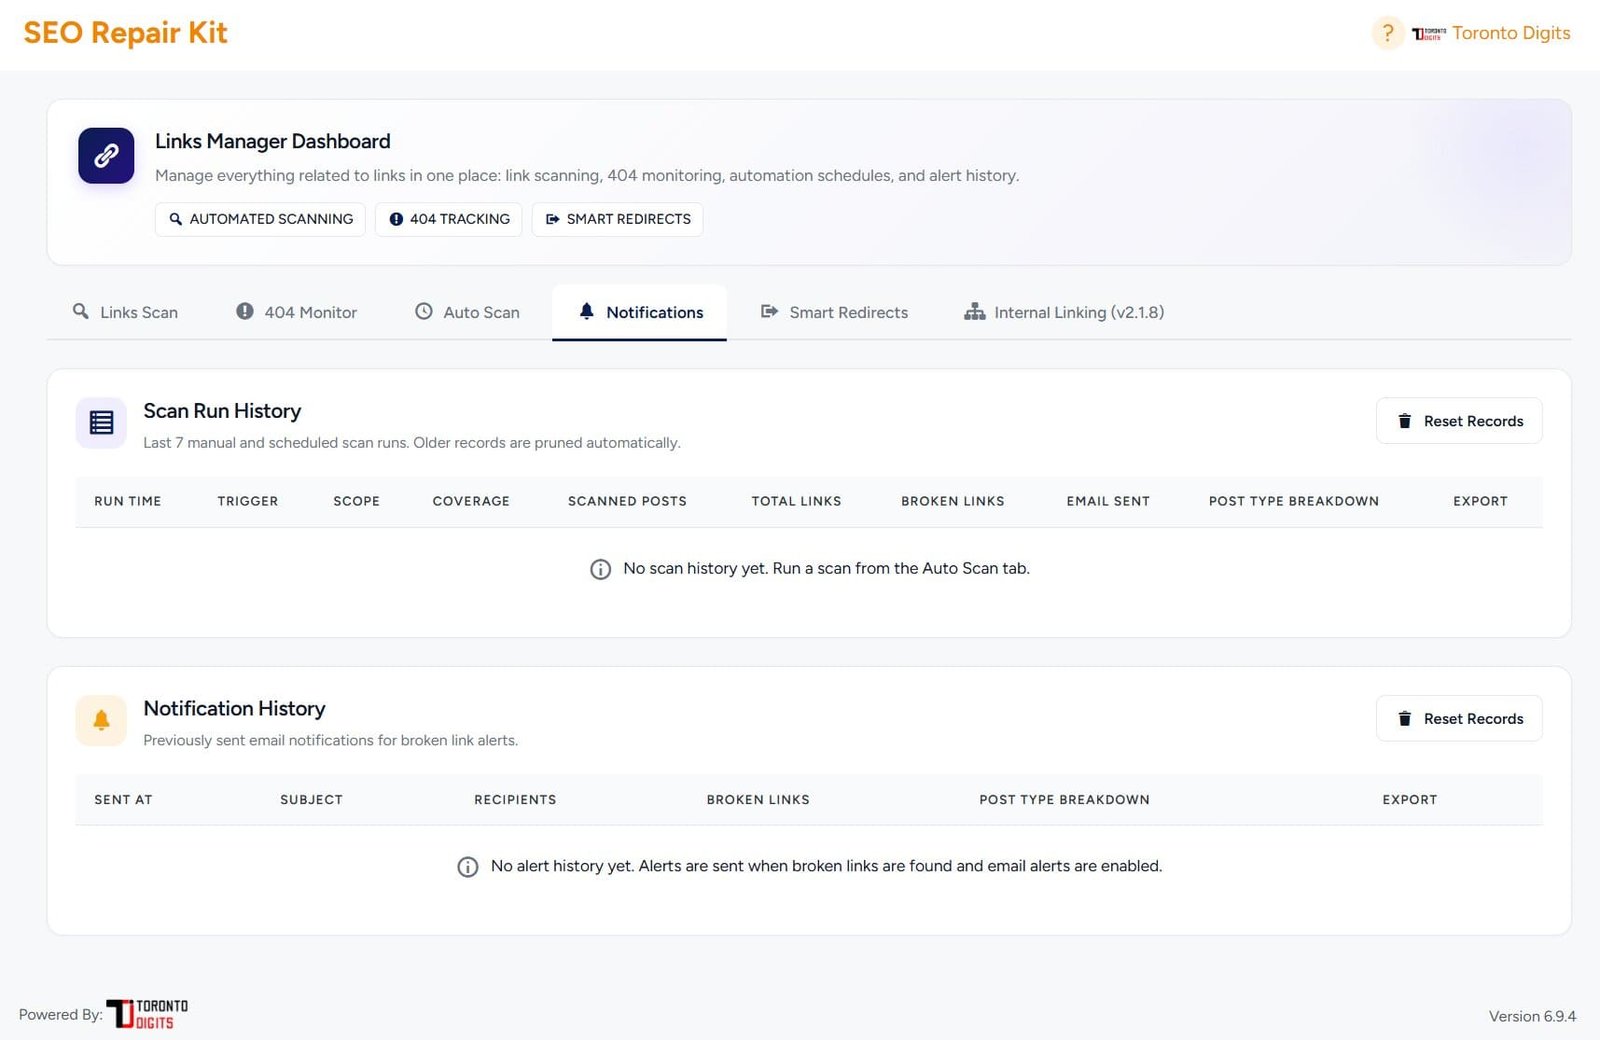
Notifications
Notifications show alert history and email report activity for link scans.
Use it to:
Review recent alerts
Confirm whether reports were sent
Check broken-link email history
Check clean-scan email history
Get Started
KeyTrack helps you view Google Search Console performance inside WordPress.
Use it to monitor:
Clicks
Impressions
CTR
Average position
Keyword/page trends
Search performance changes
Getting Started
Sitemap Manager controls what appears in the WordPress core sitemap.
Use it to:
Enable/disable sitemap control
Include/exclude post types
Include/exclude taxonomies
Keep the sitemap focused on valuable content
Getting Started
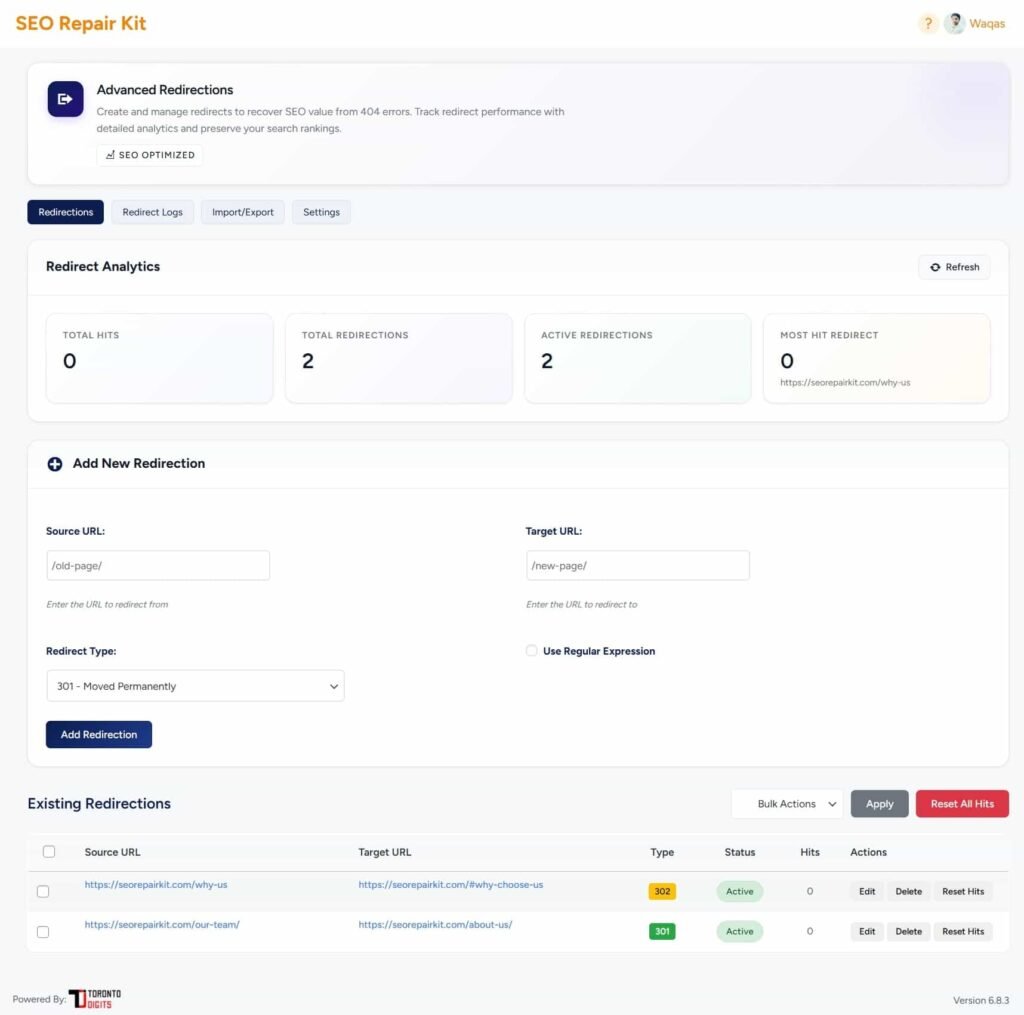
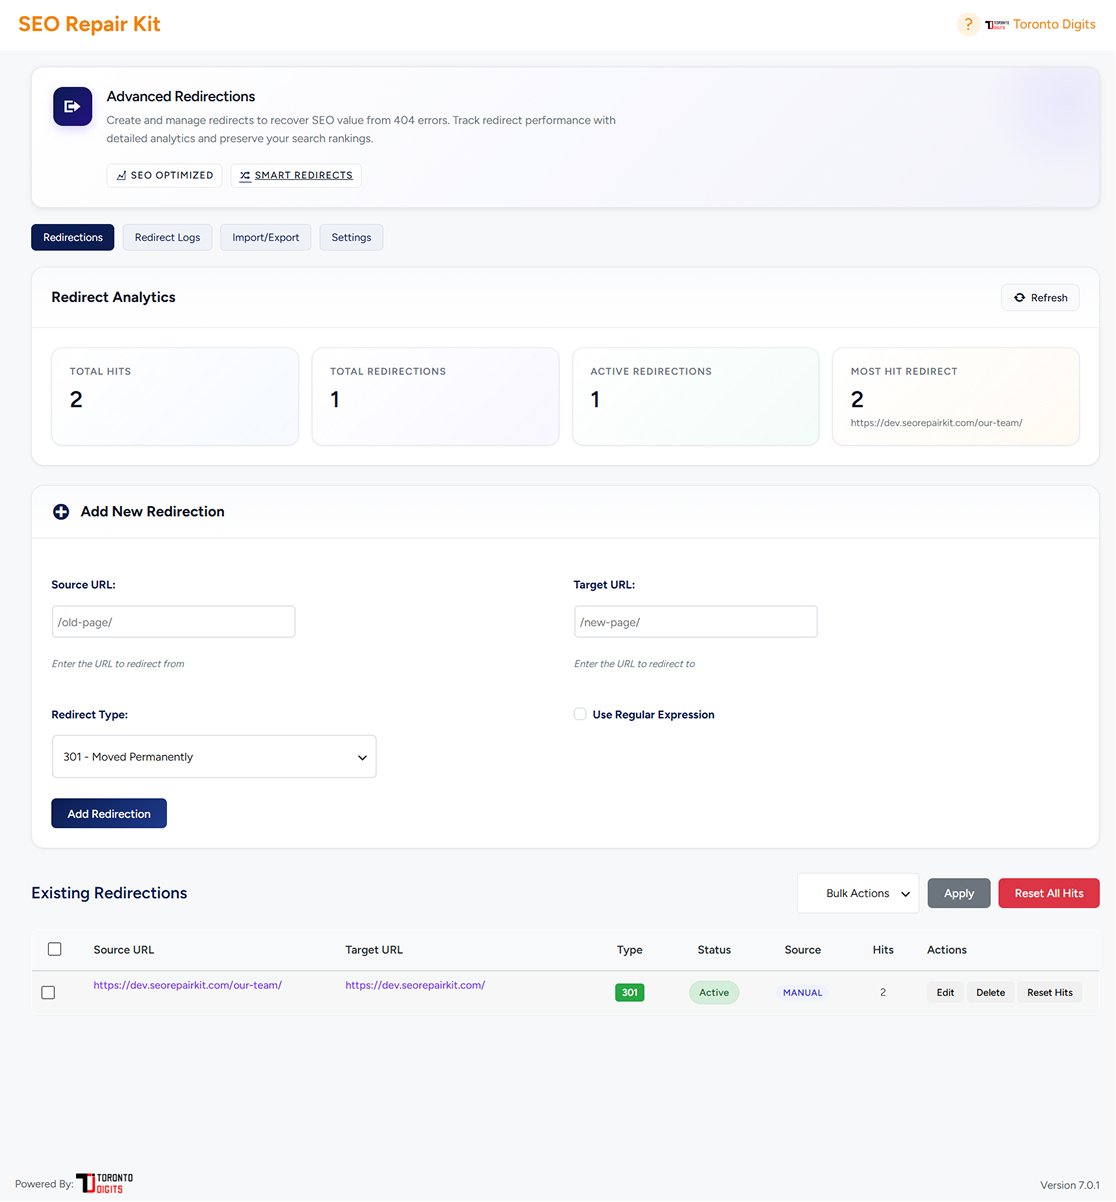
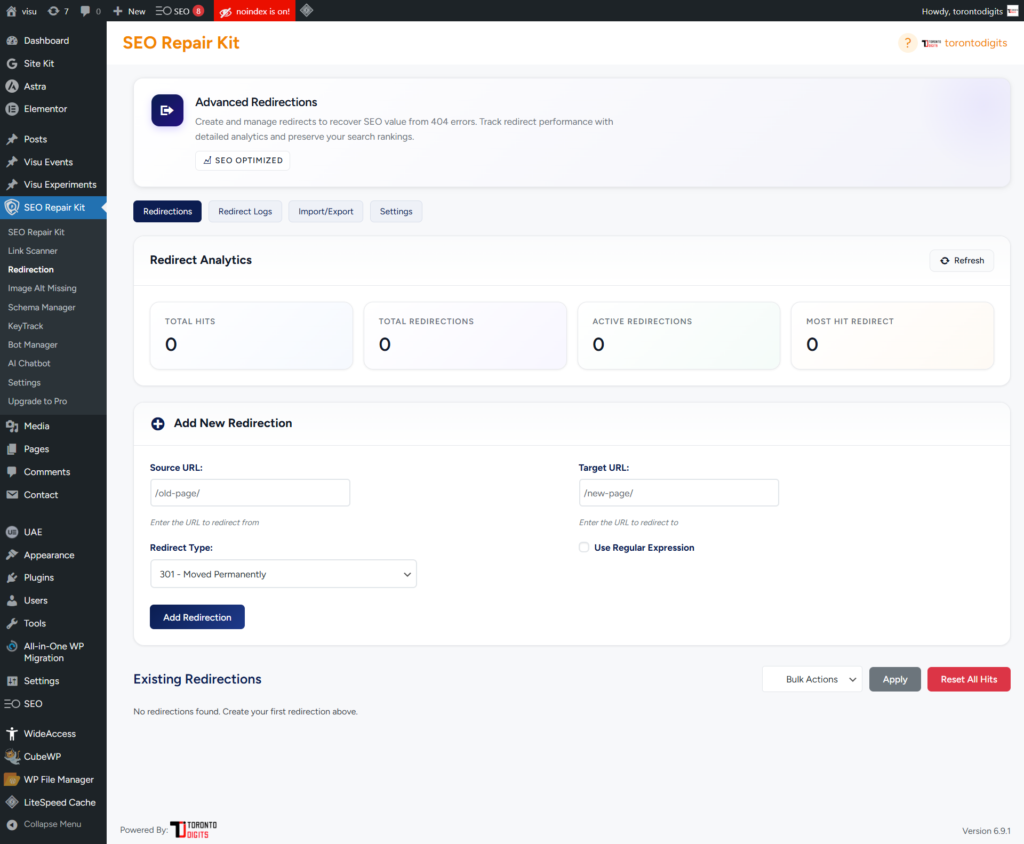
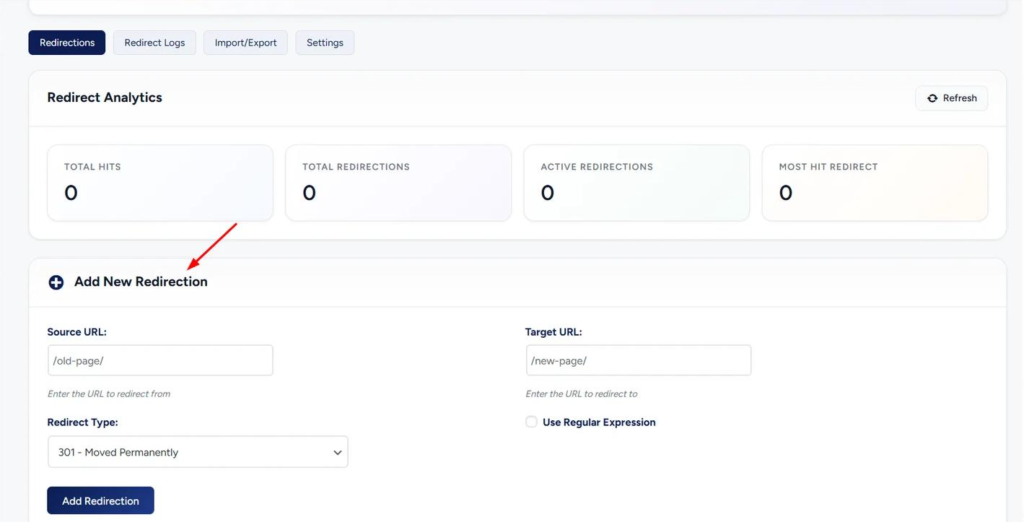
Redirection Manager lets you create and manage redirects.
Use it to:
Create 301 redirects
Create 302 redirects
Track redirect hits
Review redirect logs
Import redirects
Export redirects
Reset hit counts
SEO Repair Kit Complete User Guide
How to install SEO Repair Kit through Plugins
To install the free SEO Repair Kit for WordPress plugin on your WordPress site by downloading the plugin through the Plugins menu, follow the steps below.
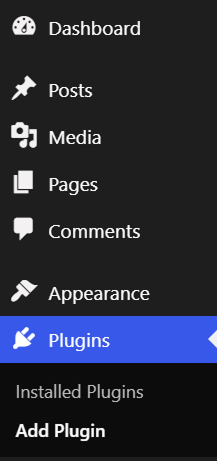
1.Navigate to the Plugin Directory:
Log in to your WordPress dashboard. From the left-hand menu, go to Plugins
Click toAdd Plugin
2.Search for SEO Repair Kit:
In the search bar located in the top right corner, type SEO Repair Kit. Look for the official plugin developed by TorontoDigits in the search results.
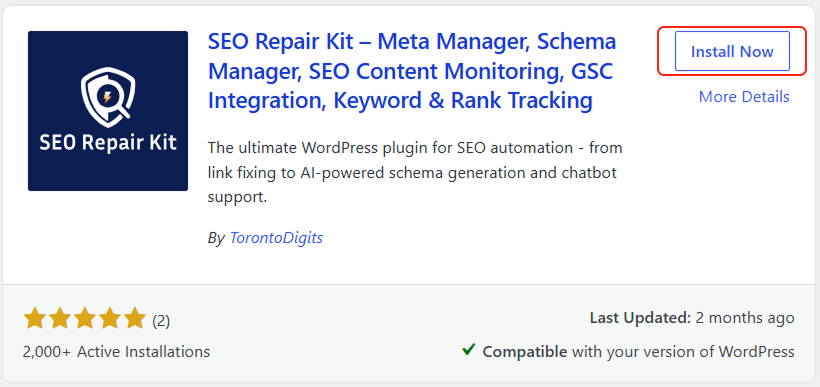
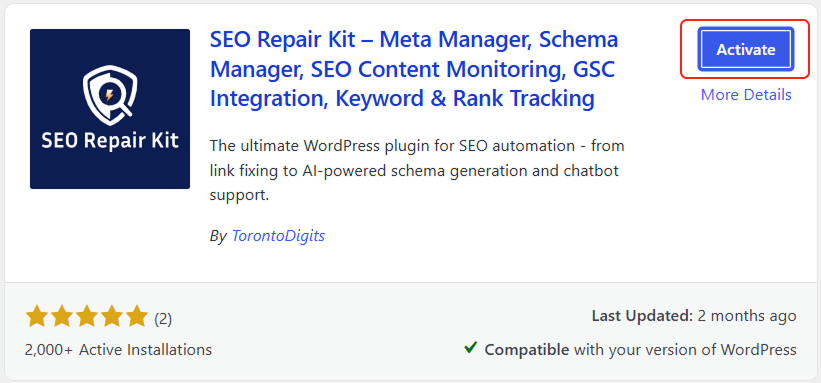
3.Install and Activate:
Click the Install Now button next to the SEO Repair Kit listing.
Once the installation is complete, the button will change to Activate. Click it to turn the plugin on.
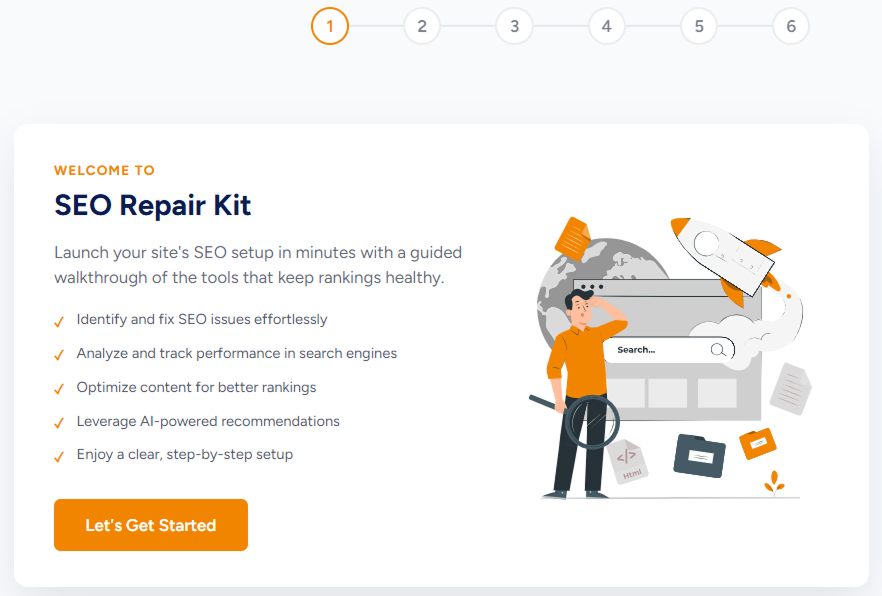
4.Start the Setup Wizard:
Upon activation, you will be redirected to the welcome screen. Click the Let’s Get Started button to begin the guided configuration.
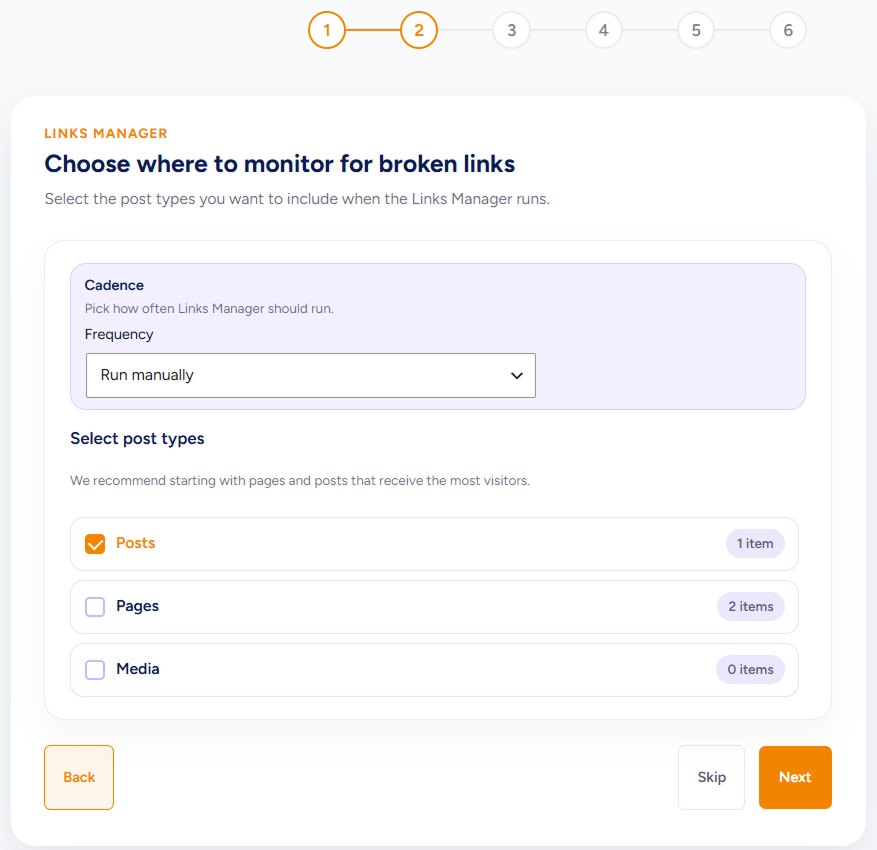
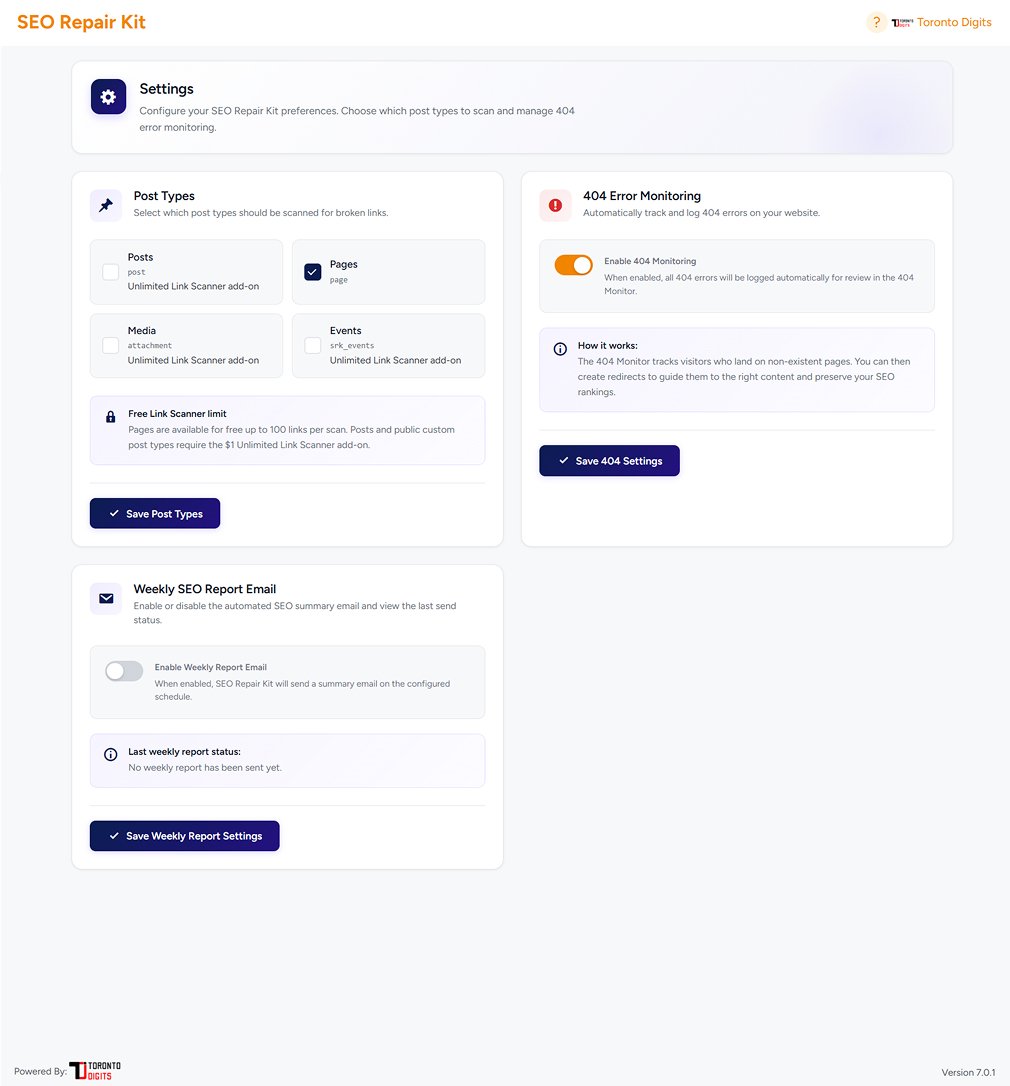
5.Configure the Link Scanner:
Choose which post types (Posts, Pages, or Media) you want the Link Scanner to automatically monitor for broken links. Once selected, click Next.
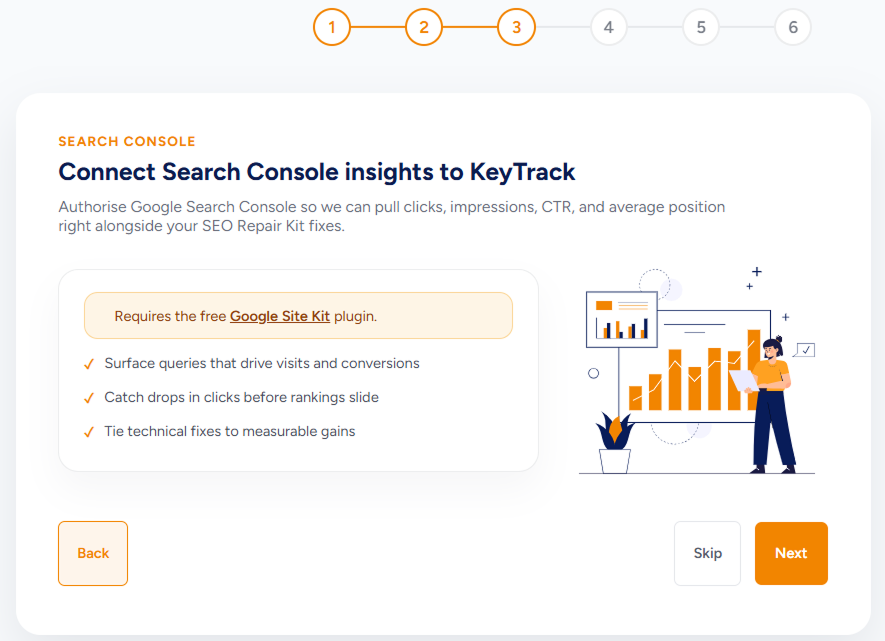
6.Connect Search Console Insights:
Authorize Google Search Console to pull clicks, impressions, CTR, and average position data directly into the KeyTrack dashboard. Click Next to proceed.
7.Enable Schema Templates:
Turn on the structured data templates that fit your content (such as Article, FAQ, Product, or Recipe schema). Click Next.
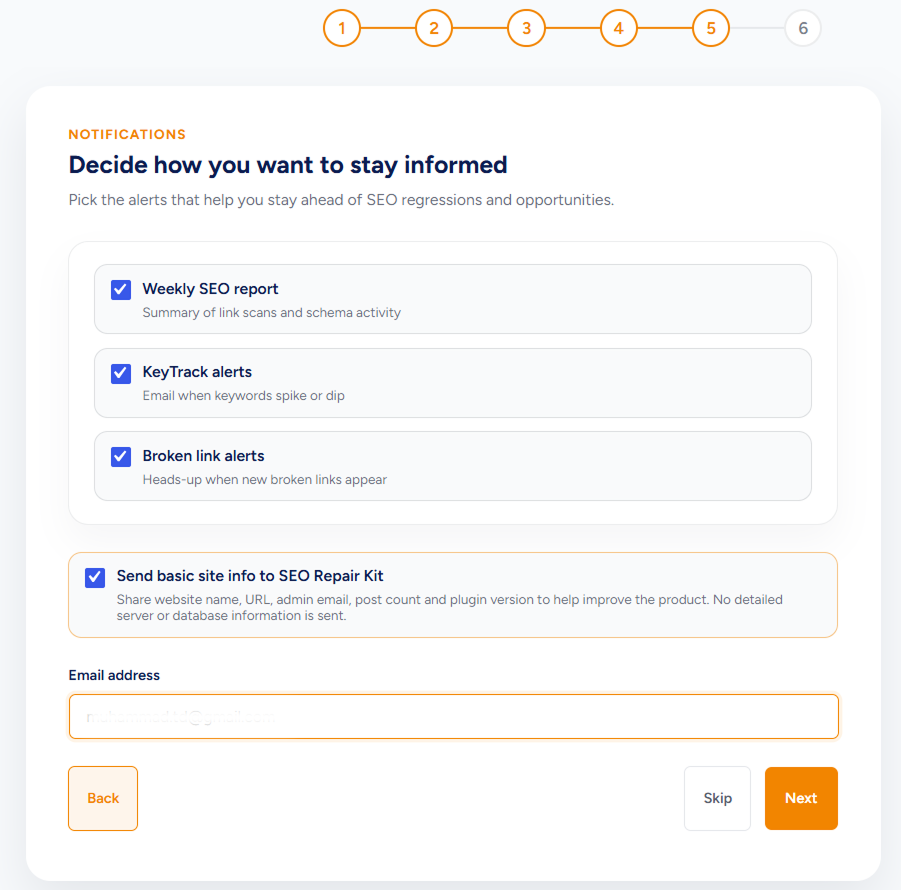
8.Set Up Notifications:
Select how you want to stay informed. You can opt-in for Weekly SEO reports, KeyTrack alerts, and Broken link alerts. Enter your preferred email address at the bottom and click Next.
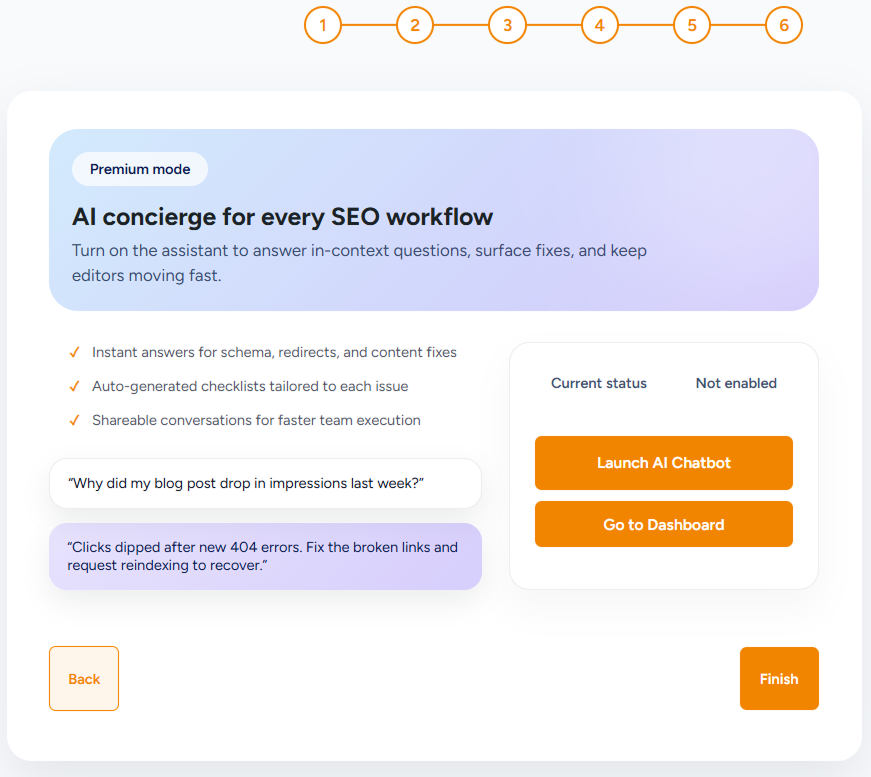
9. Complete the Setup Wizard: The final screen introduces the premium AI Concierge designed for your SEO workflows. Click Finish in the bottom right corner to exit the wizard and complete the setup process.
Congratulations on installing the SEO Repair Kit plugin!
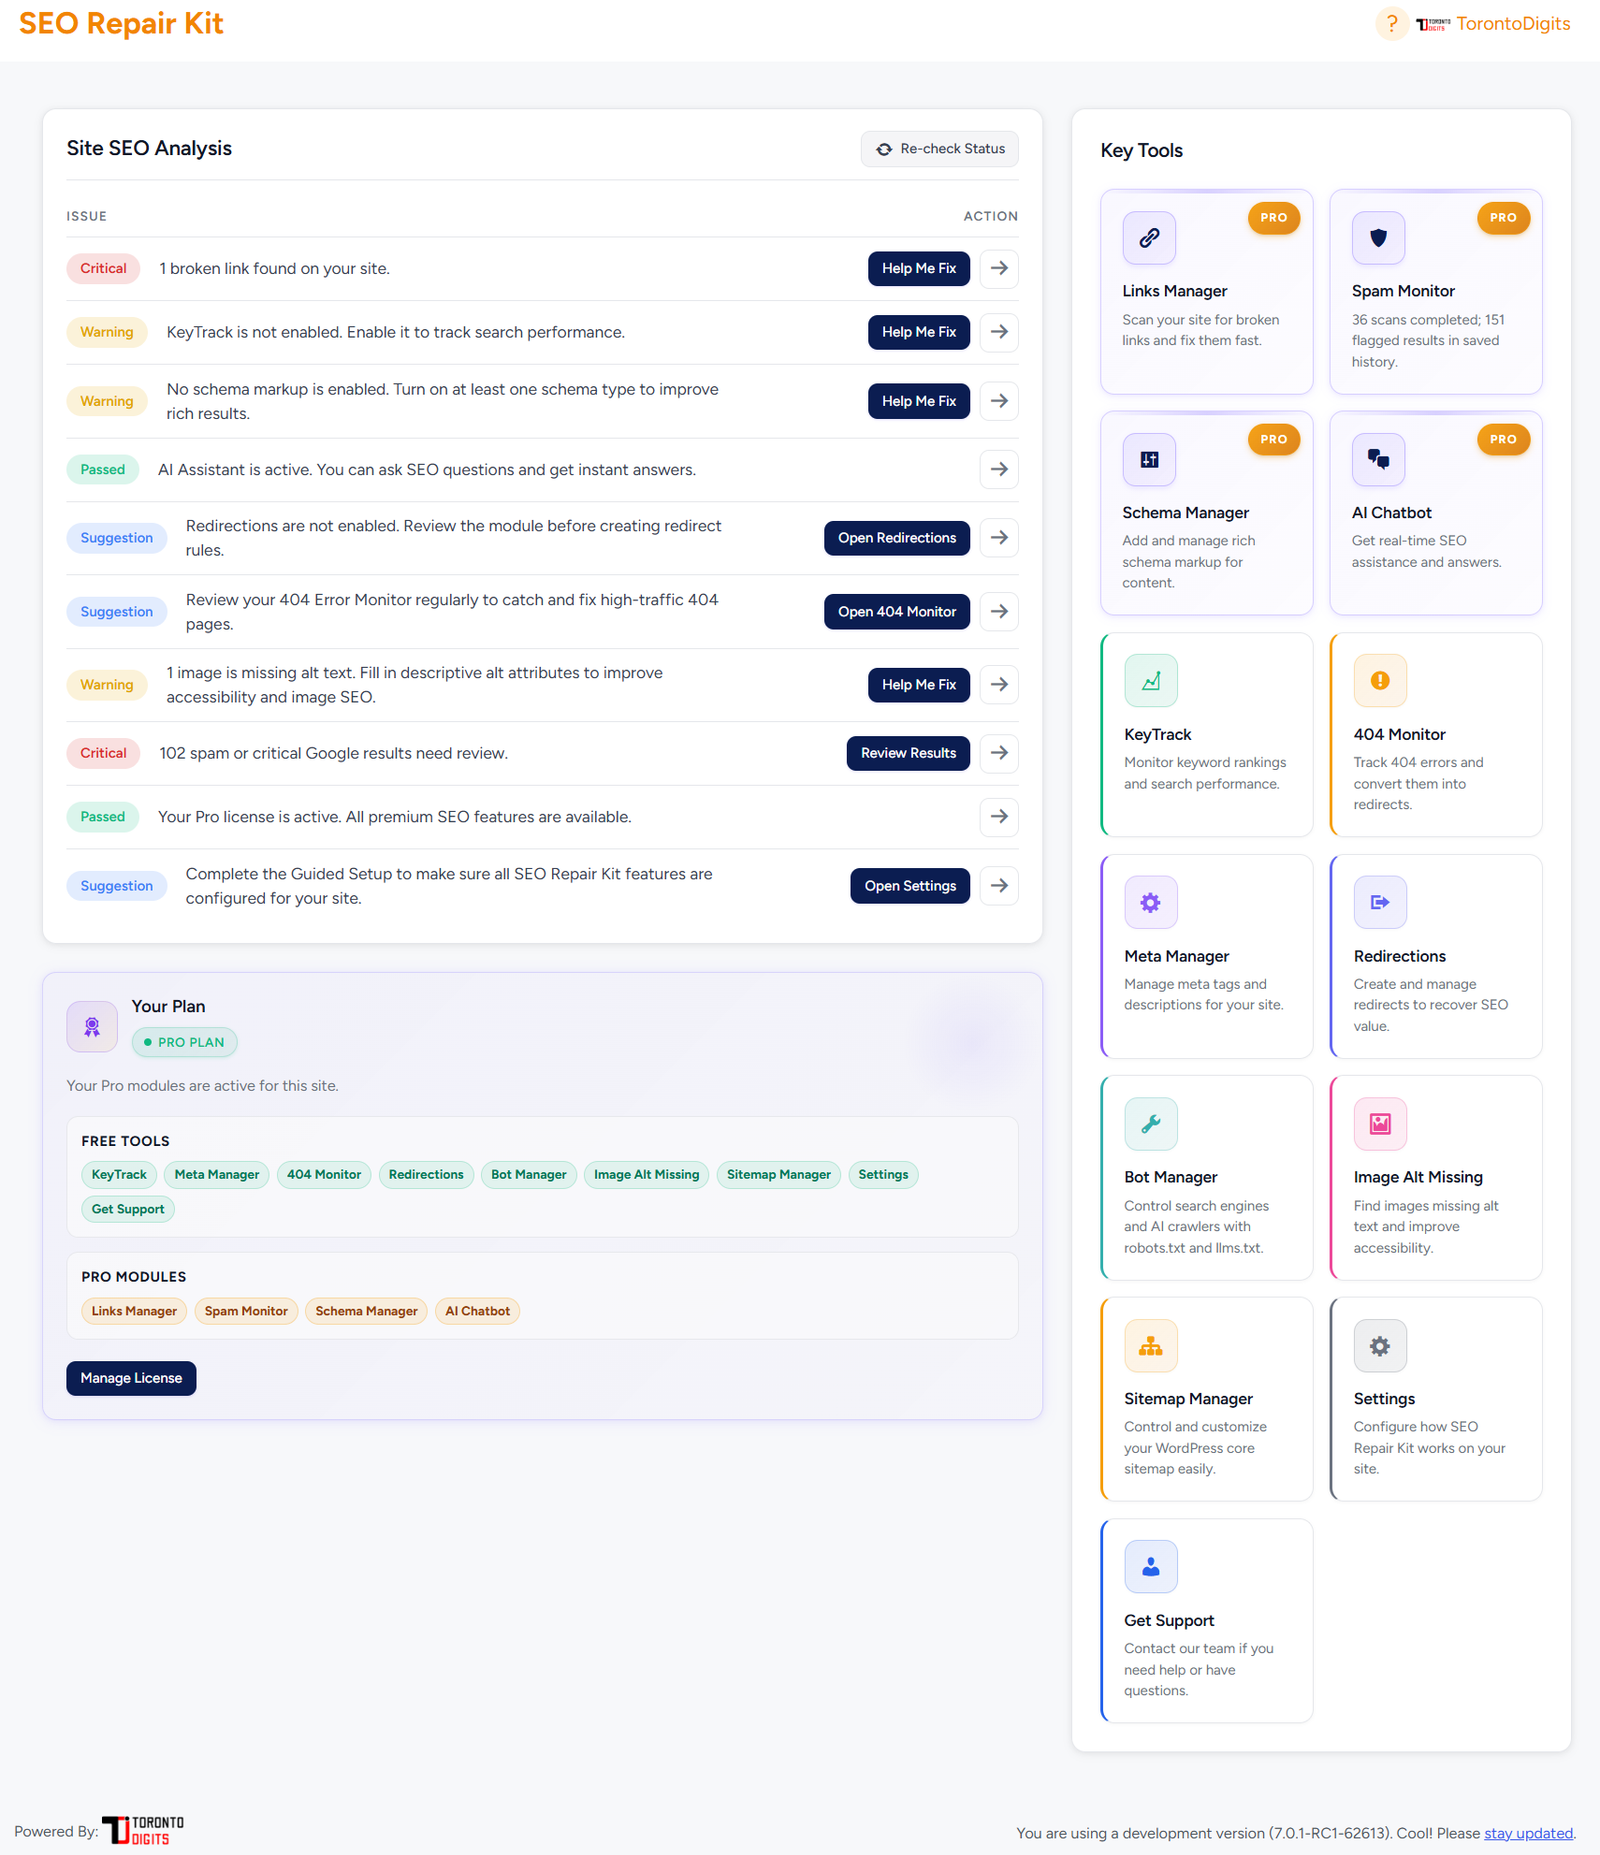
1. What SEO Repair Kit Does
SEO Repair Kit is a WordPress plugin that helps you find, monitor, and fix common SEO problems from one dashboard.
Spam Monitor helps you check indexed Google results for suspicious URLs, spam signals, language mismatch, and risky pages.
Open:
SEO Repair Kit → Spam Monitor
Spam Monitor contains these tabs:
Dashboard
Spam Rules
Google SERP Scan
Search Console Cleanup
Alerts
Settings
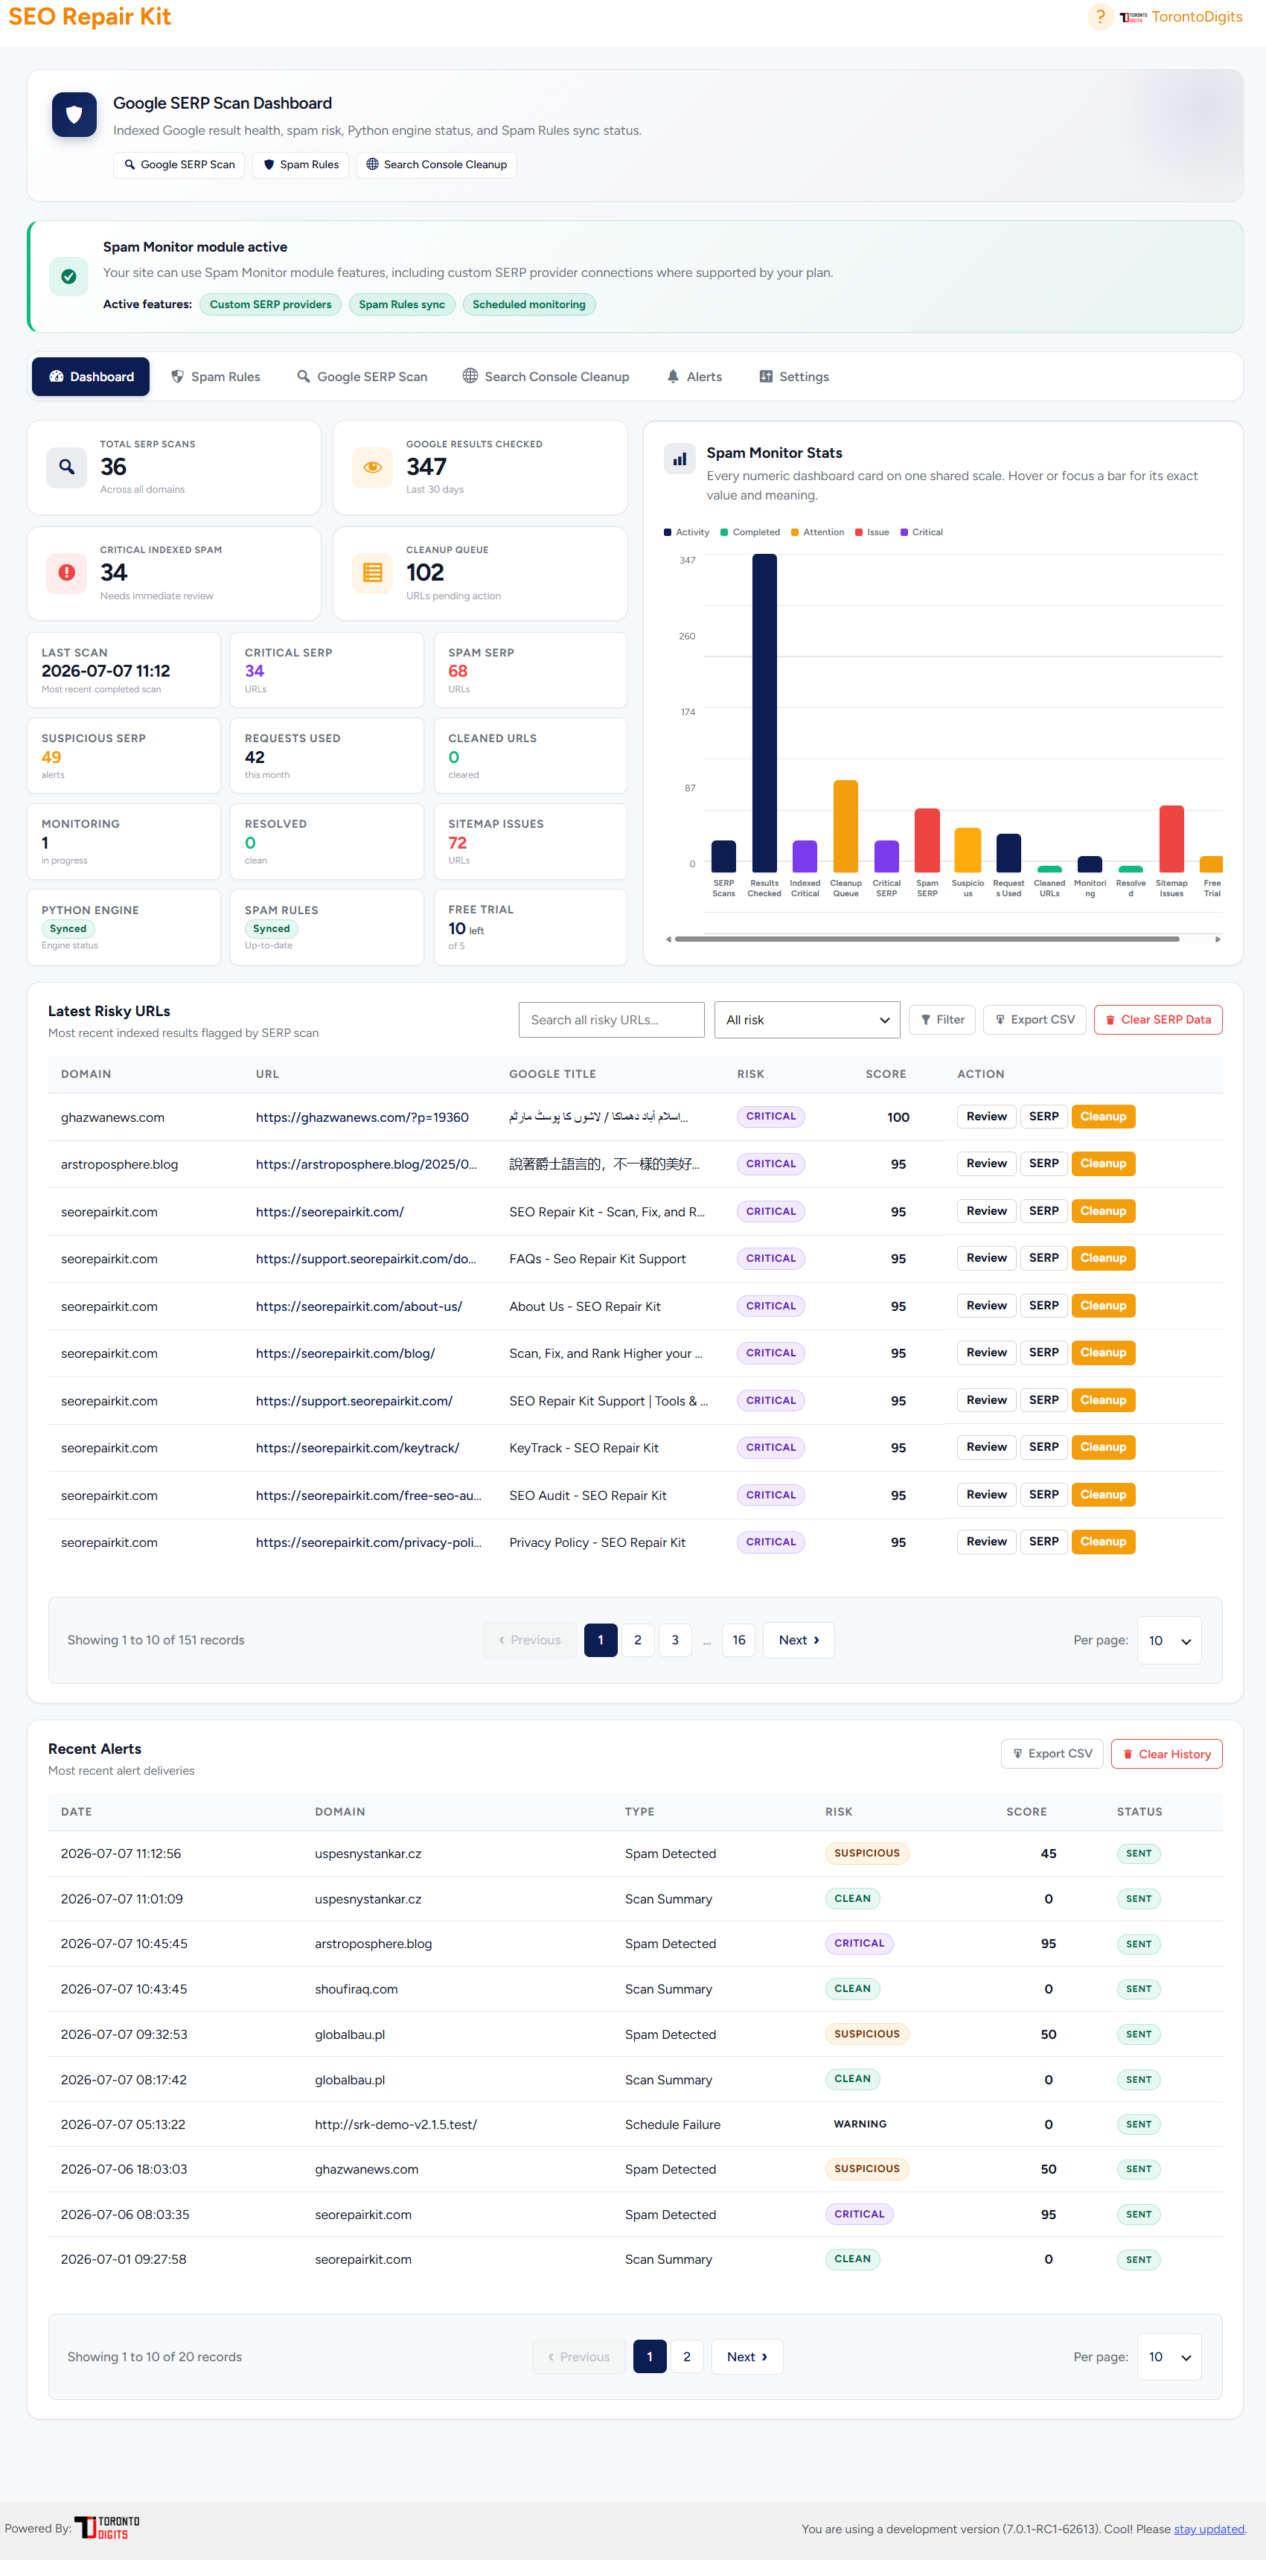
12. Spam Monitor Dashboard
The dashboard summarizes Spam Monitor activity.
Use it to see:
Total SERP scans
Google results checked
Critical indexed spam
Cleanup queue
Critical/spam/suspicious SERP counts
Requests used
Cleaned URLs
Monitoring status
Resolved URLs
Sitemap issues
Last scan
Python engine status
Spam Rules sync status
How to use
Open Spam Monitor.
Start on the Dashboard tab.
Review the KPI cards.
Check the stats graph for a quick visual summary.
Open risky records if something needs attention.
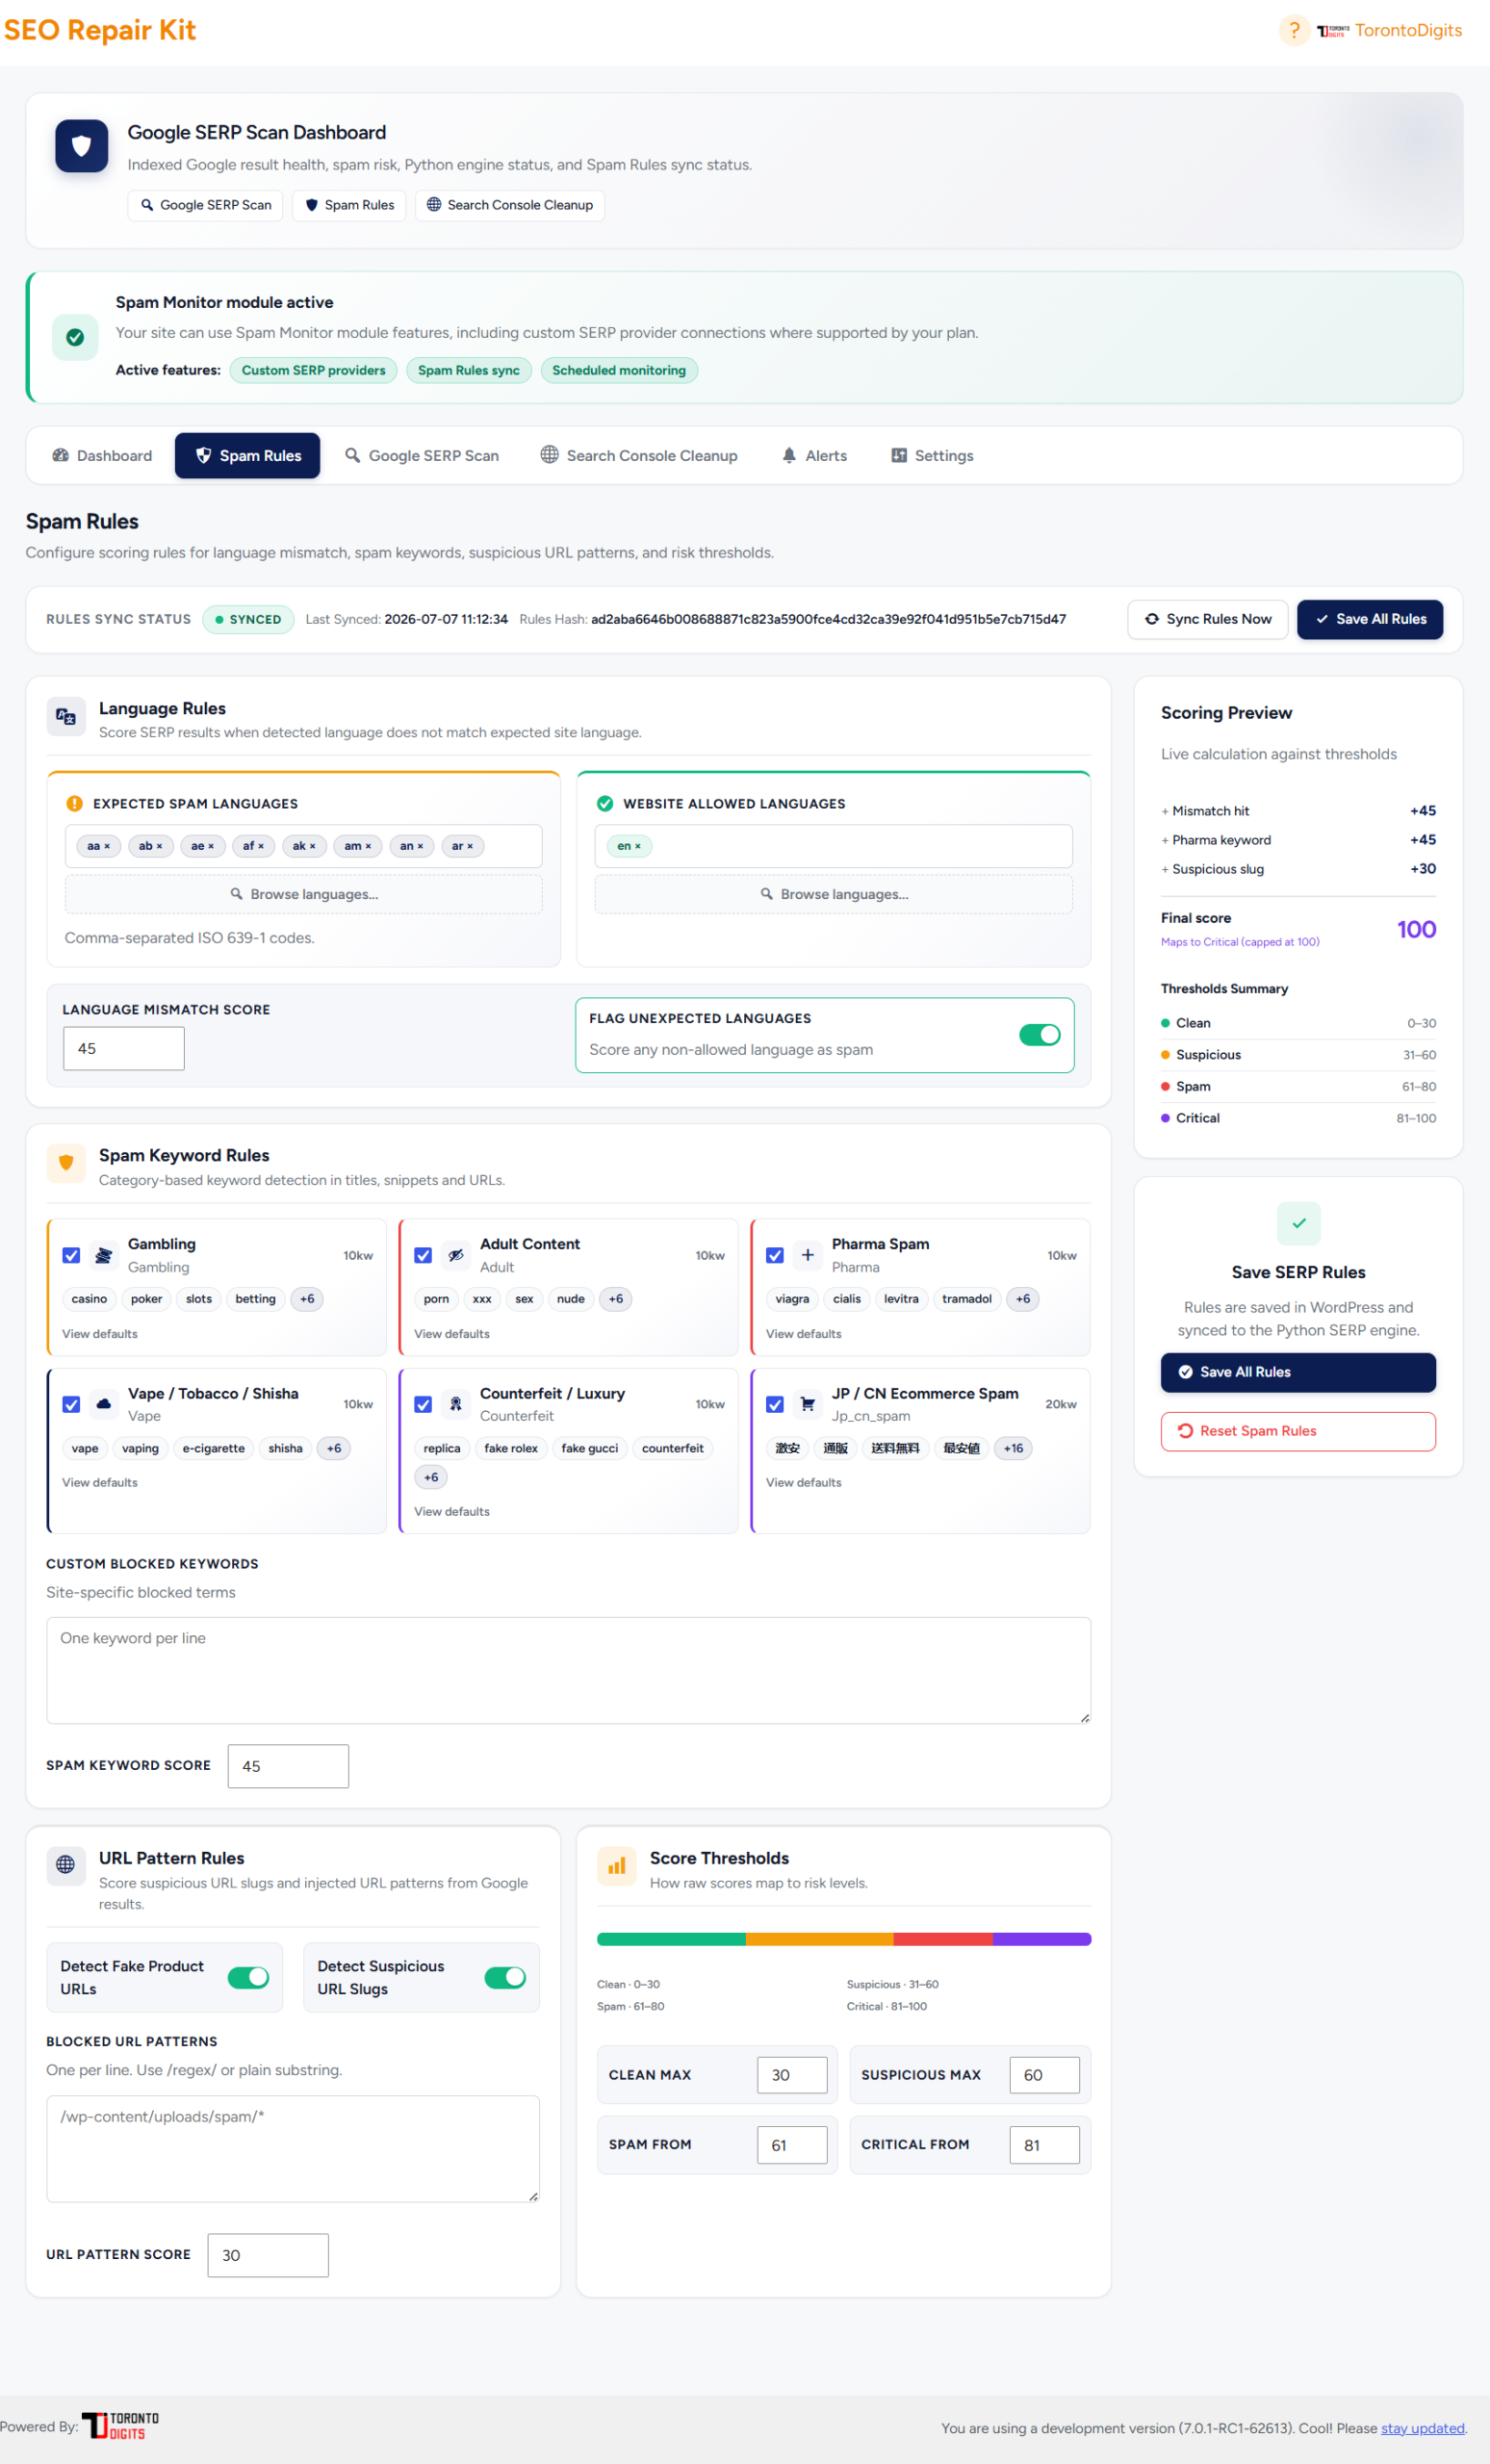
13. Spam Rules
Spam Rules control how Spam Monitor scores suspicious Google results.
Use it to configure:
Expected spam languages
Website allowed languages
Language mismatch score
Spam keyword categories
Custom blocked keywords
Suspicious URL patterns
URL pattern score
Clean/suspicious/spam/critical thresholds
How to use
Open Spam Monitor.
Go to Spam Rules.
Review language rules.
Select suspicious languages and allowed website languages.
Review spam keyword categories.
Add custom blocked keywords if needed.
Review URL pattern rules.
Adjust score thresholds carefully.
Save rules.
Sync rules if the interface shows they need syncing.
Best practice
Start with default rules first. Only adjust scores if you understand how the results are being classified.
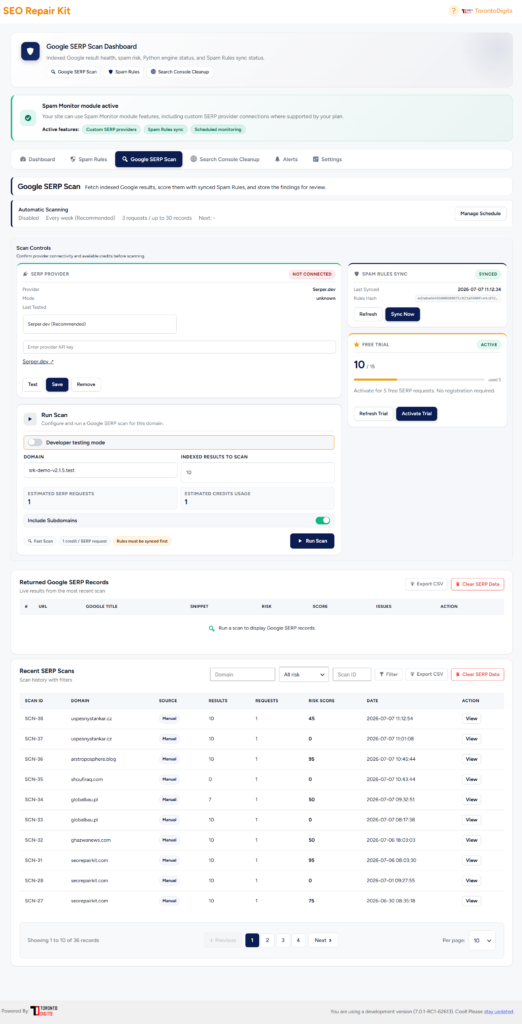
14. Google SERP Scan
Google SERP Scan checks Google indexed results for a domain.
Use it to:
Run manual SERP scans
Choose scan depth
Include or exclude subdomains
Review returned Google SERP records
Review recent scan history
Check provider status
Sync Spam Rules
How to use
Open Spam Monitor.
Go to Google SERP Scan.
Enter your domain.
Select scan depth.
Choose whether to include subdomains.
Run the scan.
Review returned SERP records.
Review recent scan history.
Scan depth
Scan depth controls how many SERP requests/results are checked.
Examples:
1 request = up to 10 records
3 requests = up to 30 records
10 requests = up to 100 records
100 requests = up to 1,000 records
200 requests = up to 2,000 records
Use larger scan depths carefully because they consume more provider requests.
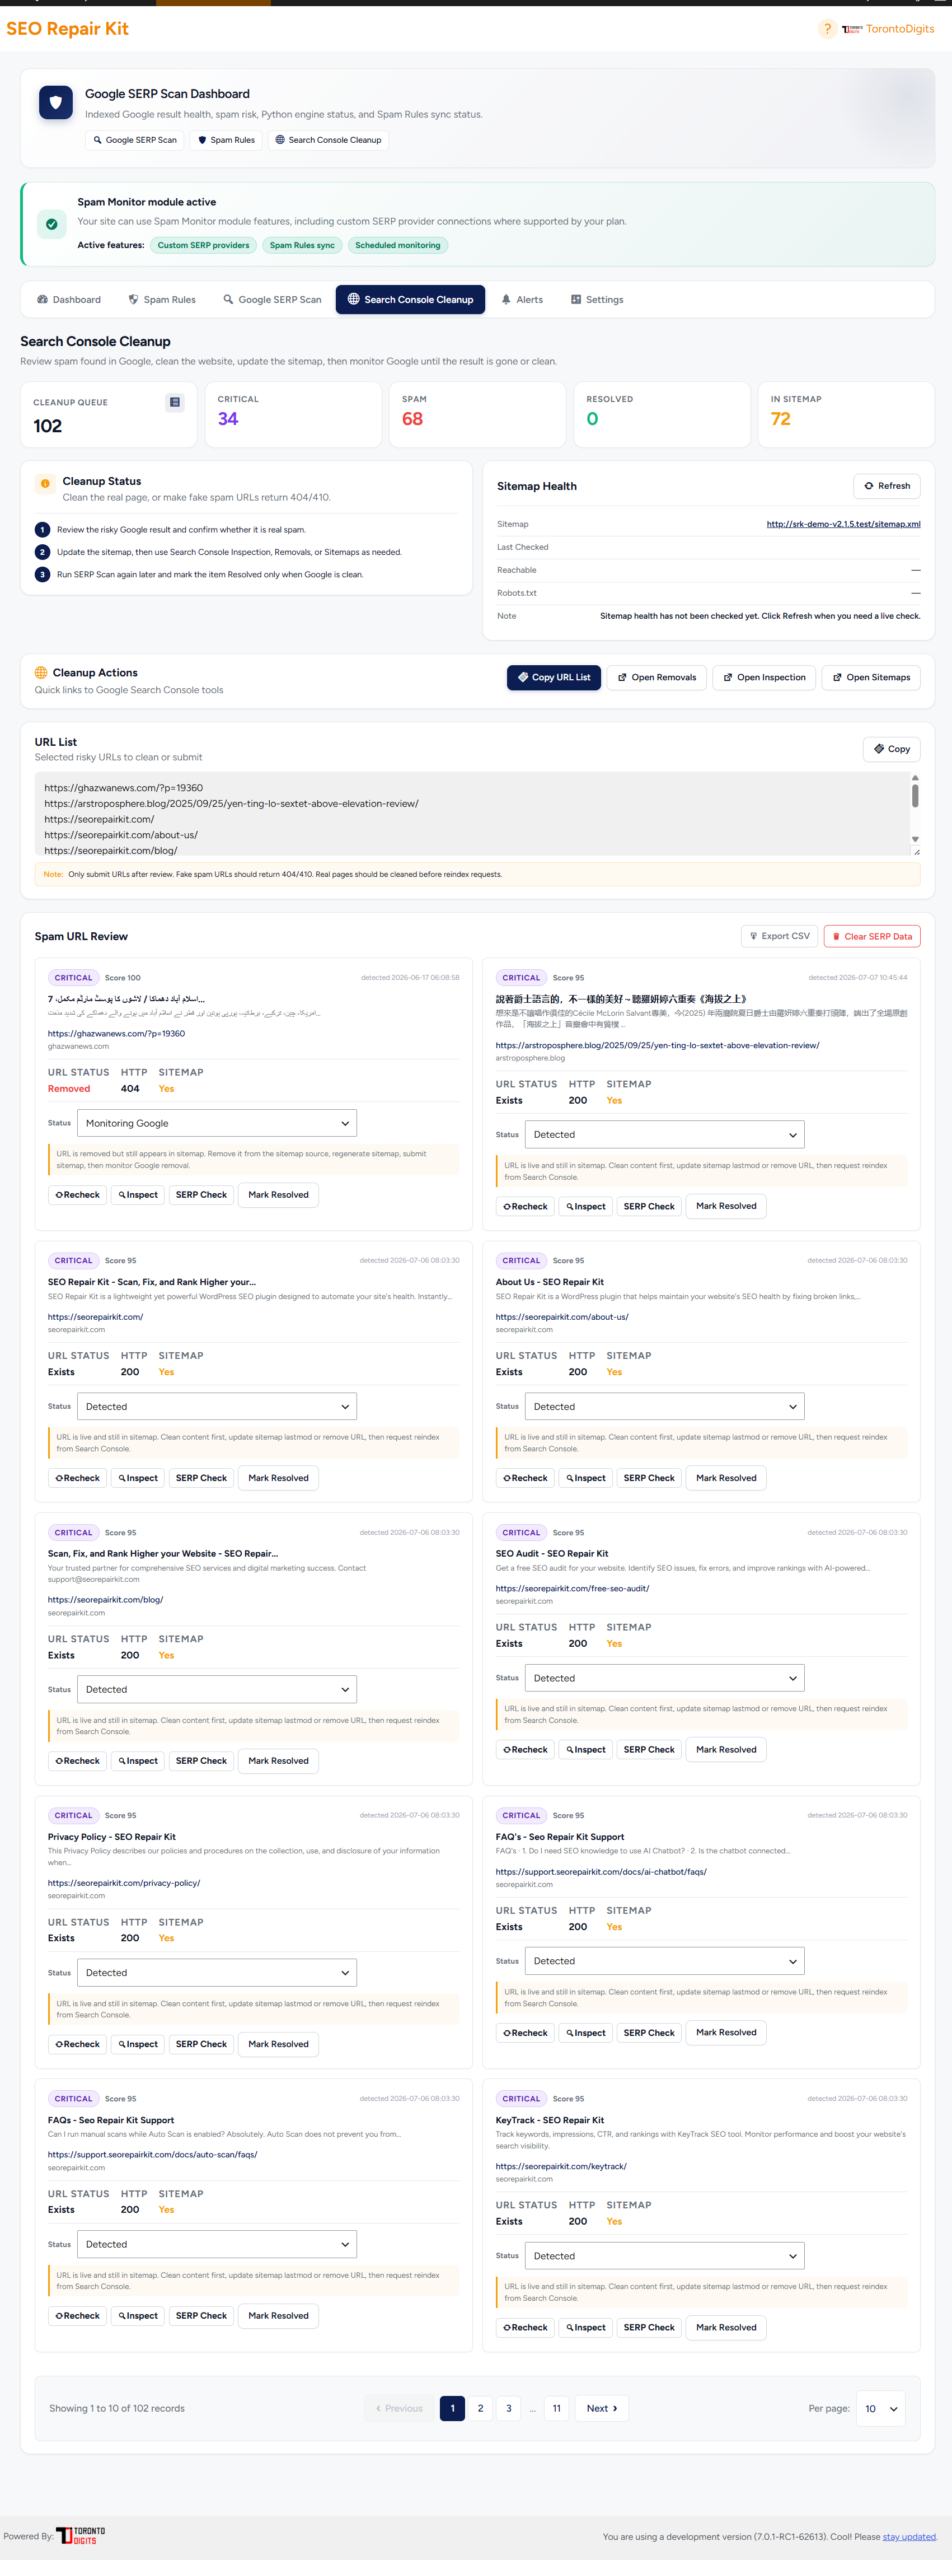
15. Search Console Cleanup
Search Console Cleanup helps you review risky indexed URLs and organize cleanup actions.
Use it to:
Detect risky URLs
Review URL status
Mark cleanup status
Check sitemap presence
Open Search Console links
Track cleanup progress
Suggested cleanup flow
Detect risky indexed URLs.
Review each URL manually.
Decide whether the URL is legitimate or suspicious.
Remove, fix, noindex, redirect, or clean the affected page.
Use Search Console to request removal or reindexing where needed.
Mark status in Spam Monitor.
Best practice
Spam Monitor is a risk signal tool. Always review unfamiliar URLs before taking destructive action.
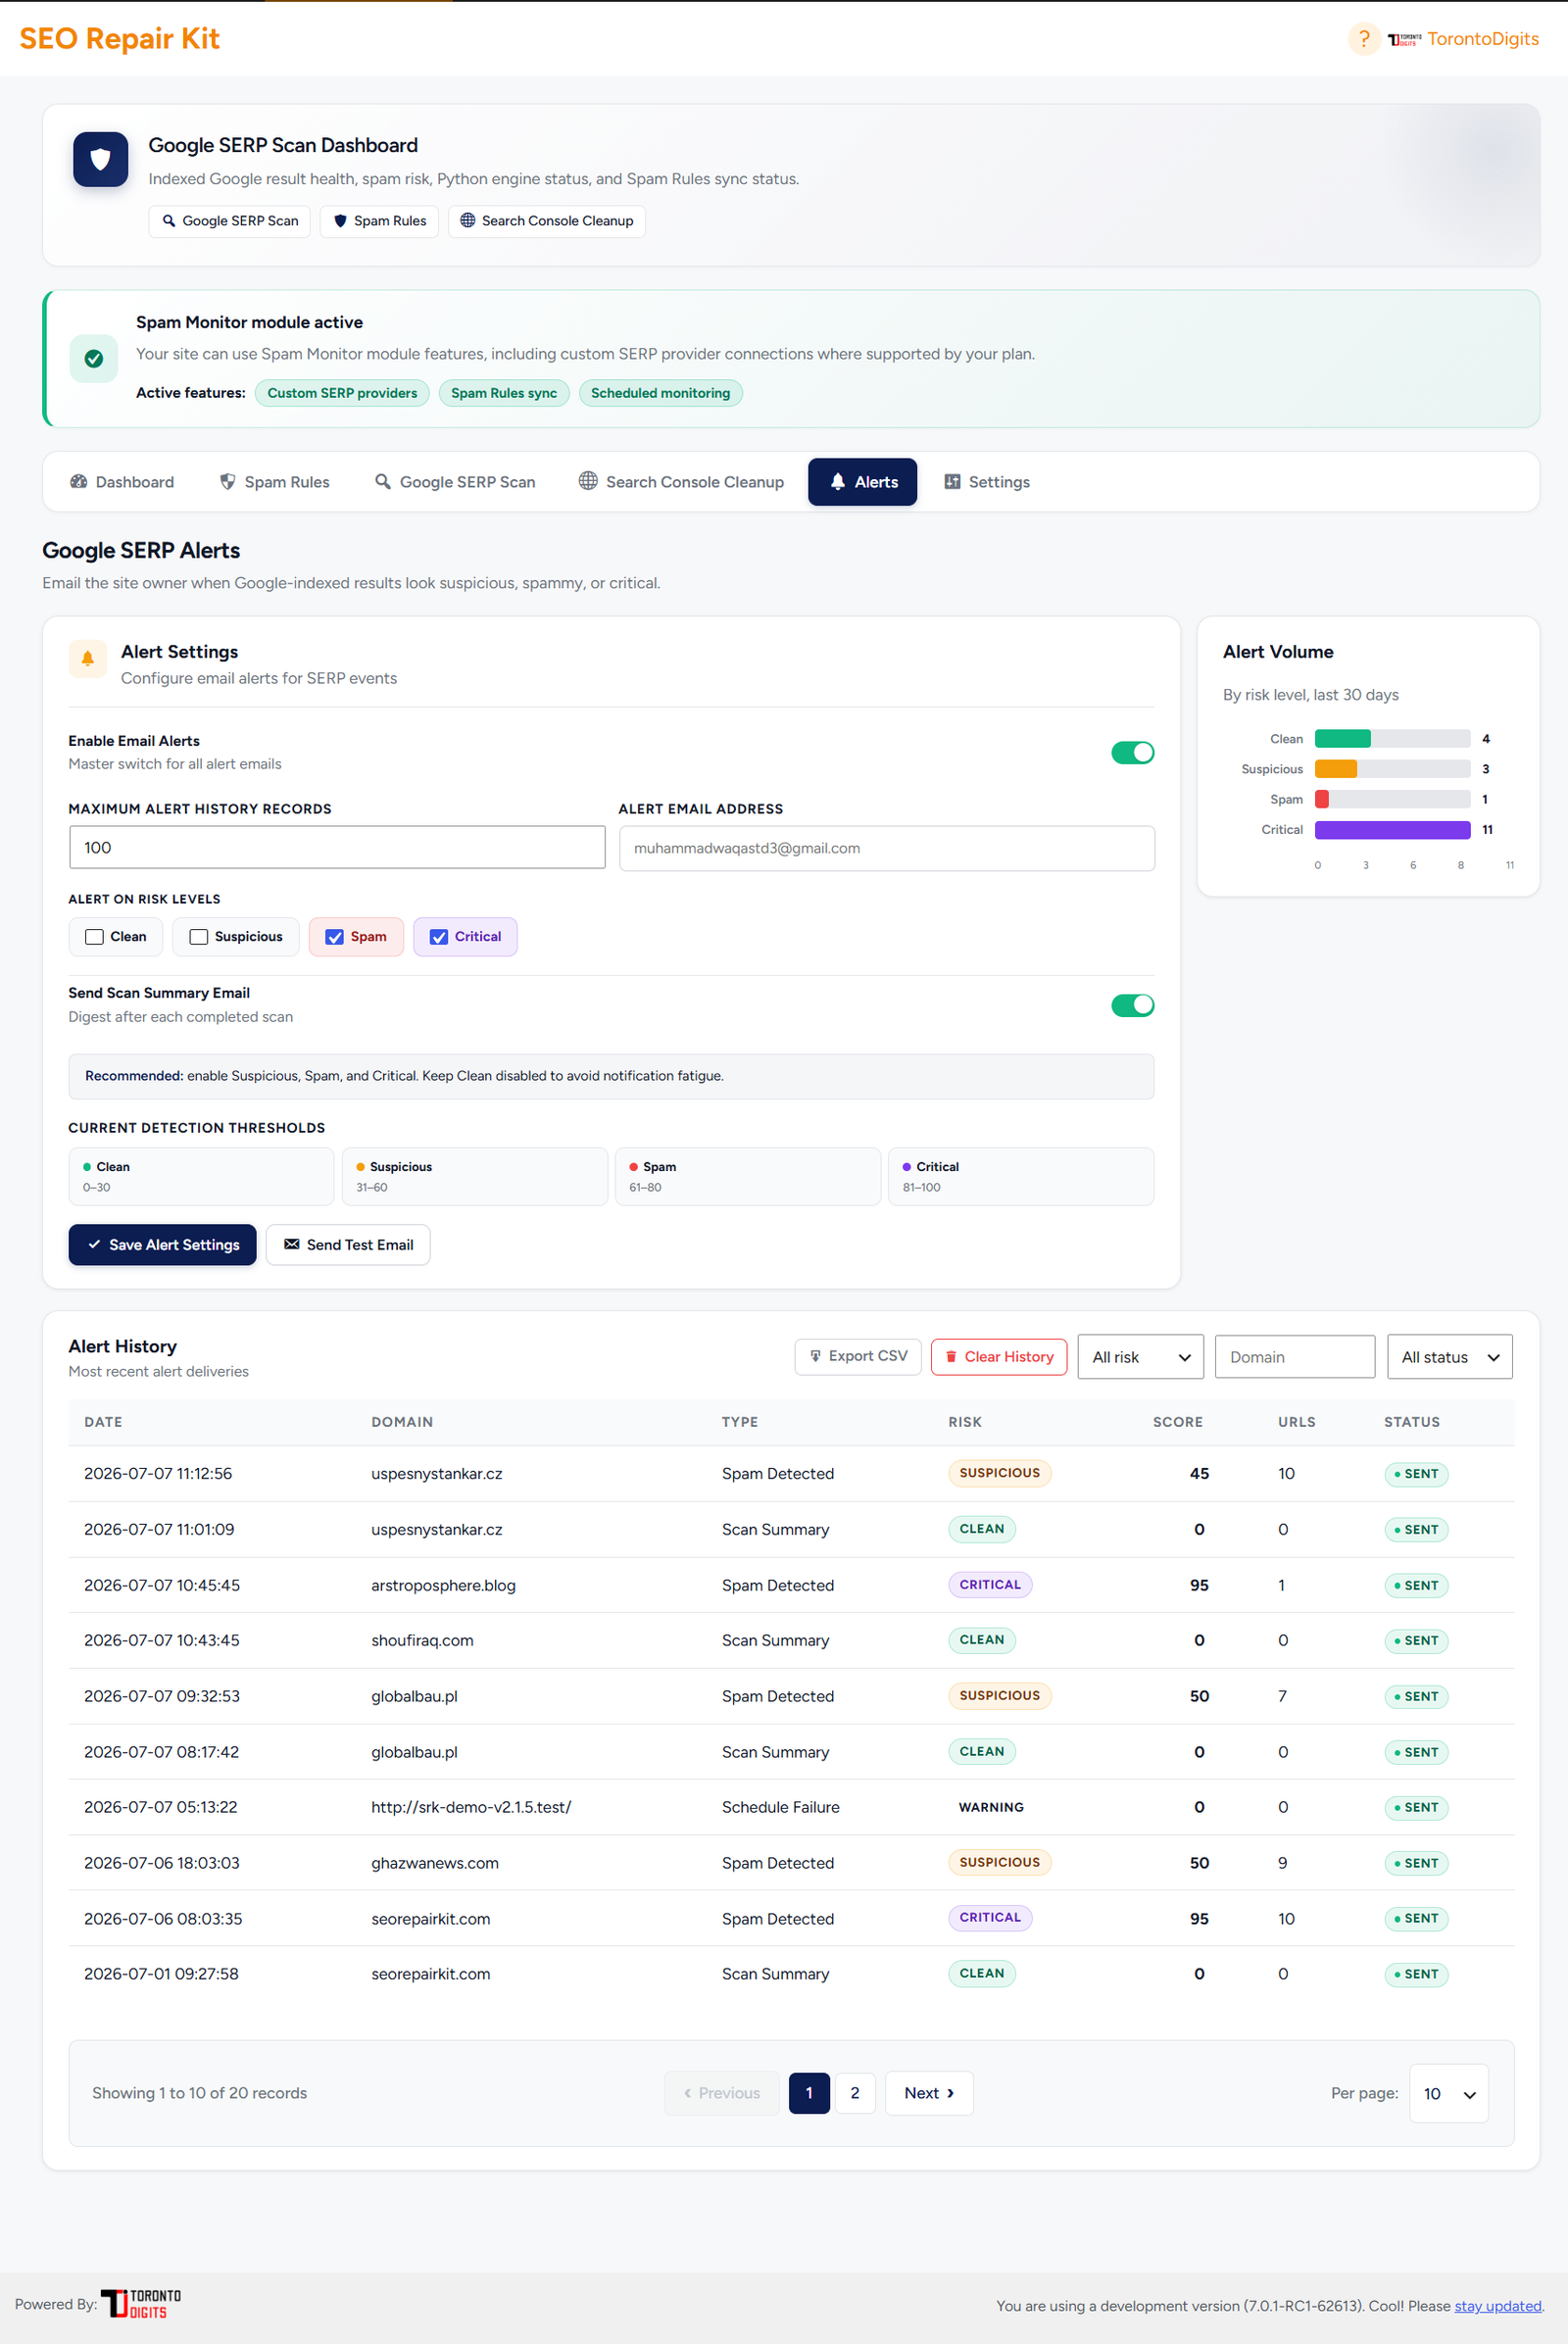
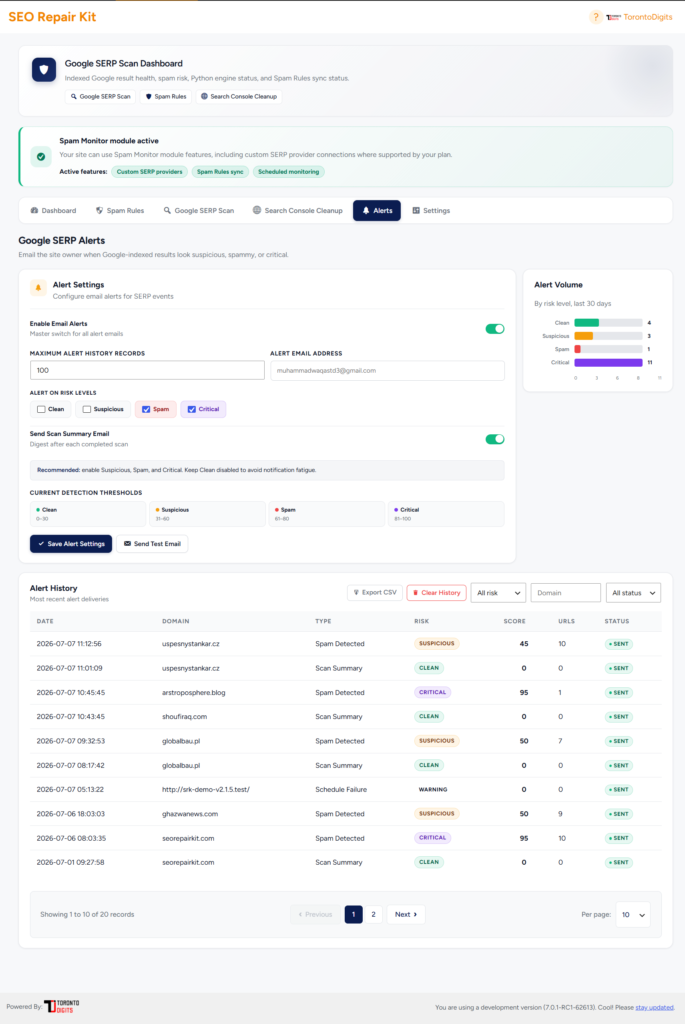
16. Spam Monitor Alerts
Alerts help you receive and review Spam Monitor notifications.
Use it to:
Enable alert emails
Choose recipients
Choose risk levels that trigger alerts
Send test emails
Review alert history
How to use
Open Spam Monitor.
Go to Alerts.
Add recipient email addresses.
Select risk levels.
Send a test email.
Save settings.
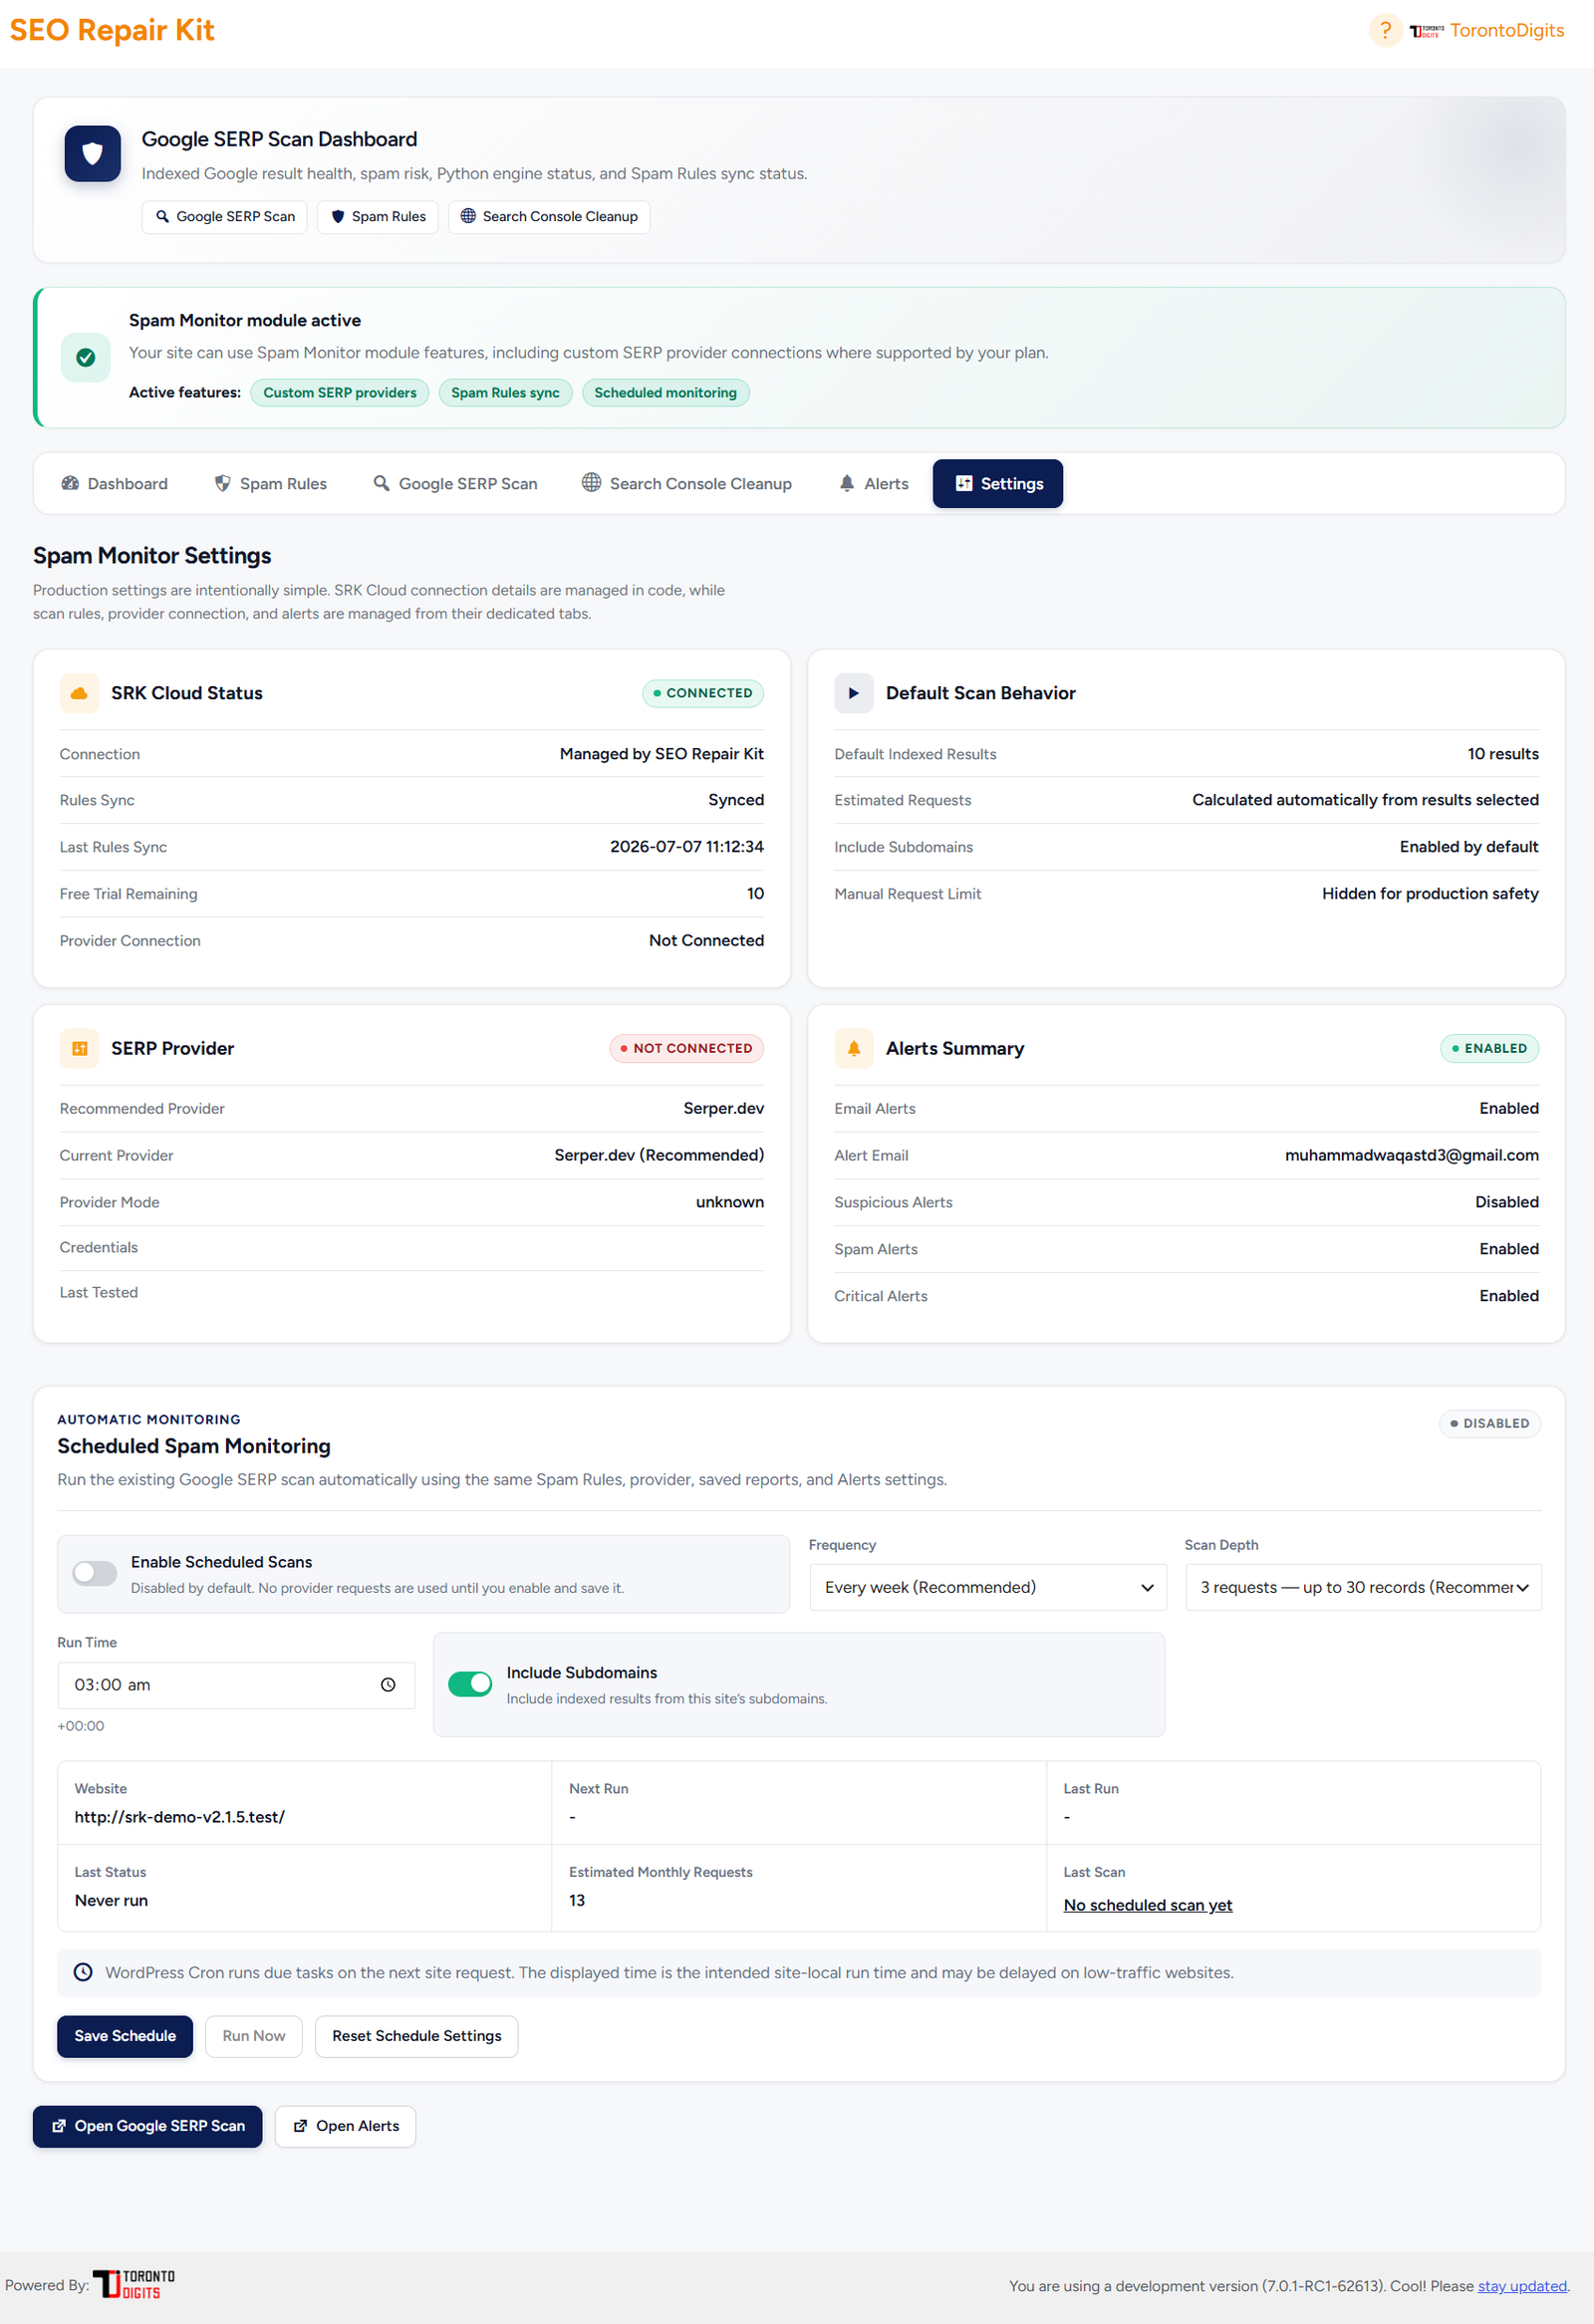
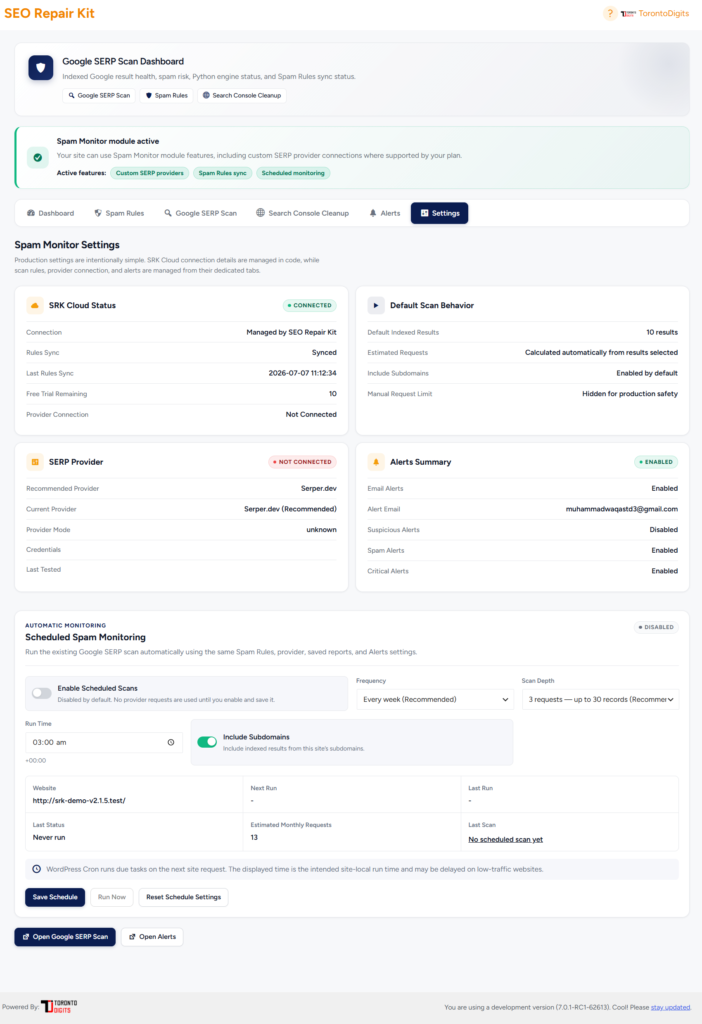
17. Scheduled Spam Monitoring
Scheduled Spam Monitoring runs Google SERP scans automatically.
Find it in:
Spam Monitor → Settings
Use it to:
Enable scheduled scans
Choose frequency
Choose scan depth
Set run time
Include subdomains
Run schedule manually for testing
Reset schedule settings
Available frequency options
Every 10 minutes, testing only
Every day, recommended
Every 3 days
Every week
Every 2 weeks
Every month
Recommended setup
For most websites:
Frequency: Every day
Scan depth: 3 requests / up to 30 records
Include subdomains: enabled if your site uses subdomains
Alerts: enabled for spam and critical findings
18. Spam Monitor Settings
Settings contains production and provider-related controls.
Use it to:
Review provider connection status
Review scheduled monitoring settings
Configure simple automation options
Reset schedule settings
Provider note
Free users can use the SEO Repair Kit trial provider. Paid Spam Monitor users can connect supported SERP providers where supported by their plan, such as:
Serper.dev
SERP API
DataForSEO
19. Meta Manager
Meta Manager controls SEO titles, meta descriptions, robots settings, and canonical settings.
Open:
SEO Repair Kit → Meta Manager
Main areas:
Global settings
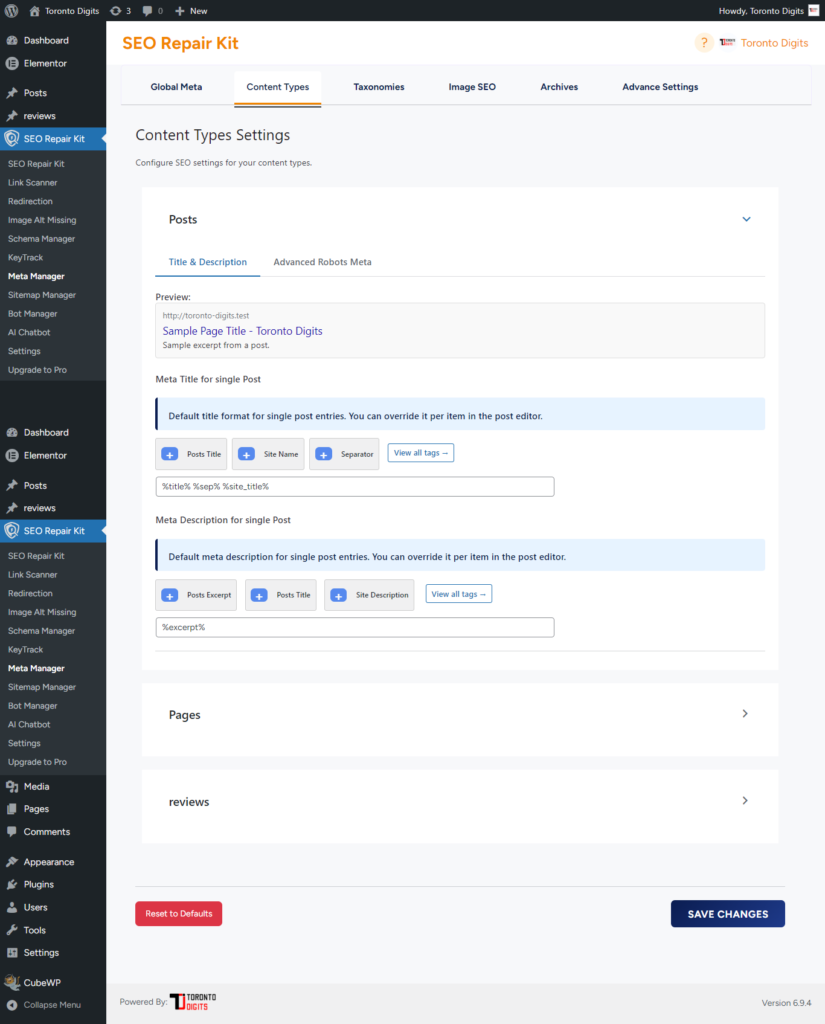
Content type settings
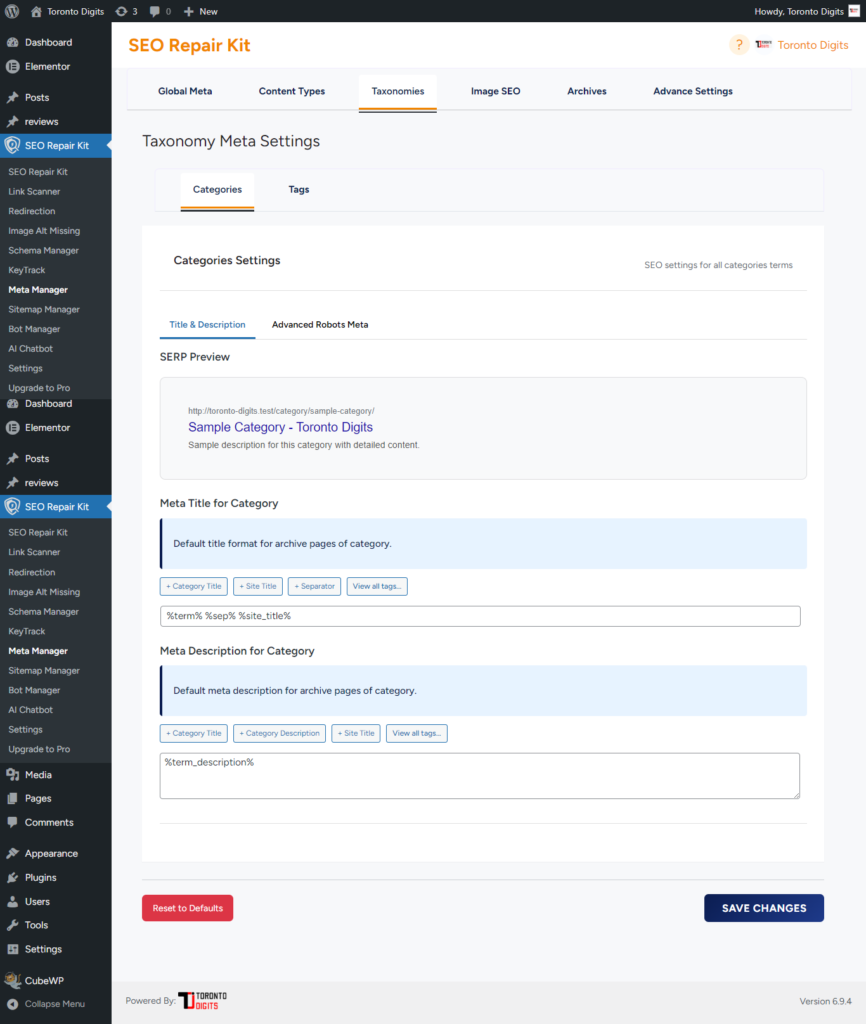
Taxonomy settings
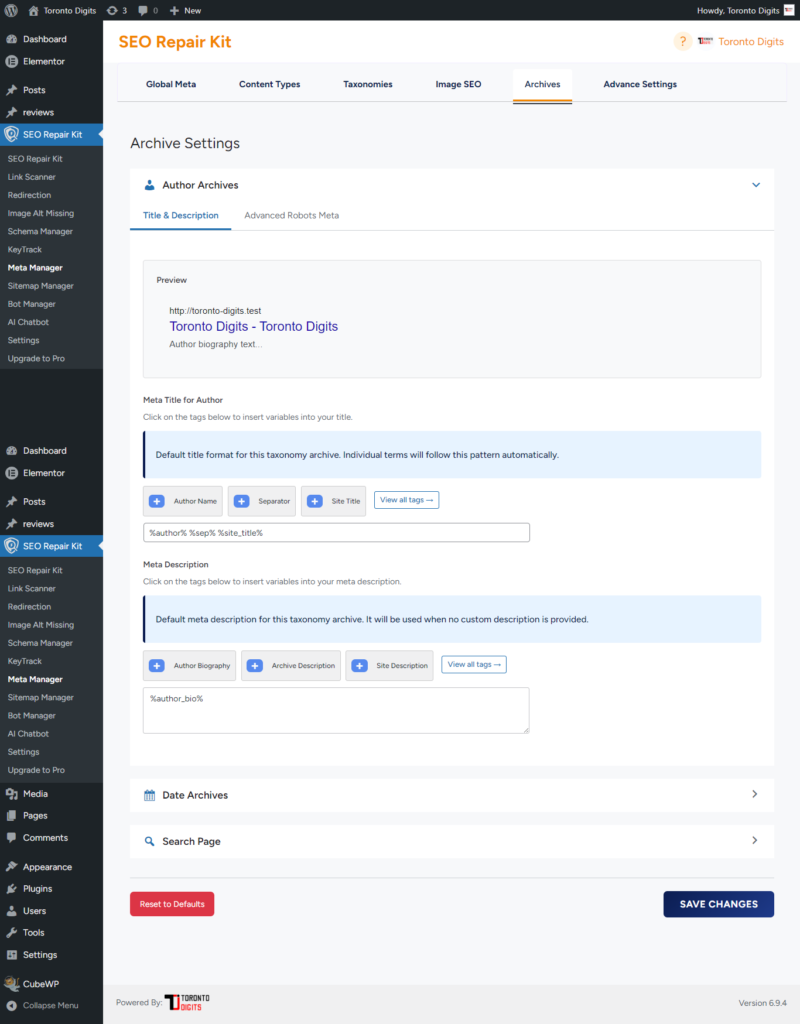
Archive settings
Advanced robots settings
Per-post/page SEO controls
How to use
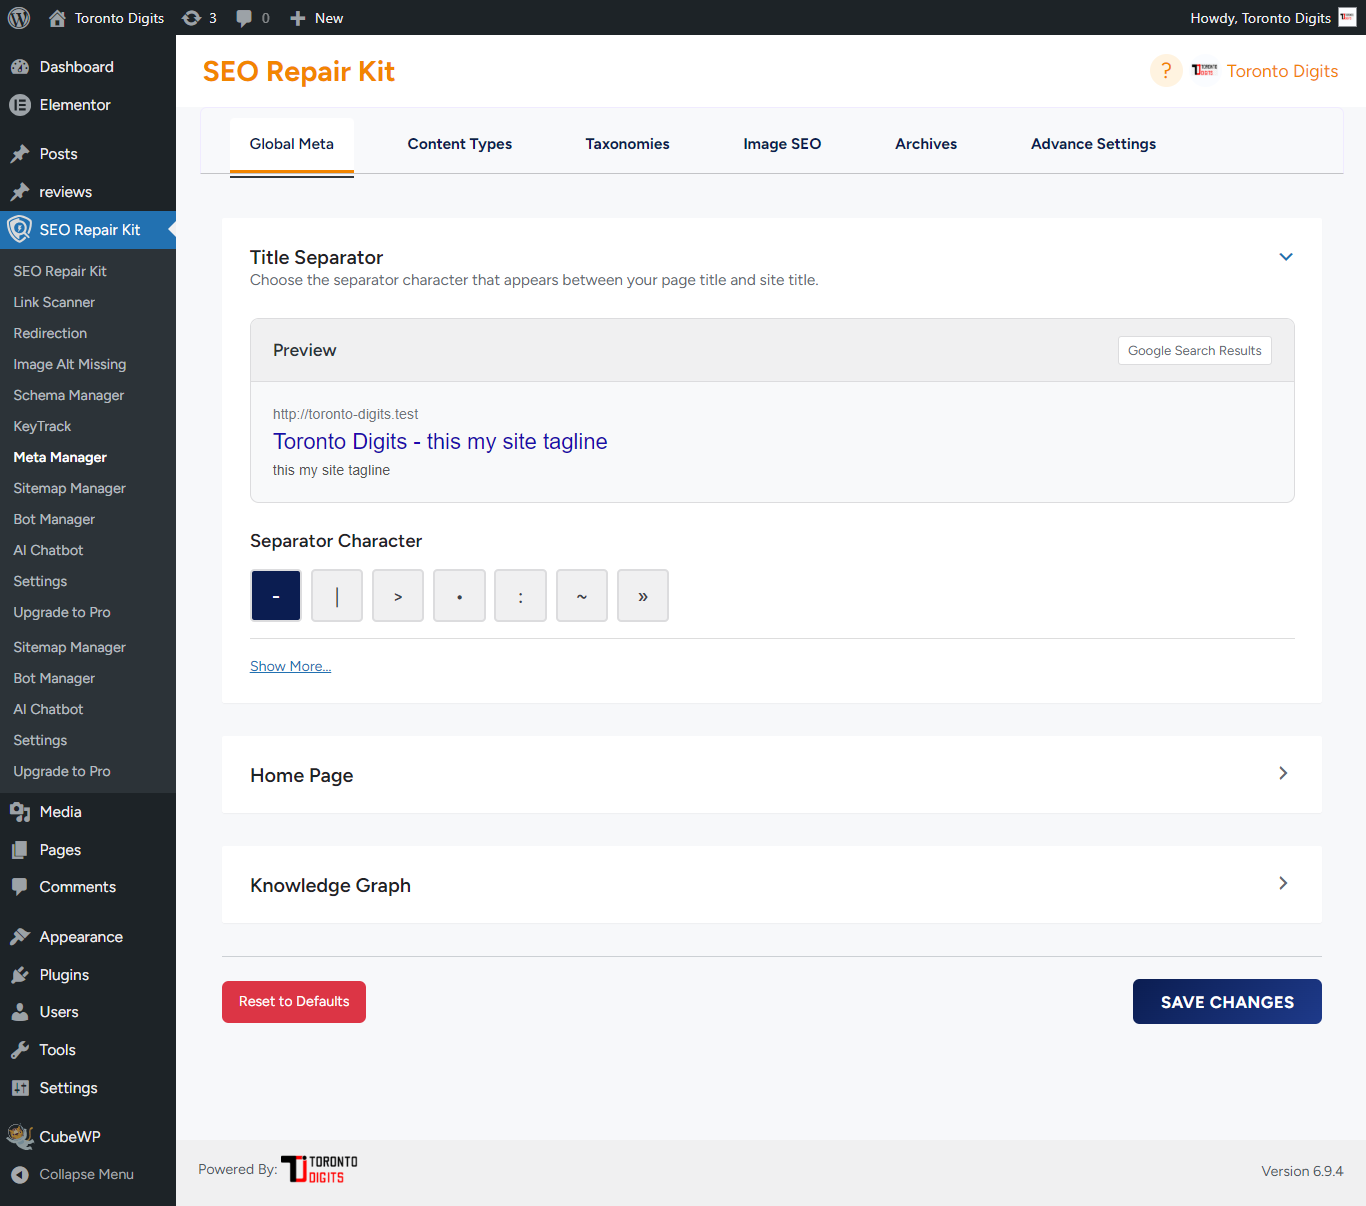
Open Meta Manager.
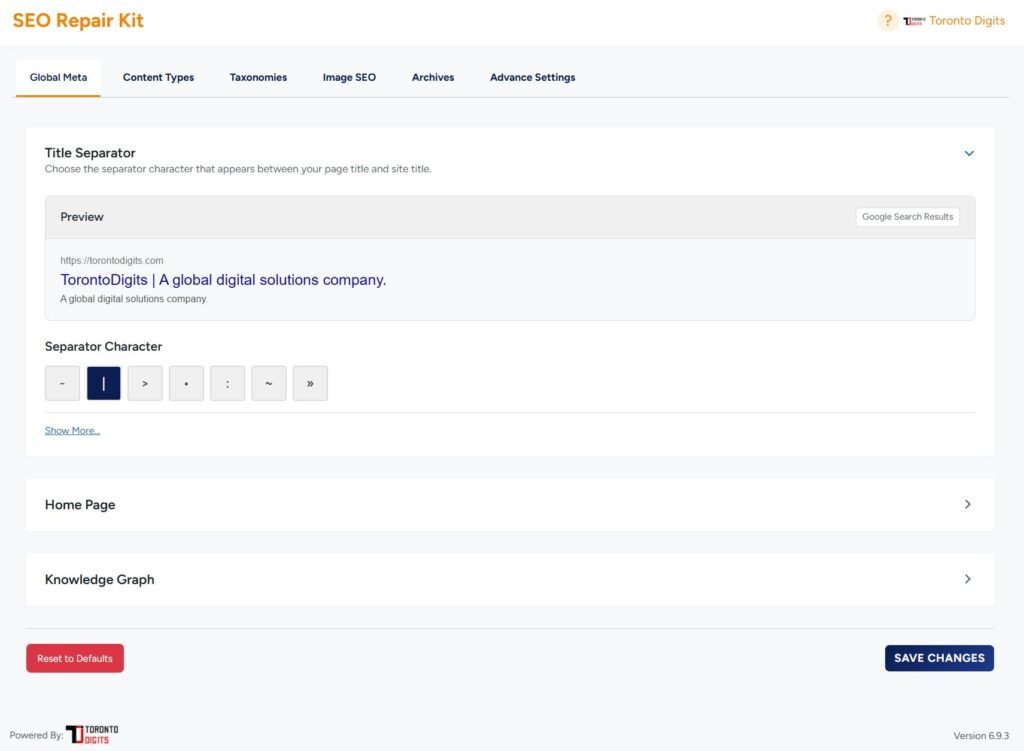
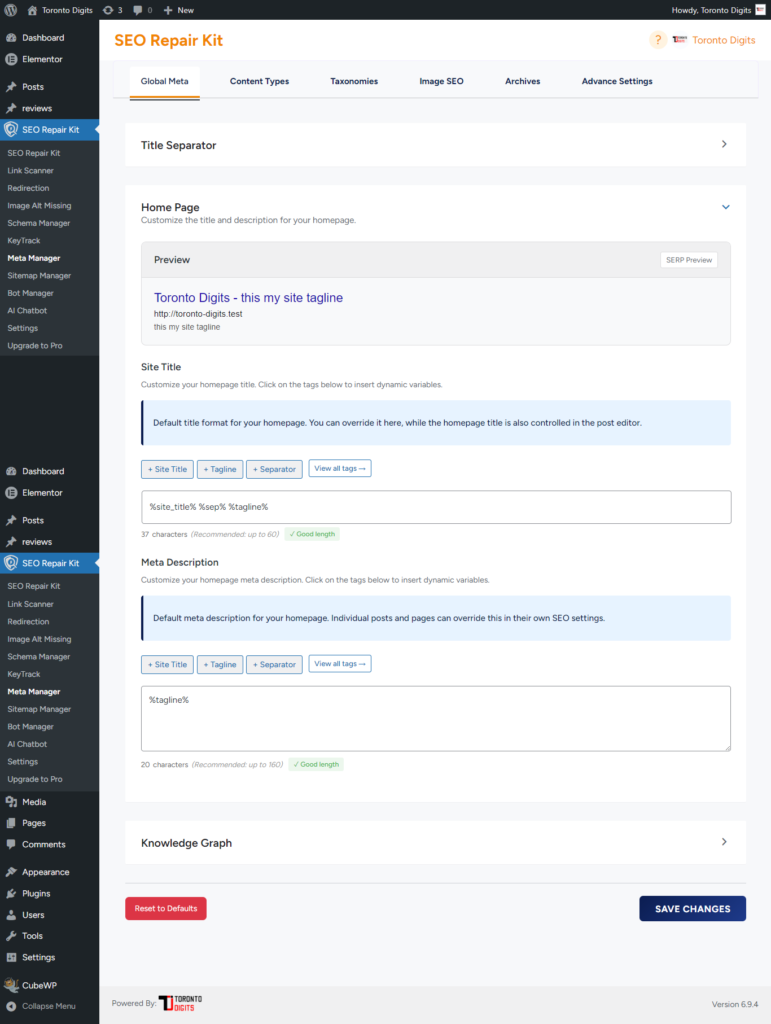
Configure global homepage SEO settings.
Set title separator.
Configure default templates for posts and pages.
Configure taxonomy templates.
Configure archive settings.
Save changes.
Dynamic tags
You can use template tags such as:
%title%
%excerpt%
%site_title%
%sep%
%current_date%
%current_day%
%month%
%year%
Best practice
Use templates for large sites, then manually override important pages.
Image Alt Text is an essential feature for improving both the accessibility and SEO of your website. By adding descriptive alternative text to your images, you help search engines index your content more effectively and ensure that users with visual impairments can understand what the images represent.
In the SEO Repair Kit plugin, you can easily review images that lack alt text and manually assign descriptive text to them, making sure your website adheres to SEO best practices.
Introduction
Image Alt Text is an essential feature for improving both the accessibility and SEO of your website. By adding descriptive alternative text to your images, you help search engines index your content more effectively and ensure that users with visual impairments can understand what the images represent.
In the SEO Repair Kit plugin, you can easily review images that lack alt text and manually assign descriptive text to them, making sure your website adheres to SEO best practices.
Getting Started
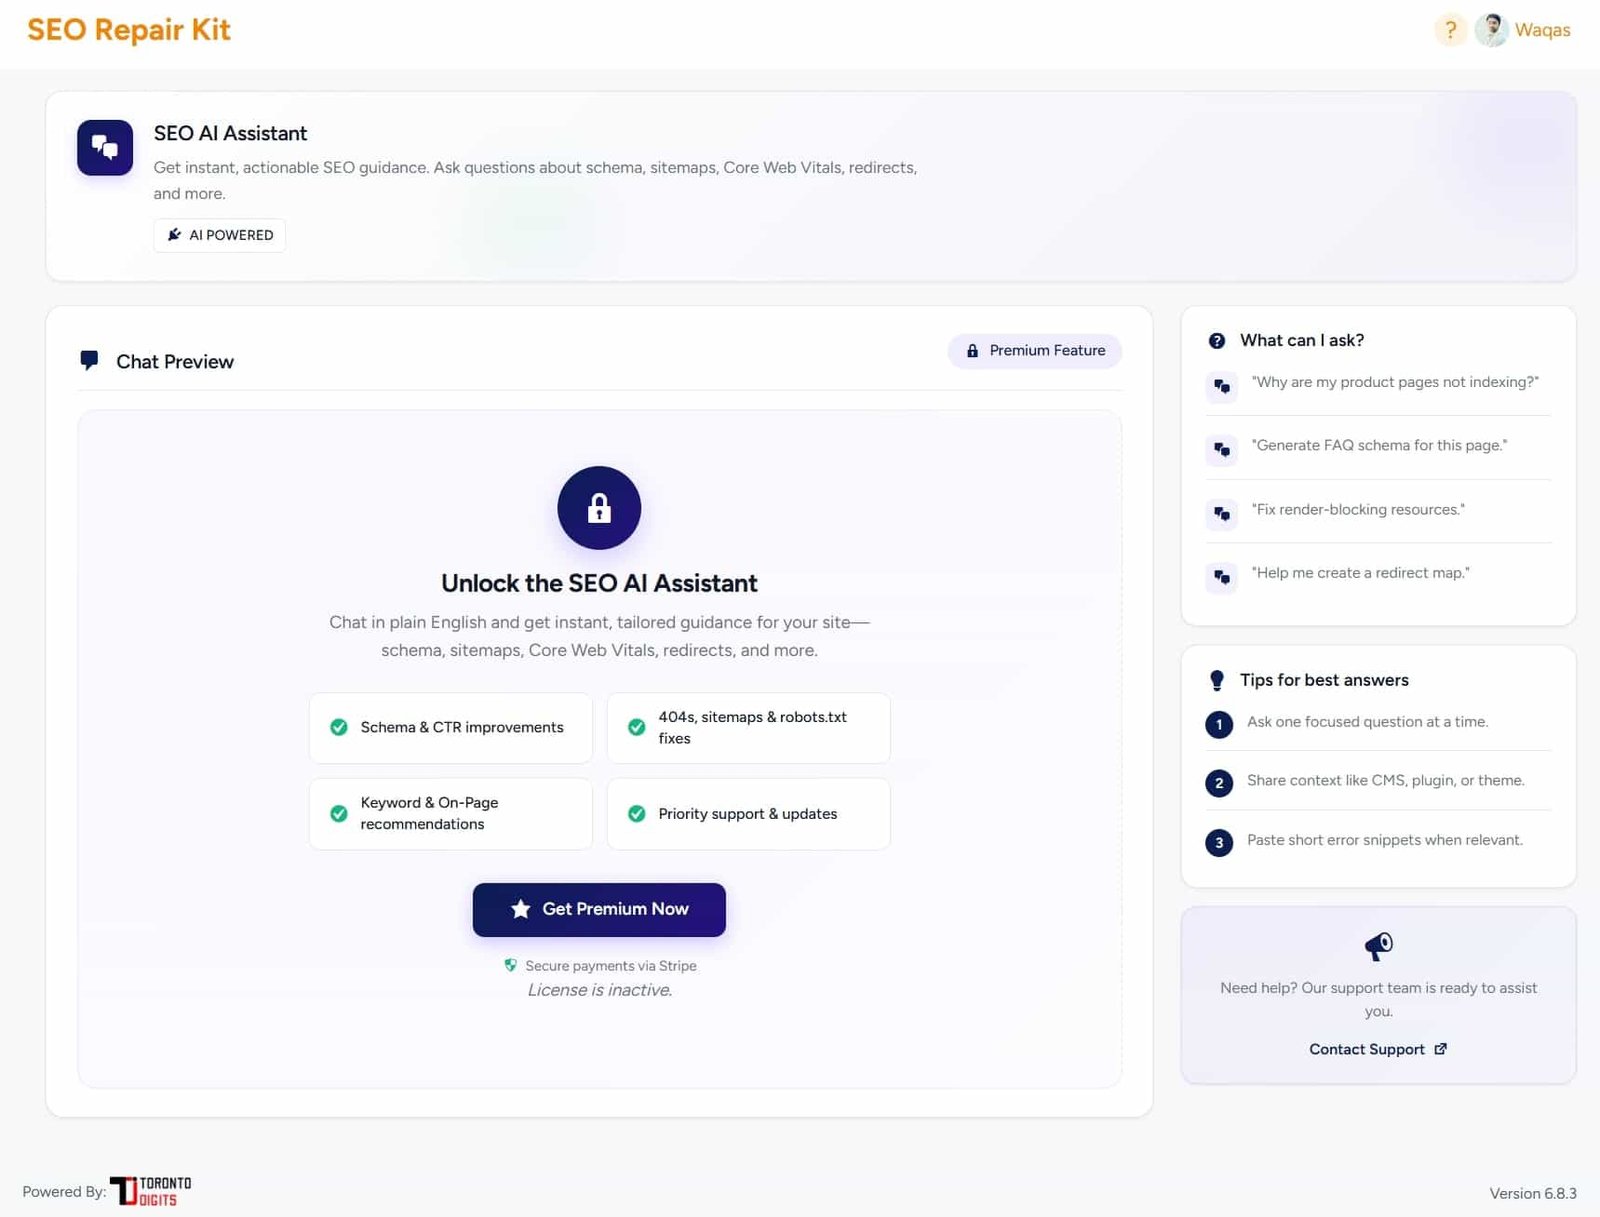
AI Chatbot provides SEO assistance inside the plugin where available by plan.
Use it to:
Ask SEO questions
Get content suggestions
Review optimization ideas
Get help understanding SEO issues
Getting Started
Meta Manager controls SEO titles, meta descriptions, robots settings, and canonical settings.
Open:
SEO Repair Kit → Meta Manager
Main areas:
Global settings
Content type settings
Taxonomy settings
Archive settings
Advanced robots settings
Per-post/page SEO controls
Getting Started
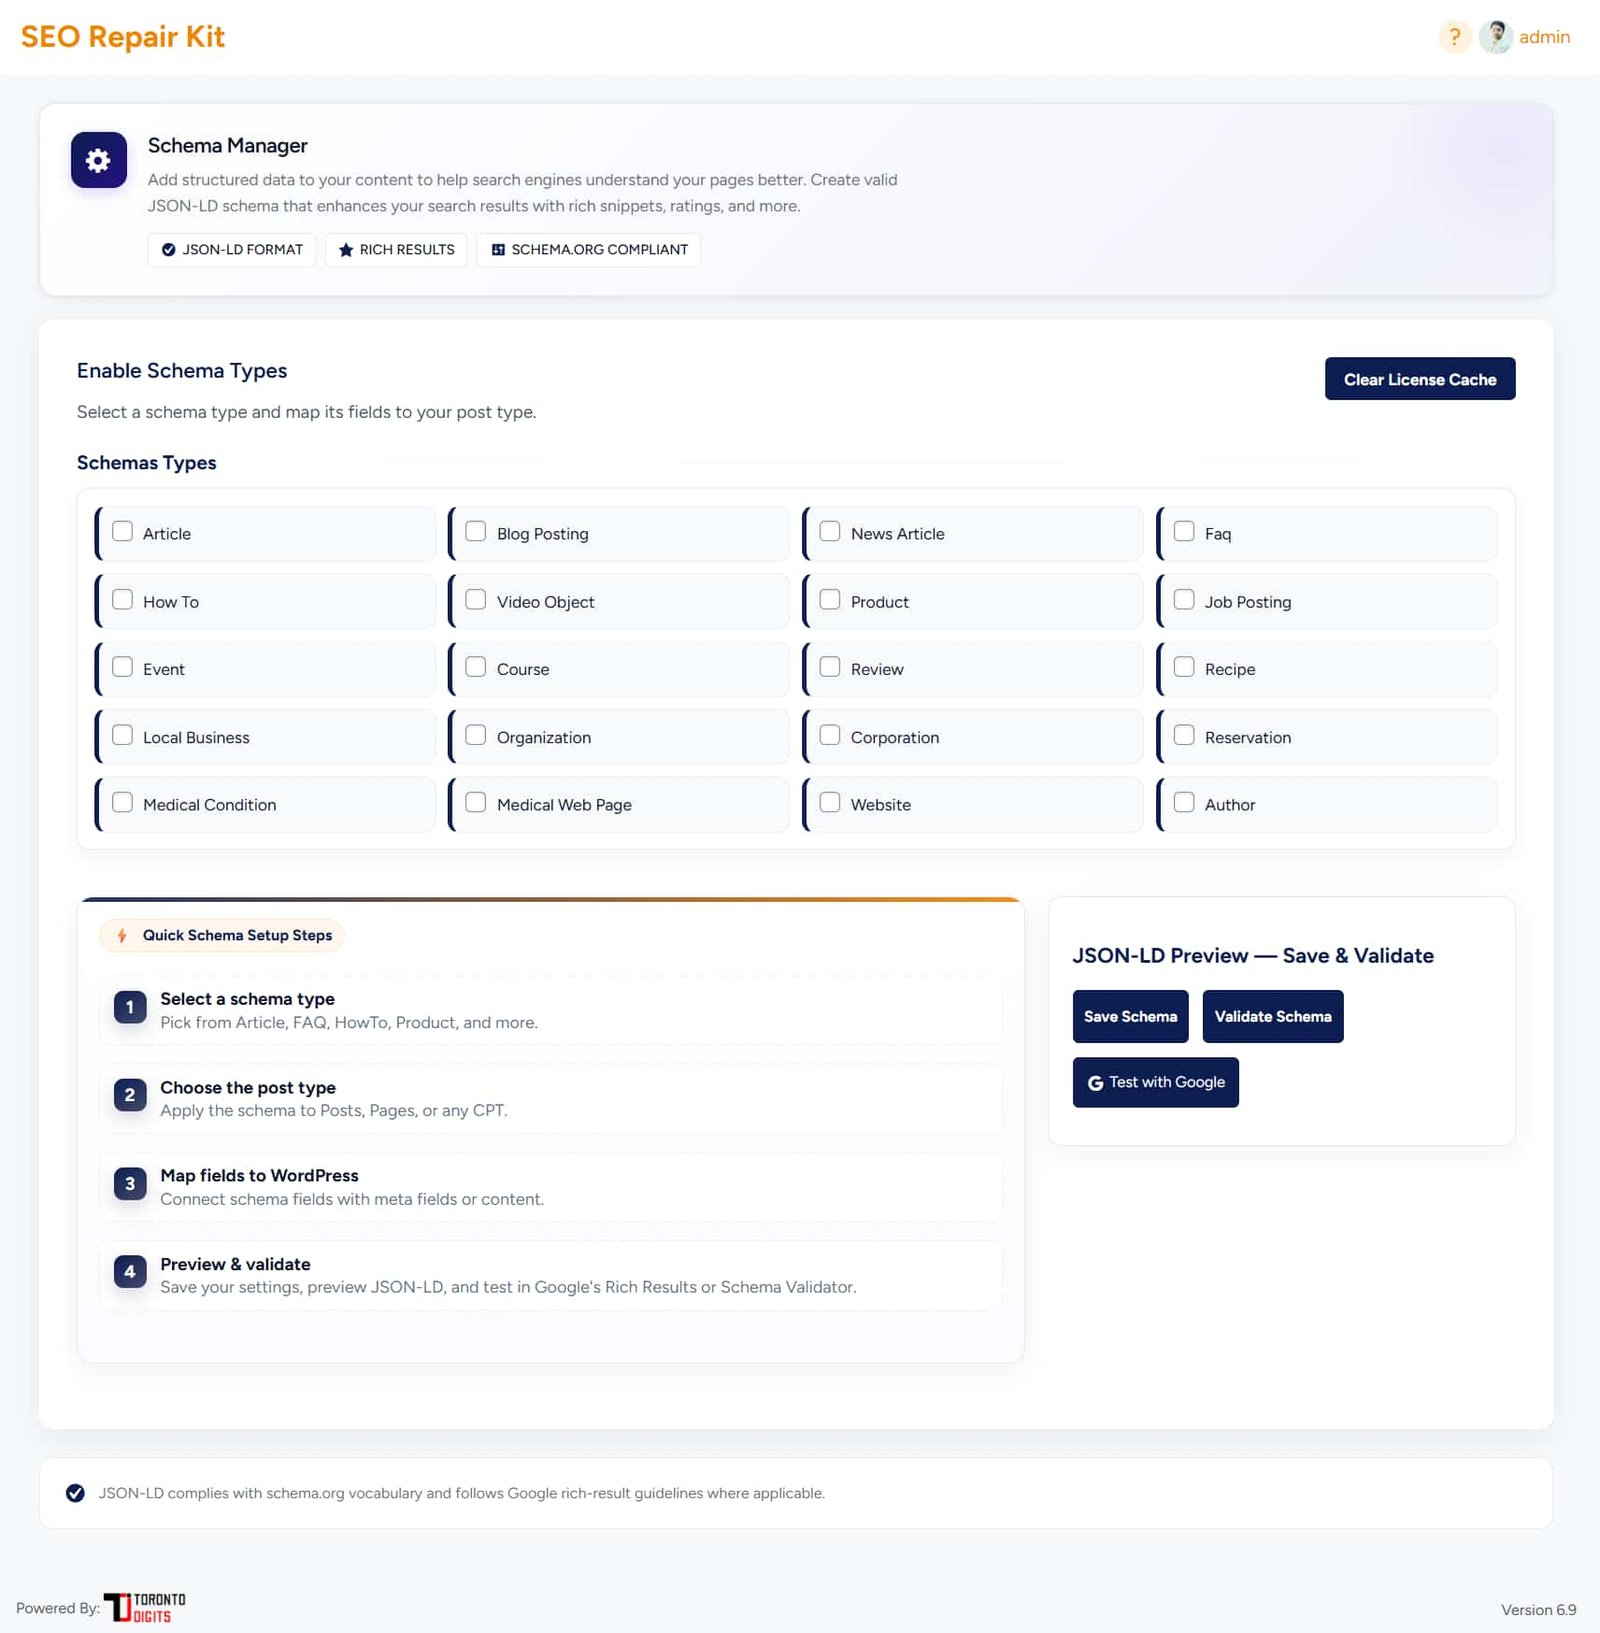
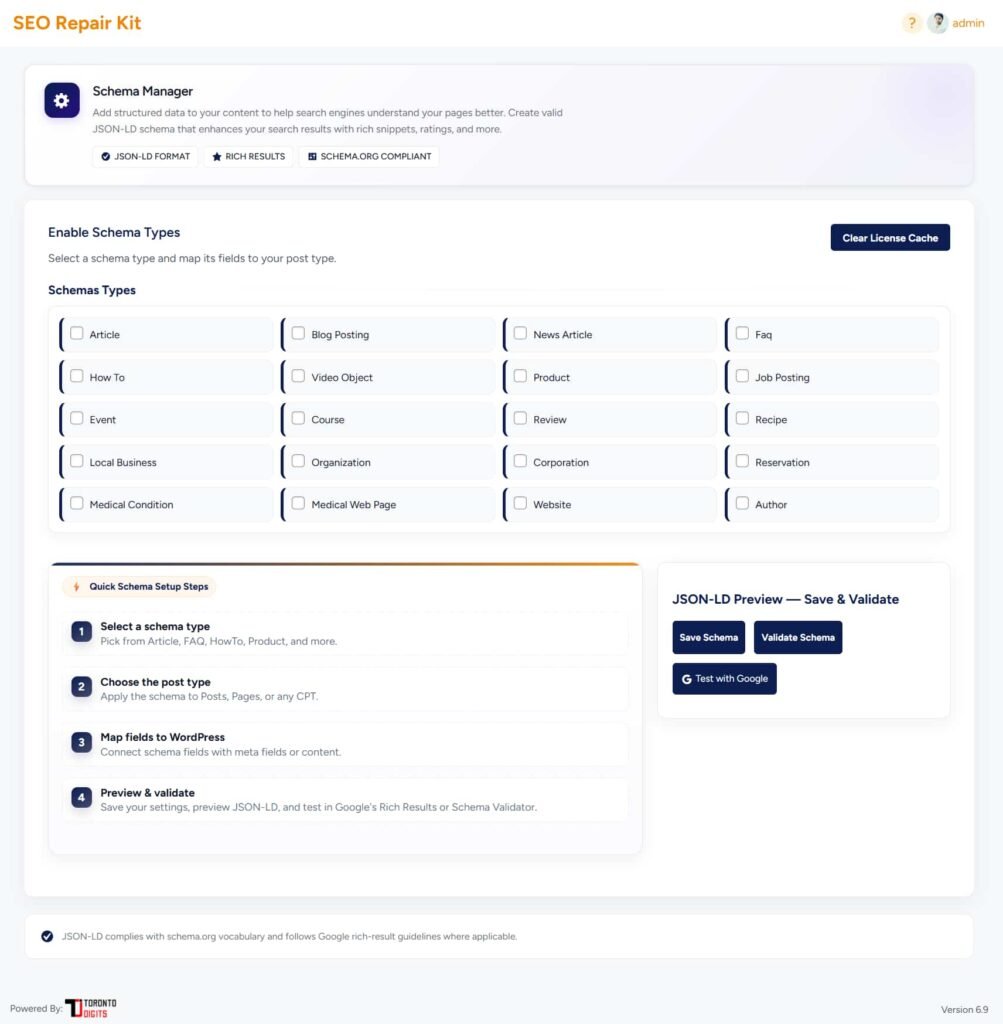
Schema Manager helps you create structured data for search engines.
Use it to create schema such as:
Article
News Article
Blog Posting
FAQ
Product
Event
Course
JobPosting
Review
Recipe
Local Business
Organization
Website
Author
Medical Condition
Getting Started
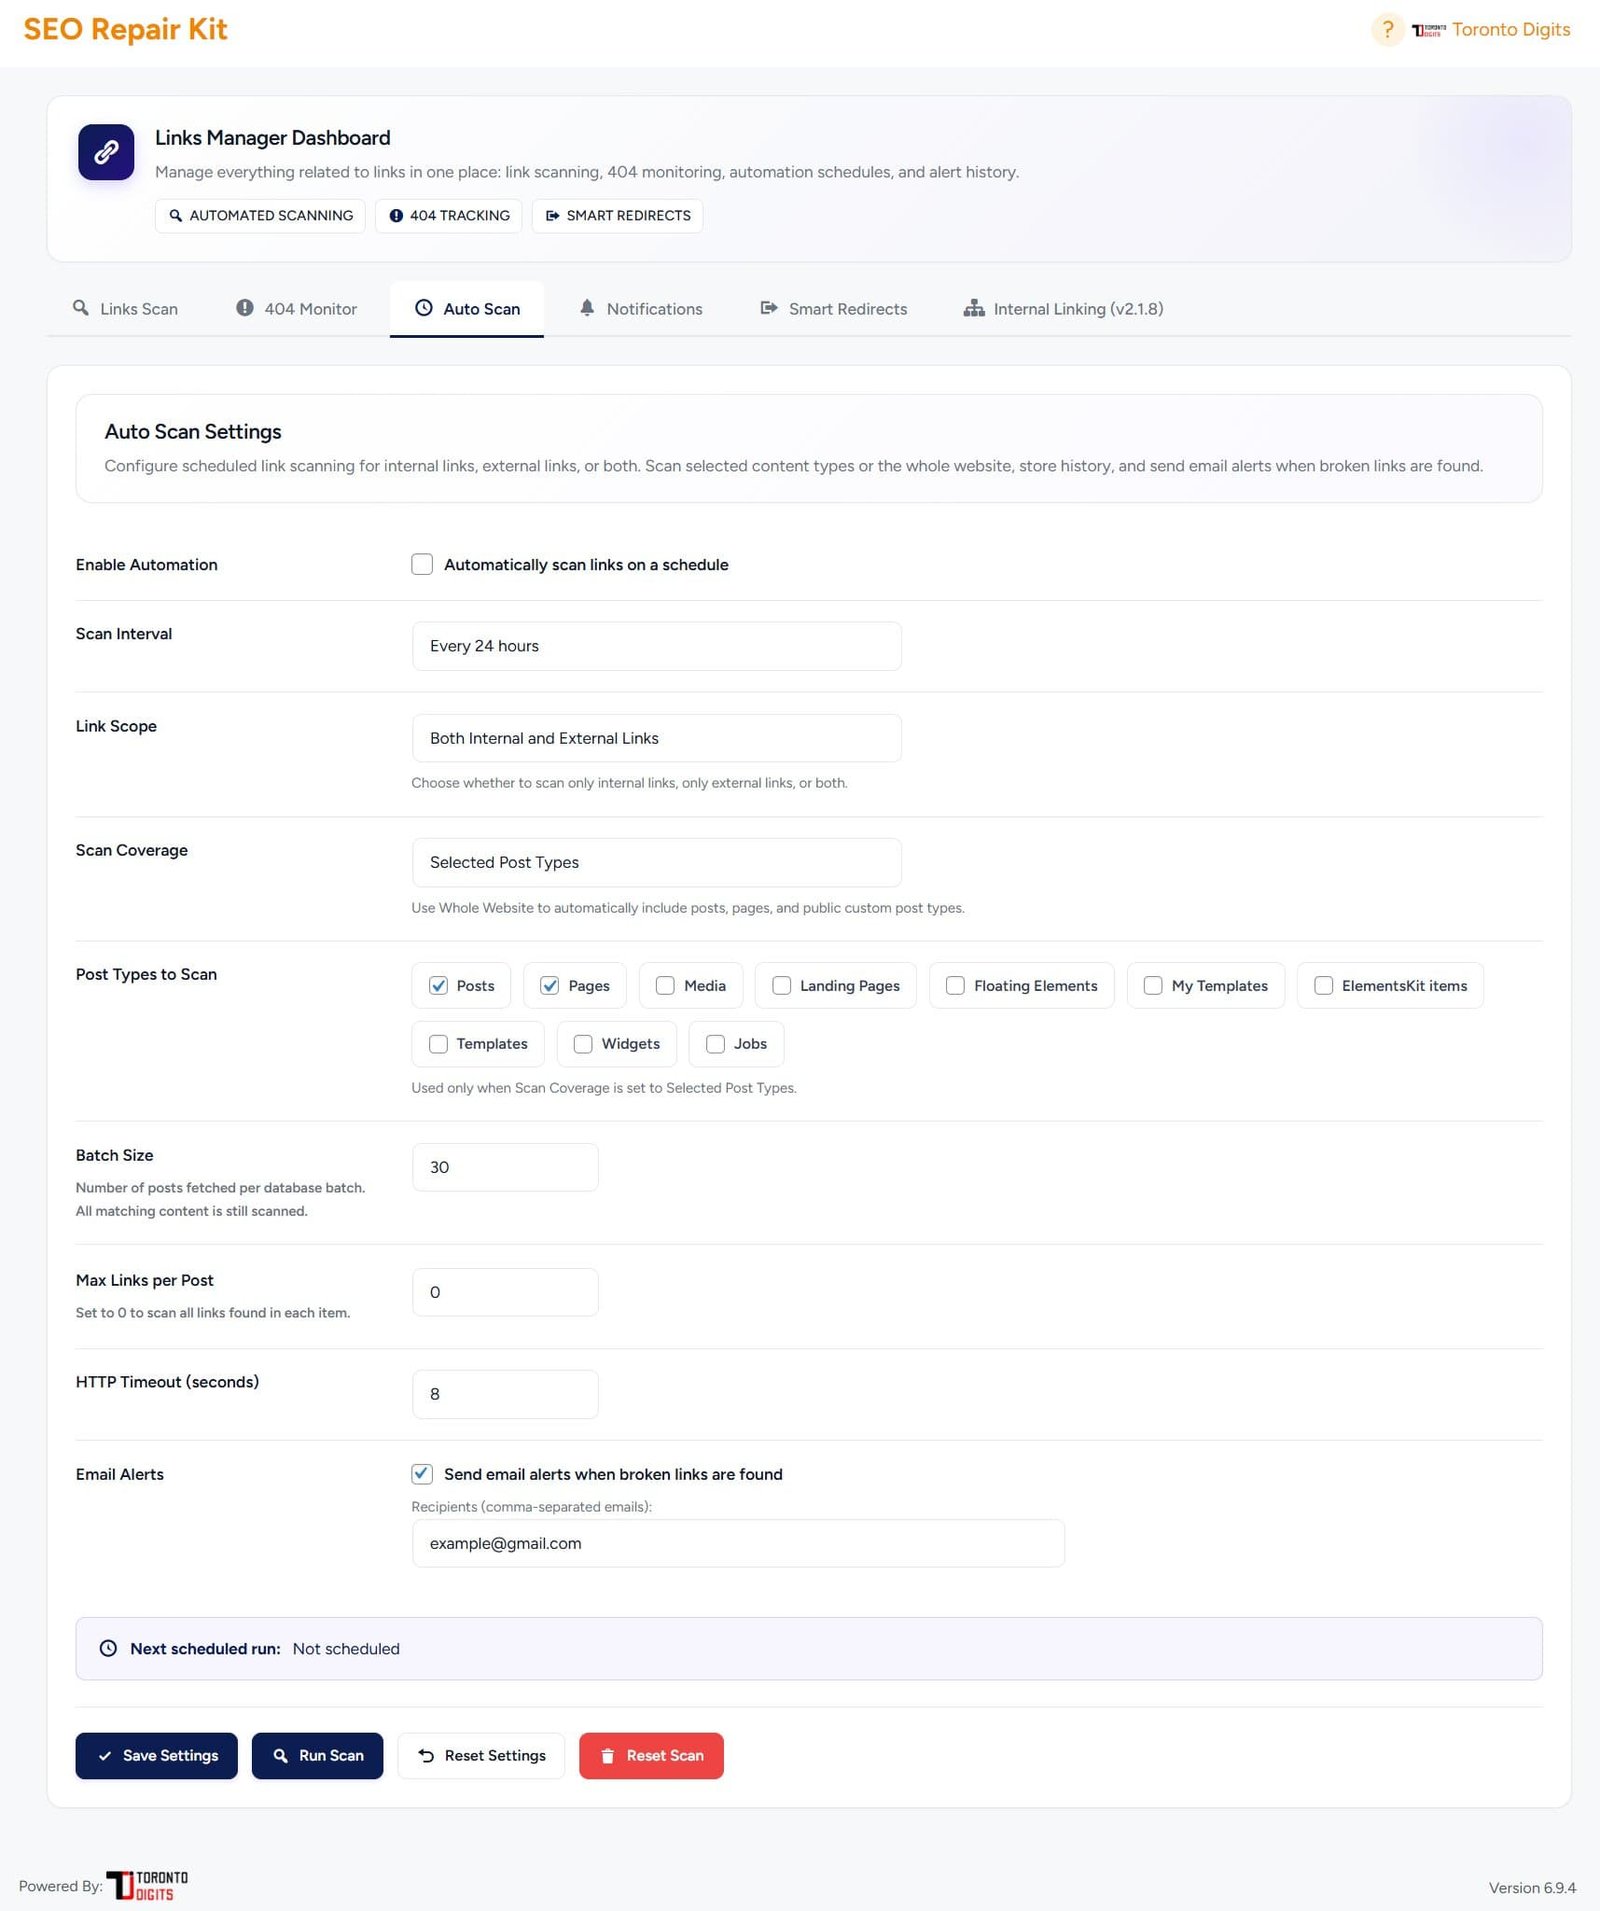
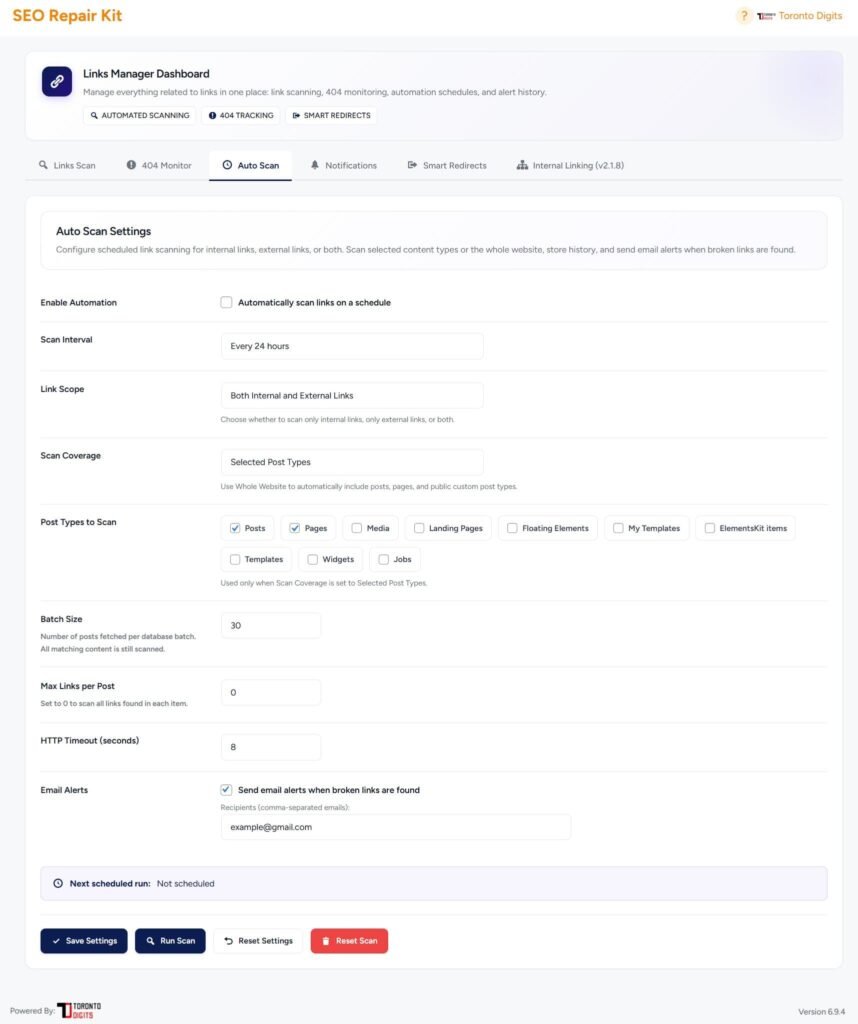
Auto Scan lets SEO Repair Kit scan links automatically on a schedule.
Use it to:
Schedule recurring link scans
Choose scan frequency
Choose scan scope
Choose post types
Set batch size and request timeout
Send automatic email reports
Getting Started
Spam Monitor helps you check indexed Google results for suspicious URLs, spam signals, language mismatch, and risky pages.
Open:
SEO Repair Kit → Spam Monitor
Spam Monitor contains these tabs:
Dashboard
Spam Rules
Google SERP Scan
Search Console Cleanup
Alerts
Settings
Spam Monitor Dashboard
The dashboard summarizes Spam Monitor activity.
Use it to see:
Total SERP scans
Google results checked
Critical indexed spam
Cleanup queue
Critical/spam/suspicious SERP counts
Requests used
Cleaned URLs
Monitoring status
Resolved URLs
Sitemap issues
Last scan
Python engine status
Spam Rules sync status
Spam Rules
Spam Rules control how Spam Monitor scores suspicious Google results.
Use it to configure:
Expected spam languages
Website allowed languages
Language mismatch score
Spam keyword categories
Custom blocked keywords
Suspicious URL patterns
URL pattern score
Clean/suspicious/spam/critical thresholds
Google SERP Scan
Google SERP Scan checks Google indexed results for a domain.
Use it to:
Run manual SERP scans
Choose scan depth
Include or exclude subdomains
Review returned Google SERP records
Review recent scan history
Check provider status
Sync Spam Rules
Search Console Cleanup
Search Console Cleanup helps you review risky indexed URLs and organize cleanup actions.
Use it to:
Detect risky URLs
Review URL status
Mark cleanup status
Check sitemap presence
Open Search Console links
Track cleanup progress
Spam Monitor Alerts
Alerts help you receive and review Spam Monitor notifications.
Use it to:
Enable alert emails
Choose recipients
Choose risk levels that trigger alerts
Send test emails
Review alert history
Scheduled Spam Monitoring
Scheduled Spam Monitoring runs Google SERP scans automatically.
Find it in:
Spam Monitor → Settings
Use it to:
Enable scheduled scans
Choose frequency
Choose scan depth
Set run time
Include subdomains
Run schedule manually for testing
Reset schedule settings
Spam Monitor Settings
Settings contains production and provider-related controls.
Use it to:
Review provider connection status
Review scheduled monitoring settings
Configure simple automation options
Reset schedule settings
Getting Started
Link Scan:
Link Scan checks all internal and external links on your website to identify broken, redirected, or problematic URLs. It gives you a complete view of your site’s link health from one place — inside the Links Manager tab.
Introduction to Link Scan: As your website grows, links naturally break or become outdated. Pages get deleted, URLs change, and external websites shut down. Manually checking every link is impossible for larger sites. Link Scan automates this process, scanning all your content and presenting results in an easy-to-understand report.
Why It Matters: Broken links frustrate visitors, increase bounce rates, and harm SEO rankings. Link Scan helps you find and fix these issues before they damage your site’s reputation or search visibility. By identifying broken links early, you create a smoother browsing experience and maintain a healthy, professional website.
What You Can Do with Link Scan:
Scan selected post types (Posts, Pages, custom post types)
Review link URLs, HTTP status codes, and link context
See where each broken link appears (post title, link text)
Export broken links report to CSV
Create redirects directly from scan results
Edit source content to fix broken links
Requirements:
SEO Repair Kit plugin installed and activated
Post types selected for scanning in Settings
Active internet connection for external link checking
No coding skills required
Getting Started
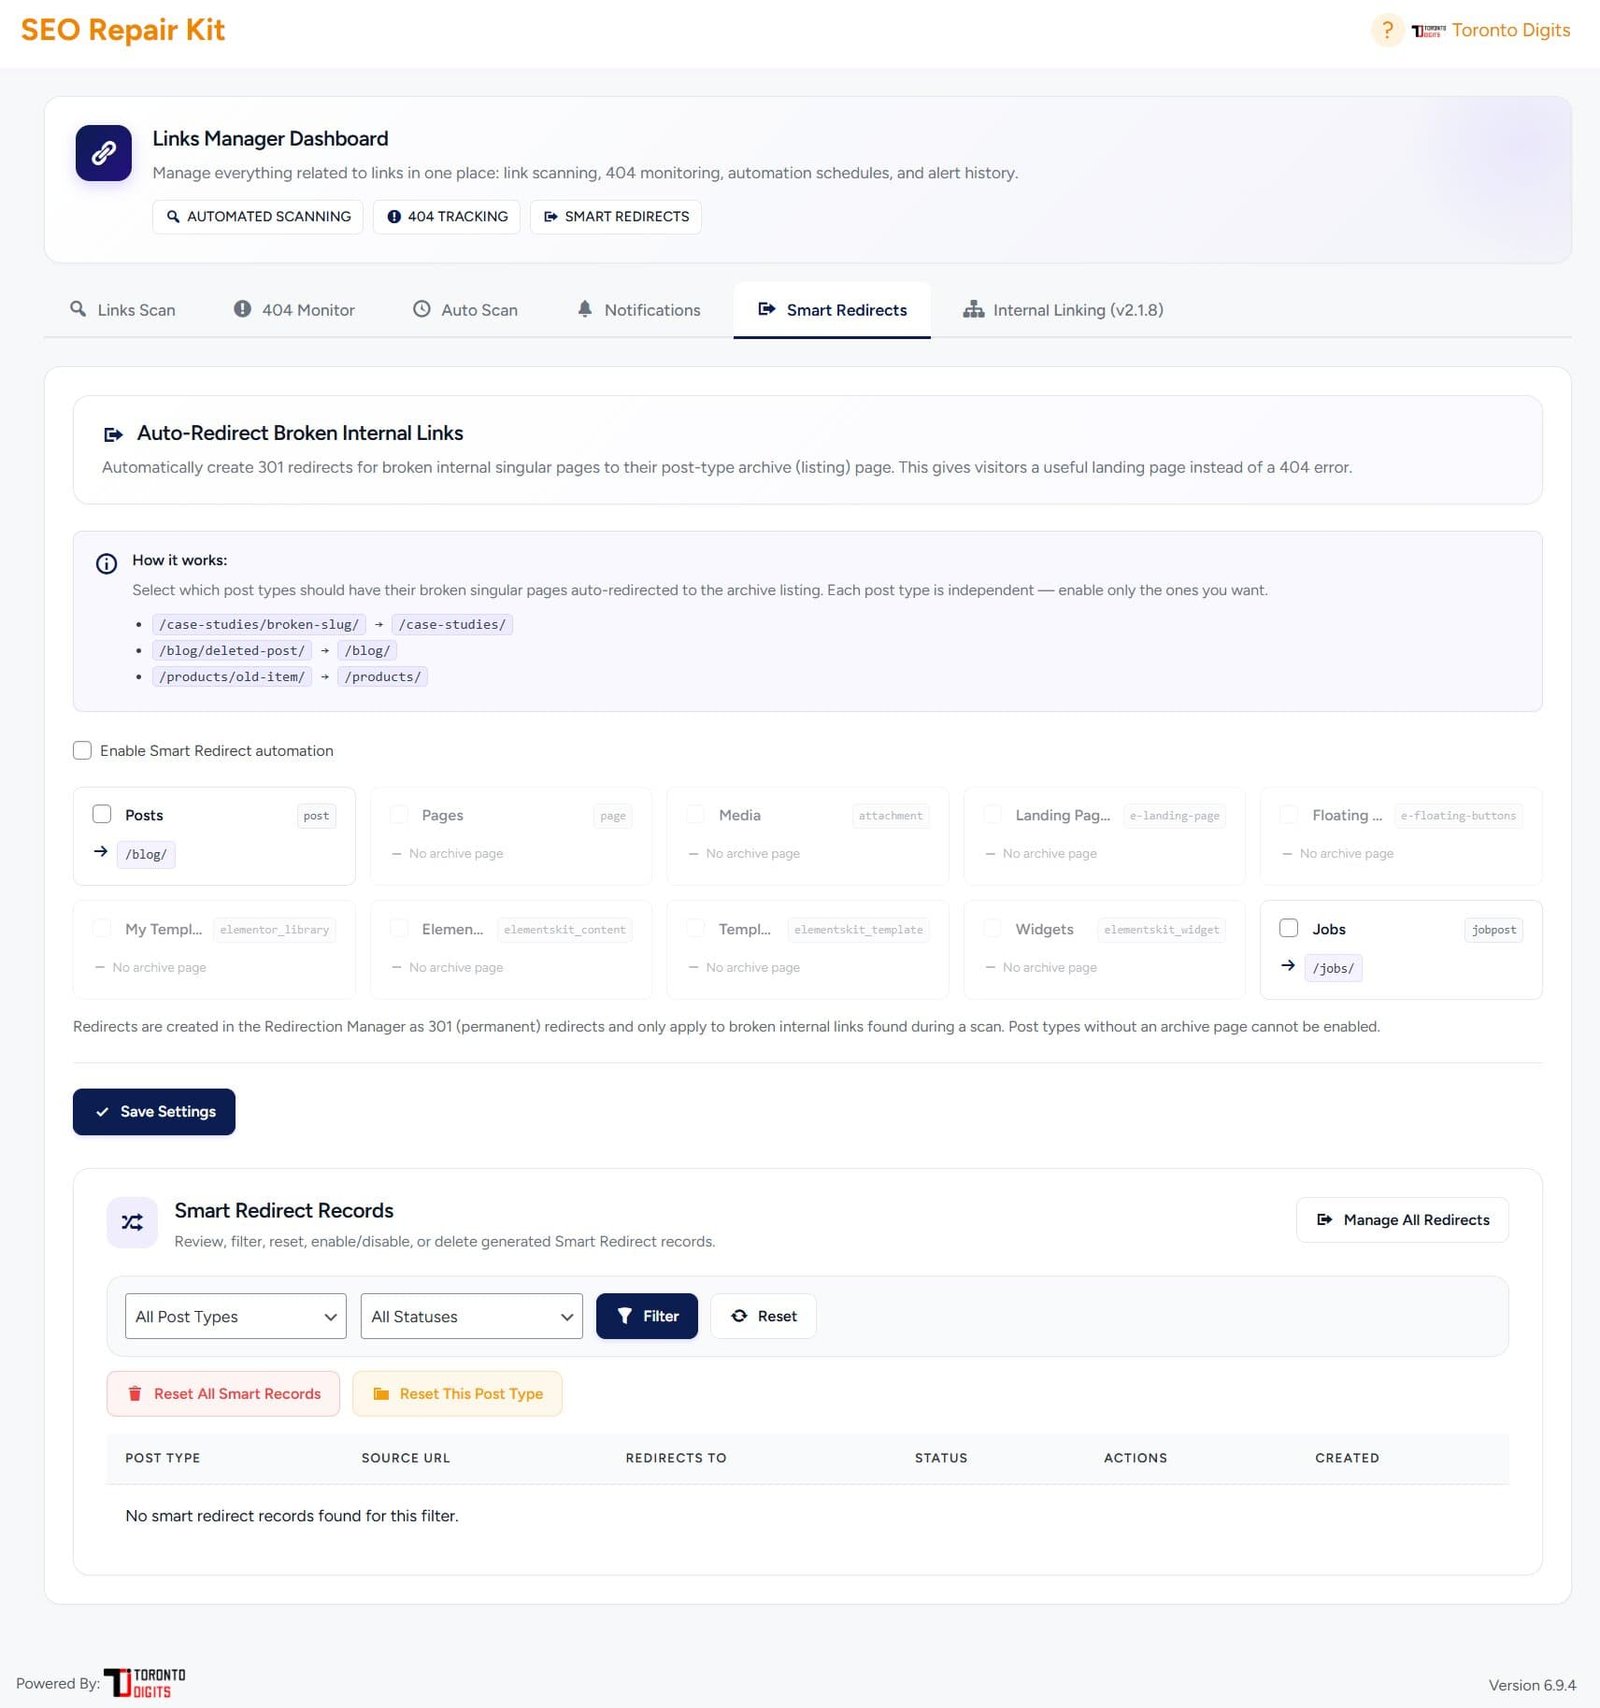
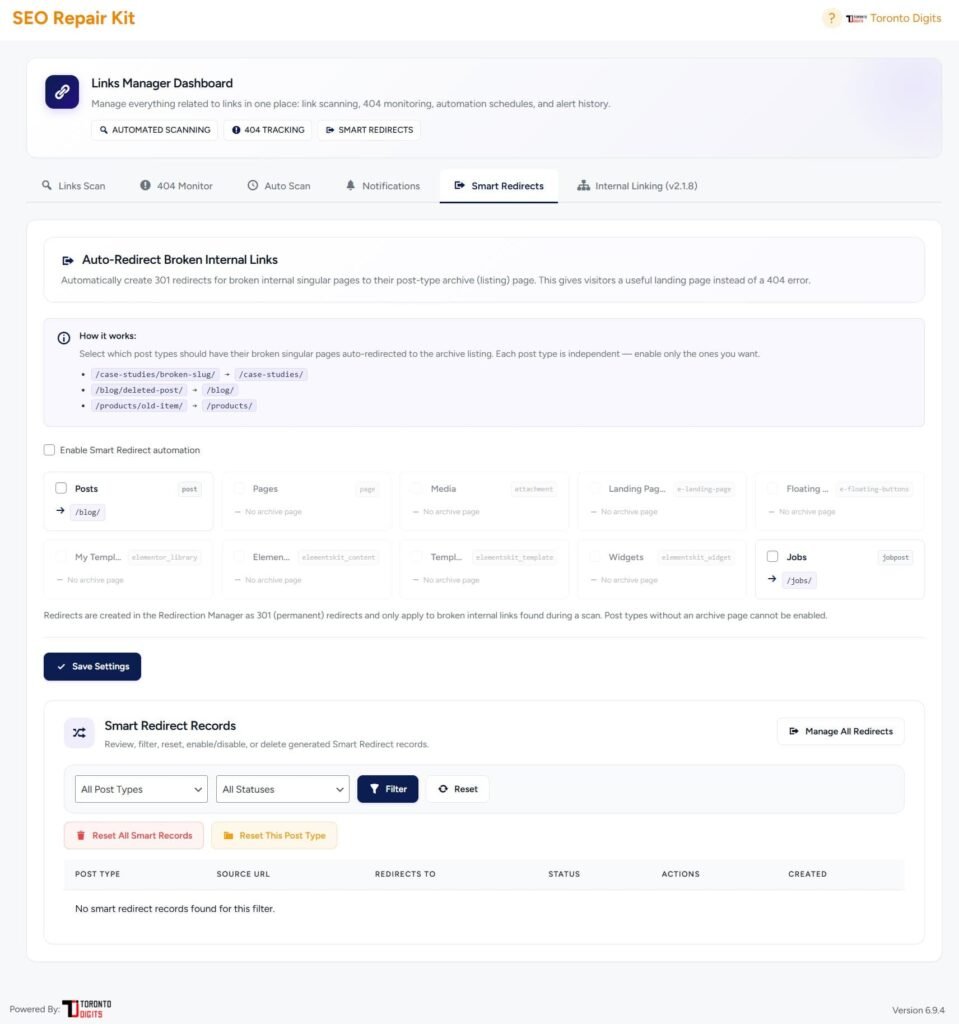
Smart Redirects can automatically create safer redirects for broken internal URLs.
Use it to:
Redirect broken singular content URLs
Redirect deleted post URLs to relevant archive pages
Enable or disable Smart Redirects per post type
Review generated redirect records
Reset Smart Redirect records if needed
How to use
Open Bot Manager.
Review robots.txt.
Add or adjust rules carefully.
Generate llms.txt if needed.
Save.
Test /robots.txt and /llms.txt in a browser.
Best practice
Be careful with Disallow rules. Blocking important pages can harm search visibility.
How to use
Open Links Manager.
Go to 404 Monitor.
Review the list of 404 URLs.
If a URL should redirect somewhere, click the redirect option.
Choose the target URL.
Save the redirect.
Best practice
Do not redirect every 404 automatically. Redirect only URLs that have a useful replacement page.
These options are ideal for large websites and dynamic URLs.
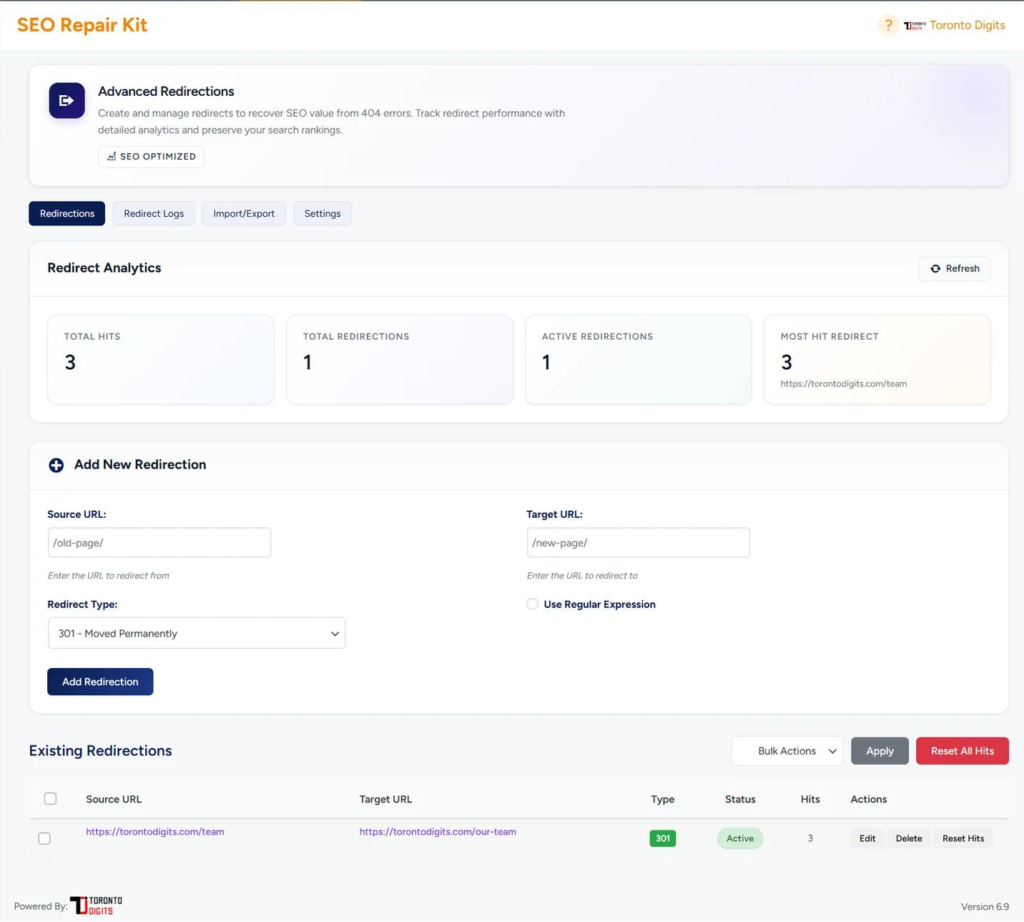
Step 5: Monitor Redirect Hits & Performance
Each redirect tracks how many times it has been used.
You can:
Identify most-hit redirects
Analyze redirect effectiveness
Detect unnecessary or outdated redirects
This helps optimize both SEO and performance.
Step 6: Manage Redirect Status
You can:
Activate or deactivate redirects
Edit source or target URLs
Delete unused redirects
This keeps your redirection system clean and efficient.
Step 7: Handle 404 Errors Proactively
The system automatically detects 404 errors.
You can:
View broken URLs
Create redirects directly from detected errors
Prevent repeated crawl issues
Step By Step Guide
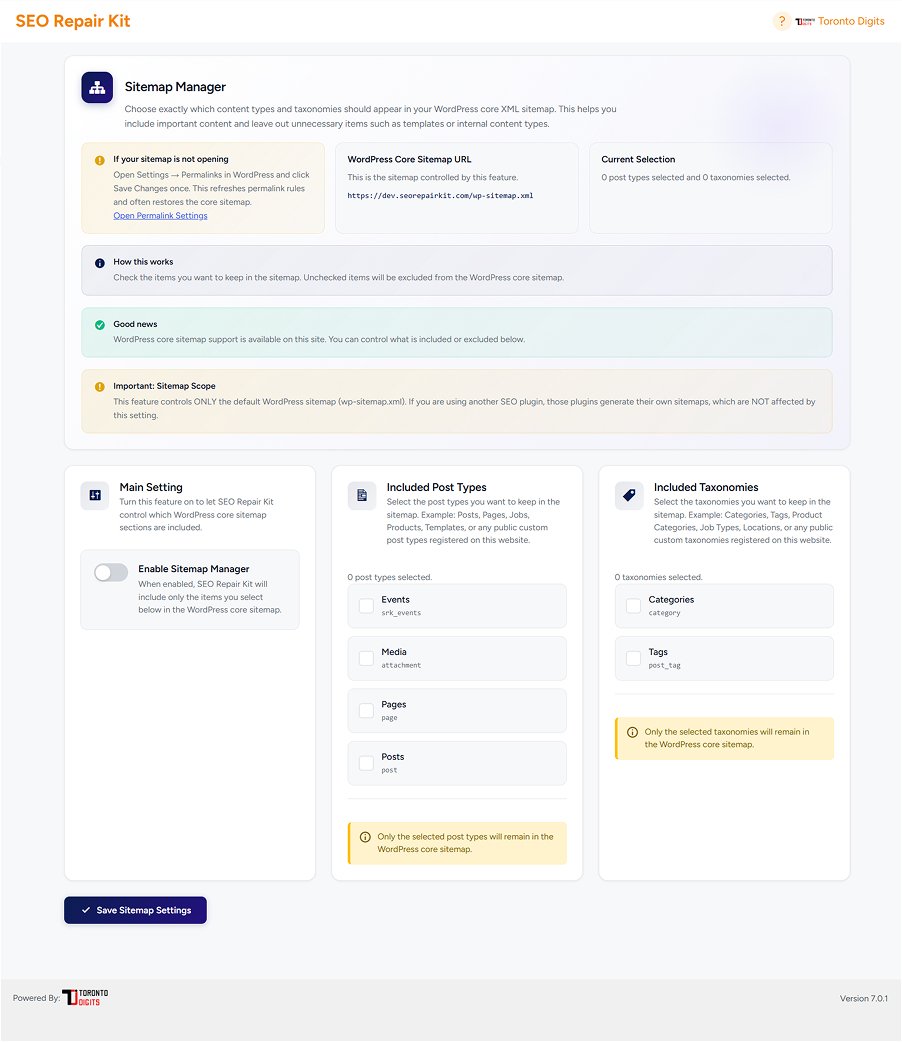
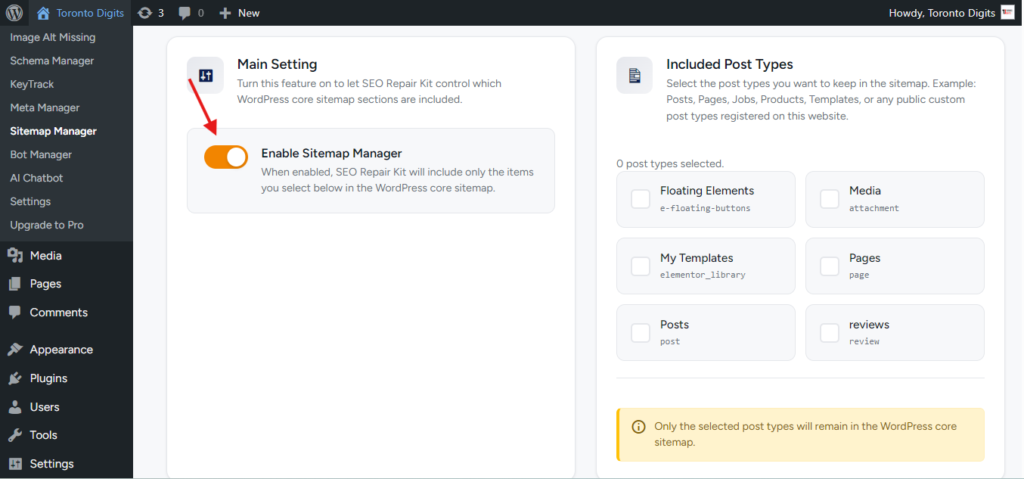
Step 1: Enable Sitemap Control
Toggle “Enable Sitemap Manager”
This activates the feature
Step 2: Select Post Types
Choose which content types you want in your sitemap:
Examples:
Posts ✅
Pages ✅
Reviews ✅
Templates ❌
Elementor Content ❌
👉 Only selected items will remain in the sitemap
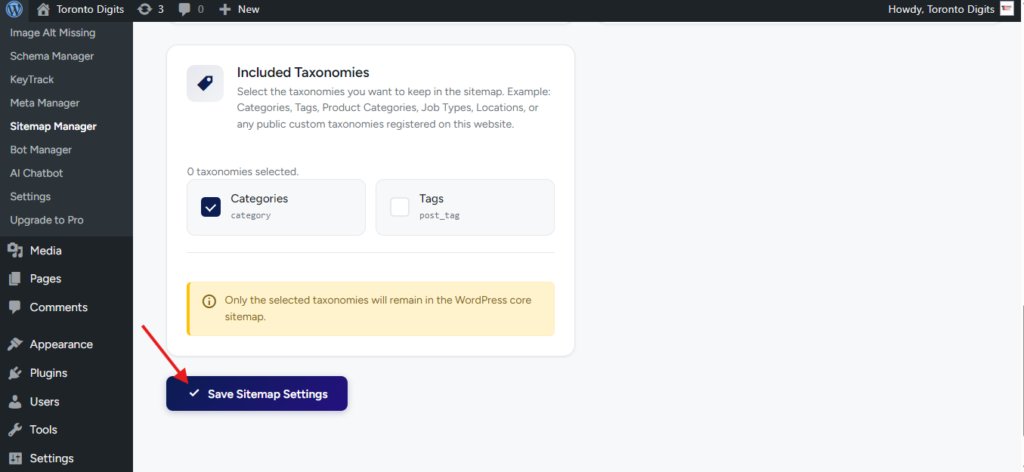
Step 3: Select Taxonomies
Choose relevant taxonomies:
Examples:
Categories ✅
Tags (optional)
Custom taxonomies (job types, locations, etc.)
Step 4: Save Settings
Click Save Sitemap Settings
Confirm changes when prompted
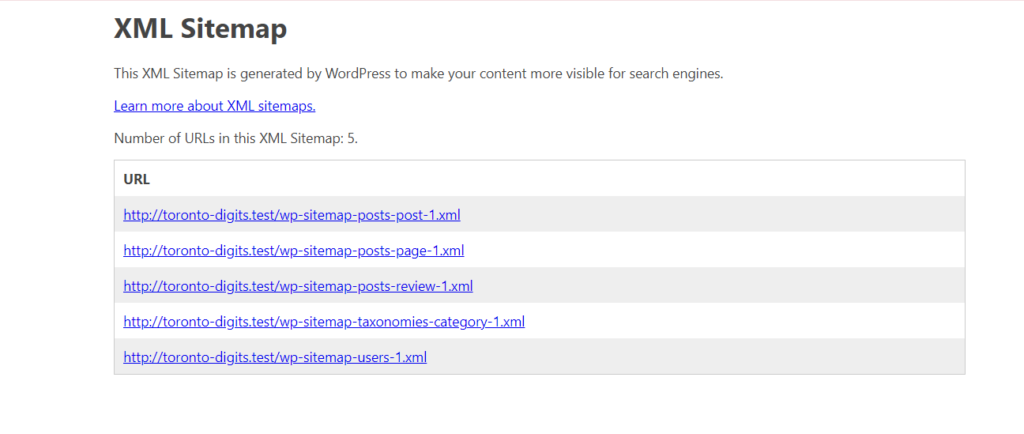
Step 5: Verify Sitemap
Open your sitemap:
yourwebsite.com/wp-sitemap.xml
Check that:
Unwanted URLs are removed
Only selected sections are visible
Step-by-step guide
Step 1: Accessto the Plugin SEO Repair Kit
Go to the SEO Repair Kit Dashboard.
Select KeyTrack from the main menu.
Now Select Go to Site Kit Settings.
Step 2: Sign in With Google
Click on Sign in with Google for Connect with Site Kit.
Step 3: Email Selection
Set up Email alerts if you want to be notified of any significant changes.
Now select Email and continue to the next step.
Step 4: KeyTrack Configuration
Select all 3 Checkboxes to Configure.
Now Allow us to go another Step.
Now select the Next button.
Now Select Go to my Dashboard.
Now you can select Go to SEO Kit KeyTrack.
Now you’ll enter in the KeyTrack Feature.
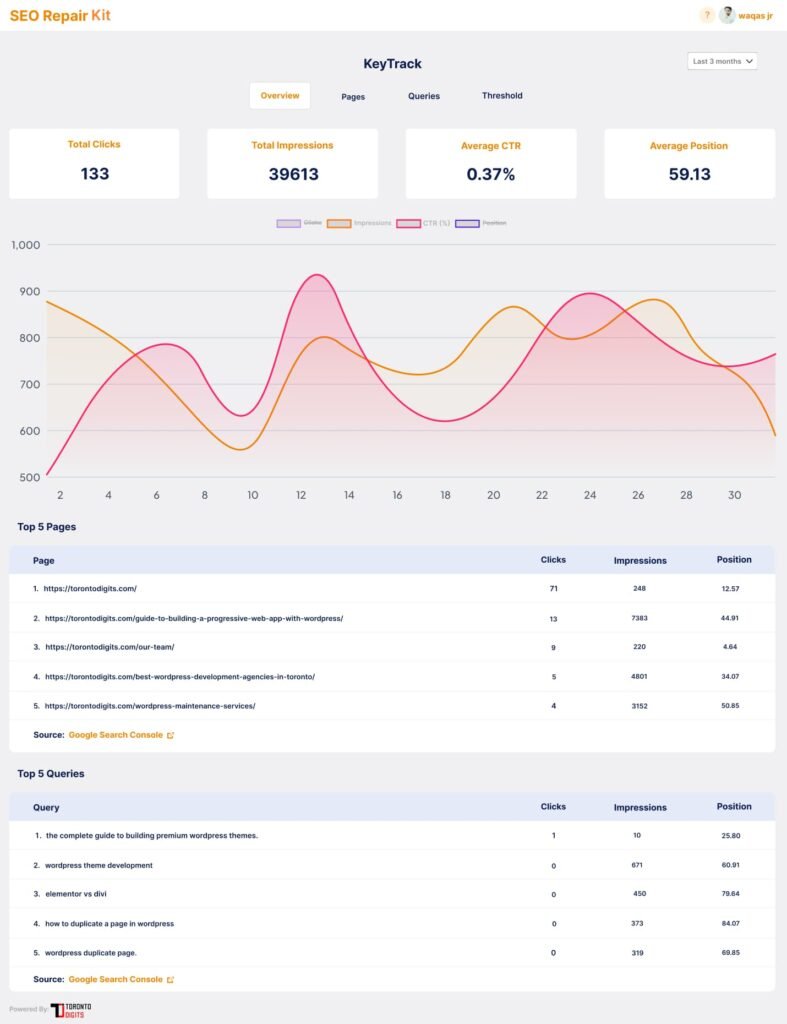
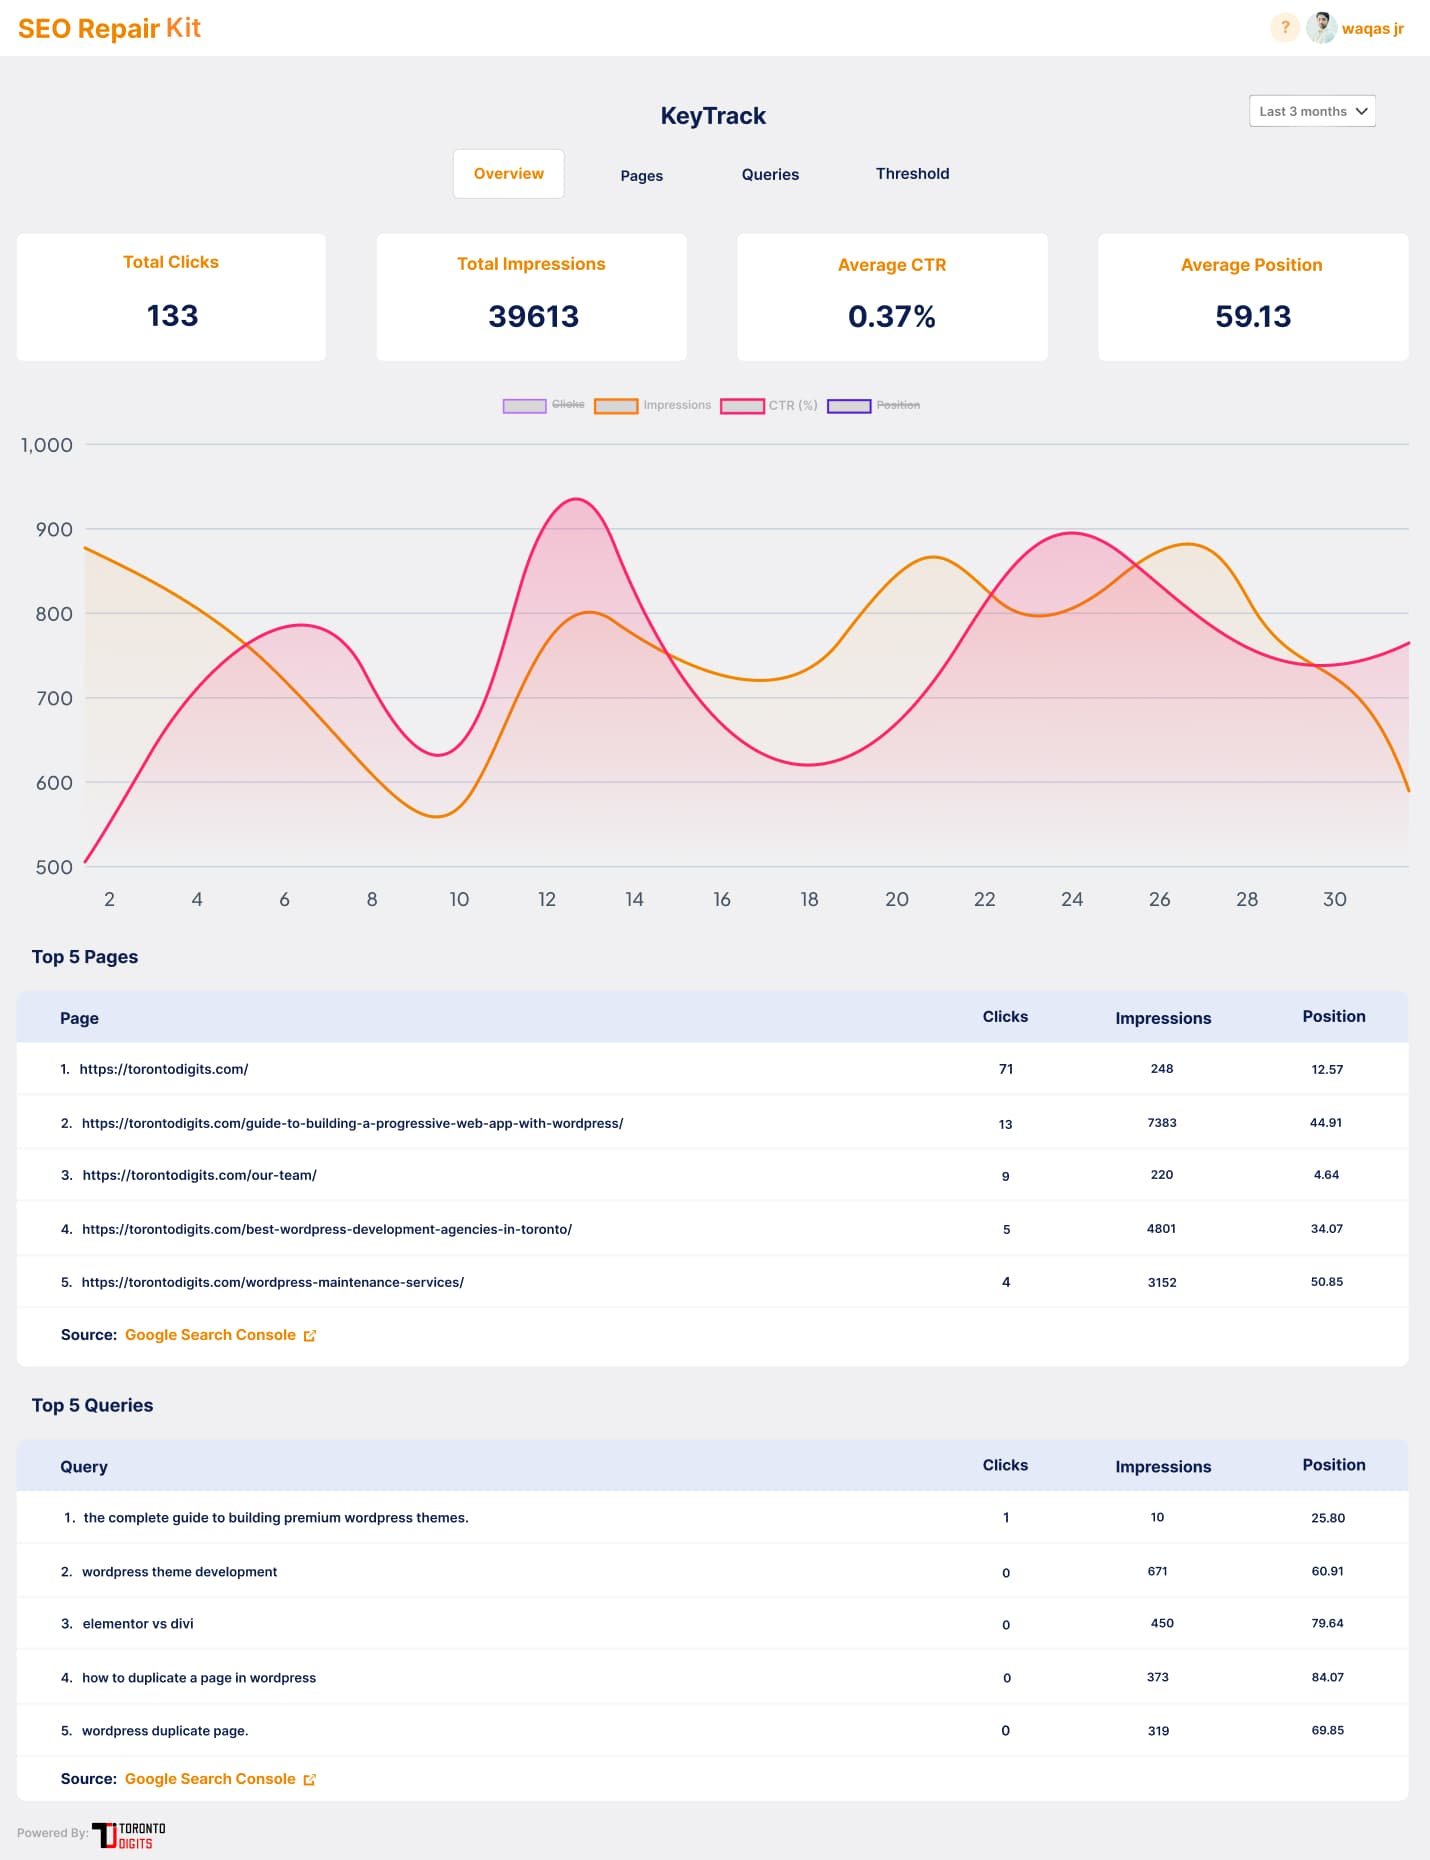
Step 5: KeyTrack Dashboard
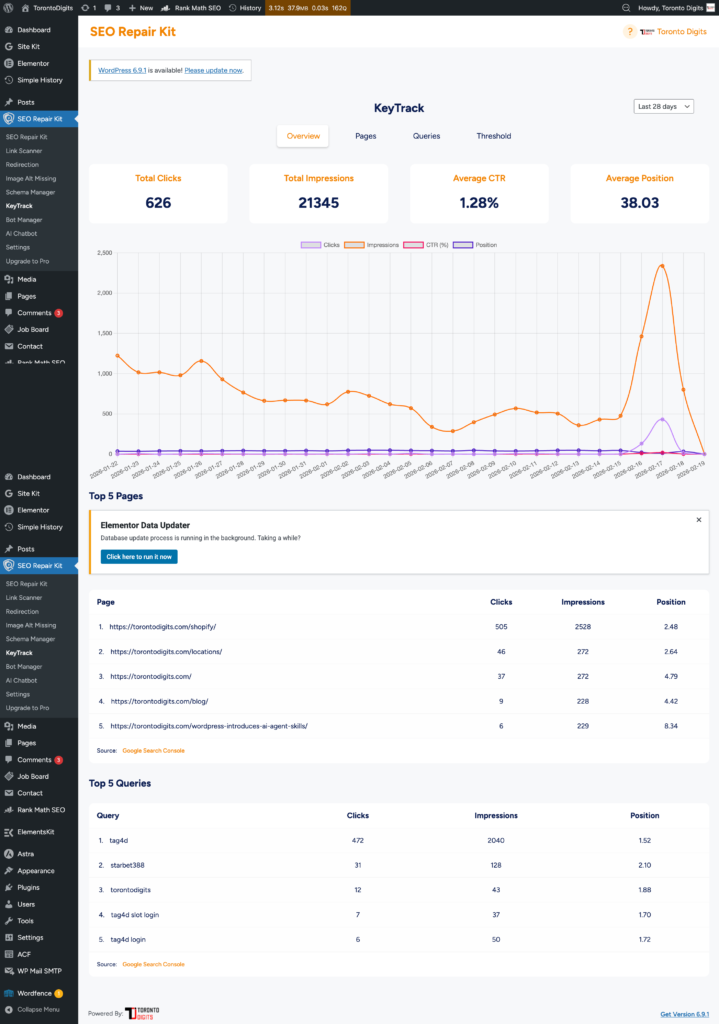
The KeyTrack Dashboard helps you see how your website performs on Google Search in a single screen. It shows your clicks, traffic, keywords, and rankings in easy charts and tables.
Follow these steps to view and understand your dashboard.
Open the Dashboard
Go to your WordPress Admin
Click SEO Repair Kit → KeyTrack → Overview
This will open the main KeyTrack dashboard.
Check the Performance Summary At the top, you will see 4 important numbers:
Total Clicks → How many people visited your site from Google
Total Impressions → How many times your site appeared in search results
Average CTR → Percentage of people who clicked your site
Average Position → Your average ranking on Google
These numbers give you a quick overview of your SEO performance.
View the Performance Chart Below the summary, you’ll see a graph. This chart shows:
Clicks
Impressions
CTR
Position
Use it to:
Track traffic growth
Notice drops
Find spikes after updates or changes
You can also change the date range (like last 7 days or 28 days) to compare results.
Check Top Pages Scroll down to Top Pages. Here you can see:
Which pages get the most clicks
How many impressions they have
Their ranking position
This helps you:
Find your best pages
Improve low-performing pages
Check Top Queries (Keywords) Next, go to Top Queries. This shows:
Keywords people search for
How many clicks each keyword gets
Their rankings
Use this to:
Discover popular keywords
Optimize your content
Target new keyword opportunities
That’s it!
The KeyTrack Dashboard makes it easy to monitor your SEO without leaving WordPress.
Check it regularly to track progress and improve your ranking
How to use
Open Alt Text Manager.
Filter images by missing alt text.
Add clear, descriptive alt text.
Save updates.
Best practice
Describe the image naturally. Avoid keyword stuffing.
How to use
Open AI Chatbot.
Ask a clear question.
Review the answer.
Apply suggestions carefully.
Best practice
Use AI help as guidance, not as a replacement for reviewing your site manually.
How to use
Open Meta Manager.
Configure global homepage SEO settings.
Set title separator.
Configure default templates for posts and pages.
Configure taxonomy templates.
Configure archive settings.
Save changes.
Dynamic tags
You can use template tags such as:
%title%
%excerpt%
%site_title%
%sep%
%current_date%
%current_day%
%month%
%year%
Best practice
Use templates for large sites, then manually override important pages.
Validate with Google Rich Results or Schema Validator.
Save.
Best practice
Only add schema that matches visible page content. Incorrect schema can hurt trust and rich result eligibility.
How to use
Open Links Manager.
Go to Auto Scan.
Enable automatic scans.
Select frequency, such as daily, every 3 days, weekly, biweekly, or monthly.
Choose what content should be scanned.
Save settings.
Free access note
Free Link Scanner access may be limited to Pages and a limited number of links per run.
How to use
Spam Monitor Dashboard
Open Spam Monitor.
Start on the Dashboard tab.
Review the KPI cards.
Check the stats graph for a quick visual summary.
Open risky records if something needs attention.
Spam Rules
Open Spam Monitor.
Go to Spam Rules.
Review language rules.
Select suspicious languages and allowed website languages.
Review spam keyword categories.
Add custom blocked keywords if needed.
Review URL pattern rules.
Adjust score thresholds carefully.
Save rules.
Sync rules if the interface shows they need syncing.
Best practice
Start with default rules first. Only adjust scores if you understand how the results are being classified.
Google SERP Scan
Open Spam Monitor.
Go to Google SERP Scan.
Enter your domain.
Select scan depth.
Choose whether to include subdomains.
Run the scan.
Review returned SERP records.
Review recent scan history.
Scan depth
Scan depth controls how many SERP requests/results are checked.
Examples:
1 request = up to 10 records
3 requests = up to 30 records
10 requests = up to 100 records
100 requests = up to 1,000 records
200 requests = up to 2,000 records
Use larger scan depths carefully because they consume more provider requests.
Search Console Cleanup
Suggested cleanup flow
Detect risky indexed URLs.
Review each URL manually.
Decide whether the URL is legitimate or suspicious.
Remove, fix, noindex, redirect, or clean the affected page.
Use Search Console to request removal or reindexing where needed.
Mark status in Spam Monitor.
Best practice
Spam Monitor is a risk signal tool. Always review unfamiliar URLs before taking destructive action.
Spam Monitor Alerts
Open Spam Monitor.
Go to Alerts.
Add recipient email addresses.
Select risk levels.
Send a test email.
Save settings.
Scheduled Spam Monitoring
Available frequency options
Every 10 minutes, testing only
Every day, recommended
Every 3 days
Every week
Every 2 weeks
Every month
Recommended setup
For most websites:
Frequency: Every day
Scan depth: 3 requests / up to 30 records
Include subdomains: enabled if your site uses subdomains
Alerts: enabled for spam and critical findings
Spam Monitor Settings
Provider note
Free users can use the SEO Repair Kit trial provider. Paid Spam Monitor users can connect supported SERP providers where supported by their plan, such as:
Serper.dev
SERP API
DataForSEO
How it Works
Link Scanning: When you click Start Scan, Link Scan examines every link across your selected post types — including pages, posts, and embedded links. It checks each link’s HTTP status to determine whether it’s active, redirected, or broken — covering both internal and external URLs.
Status Detection: Each link is tested and categorized as:
Status
Description
HTTP Codes
Healthy
Link works properly
200 OK
Broken
Link returns an error
404, 403, 500, etc.
Redirected
Link points to different URL
301, 302
Link Reporting: Once the scan is complete, all detected broken links are organized into a clear, easy-to-read table. Each entry shows:
Post Title – Where the broken link appears
Type – Content type (Post, Page, etc.)
Status – Publication status (Published, Draft, etc.)
Broken Link URL – The actual failing link
HTTP Status Code – Error type (e.g., 404 Not Found)
Link Text – Anchor text used in the content
Redirect Action – Option to redirect the broken link
Edit Icon – Quickly edit the source content
Manual Detection: You can manually trigger a scan at any time. This is especially useful after publishing new content or making major updates, ensuring broken links are caught immediately.
Fixing Broken Links: From the report dashboard, you can fix broken links in just a few clicks:
Edit the link to update it with a correct URL
Redirect the link to a relevant working page
Remove the link if it’s no longer needed
Export Capability: Click Download CSV to export the broken links report. This is useful for sharing with team members, tracking fixes, or maintaining audit records.
Proactive Monitoring: Regular manual scans help prevent future issues. By scanning after content changes, you ensure new broken links are identified early — keeping your website healthy, user-friendly, and SEO-optimized.
How to use
Open Links Manager.
Go to Smart Redirects.
Enable Smart Redirects.
Select the post types you want to protect.
Save settings.
Review generated redirect records.
Best practice
Use Smart Redirects for clear, predictable cases. For important pages, manually confirm the best target URL.
Step by Step Guide
Step 1: Access Bot Manager
From your WordPress admin panel, go to SEO Repair Kit → Bot Manager. This is your central hub for controlling all bot and crawler access.
Step 2: Review the Overview Cards
At the top of the dashboard, you’ll see a quick summary:
Robots.txt Status – Whether the file exists and is writable
LLMs.txt Status – Whether the AI discovery file is generated
Blocked AI Bots – Number of AI crawlers currently blocked
Allowed Bots – Number of bots explicitly allowed
These cards give you an instant snapshot of your bot control health.
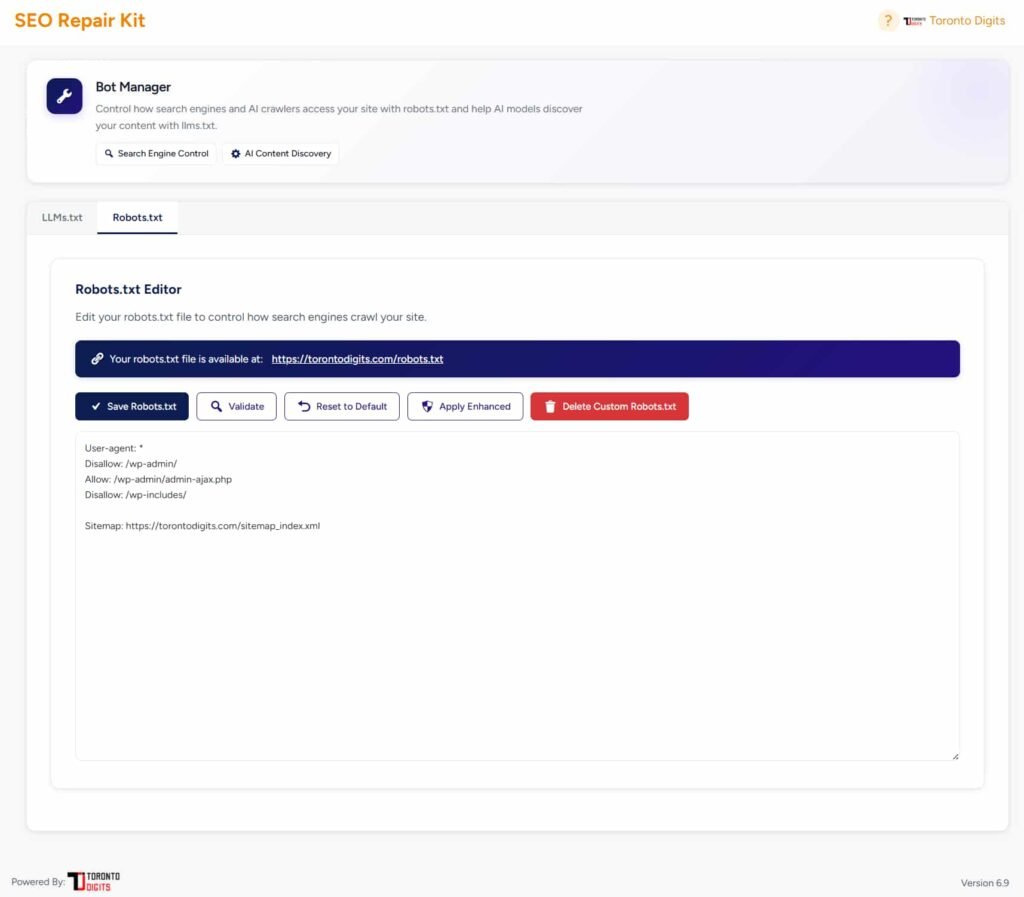
Step 3: Manage Robots.txt
Click on the Robots.txt Editor tab.
Use the visual interface to add new rules (e.g., Disallow: /private/)
Choose user agents from a dropdown (Googlebot, GPTBot, etc.)
Set allow/disallow paths with auto-completion
See a live preview of the generated file
You can also switch to Code View if you prefer manual editing.
Step 4: Control AI Bots
Go to the AI Bot Control section.
See a list of known AI crawlers (ChatGPT, Claude, Bard, etc.)
For each bot, choose:
Allow (default)
Block via robots.txt
Block at server level (403)
Changes are applied immediately
Bot Manager automatically updates both robots.txt and server config files when needed.
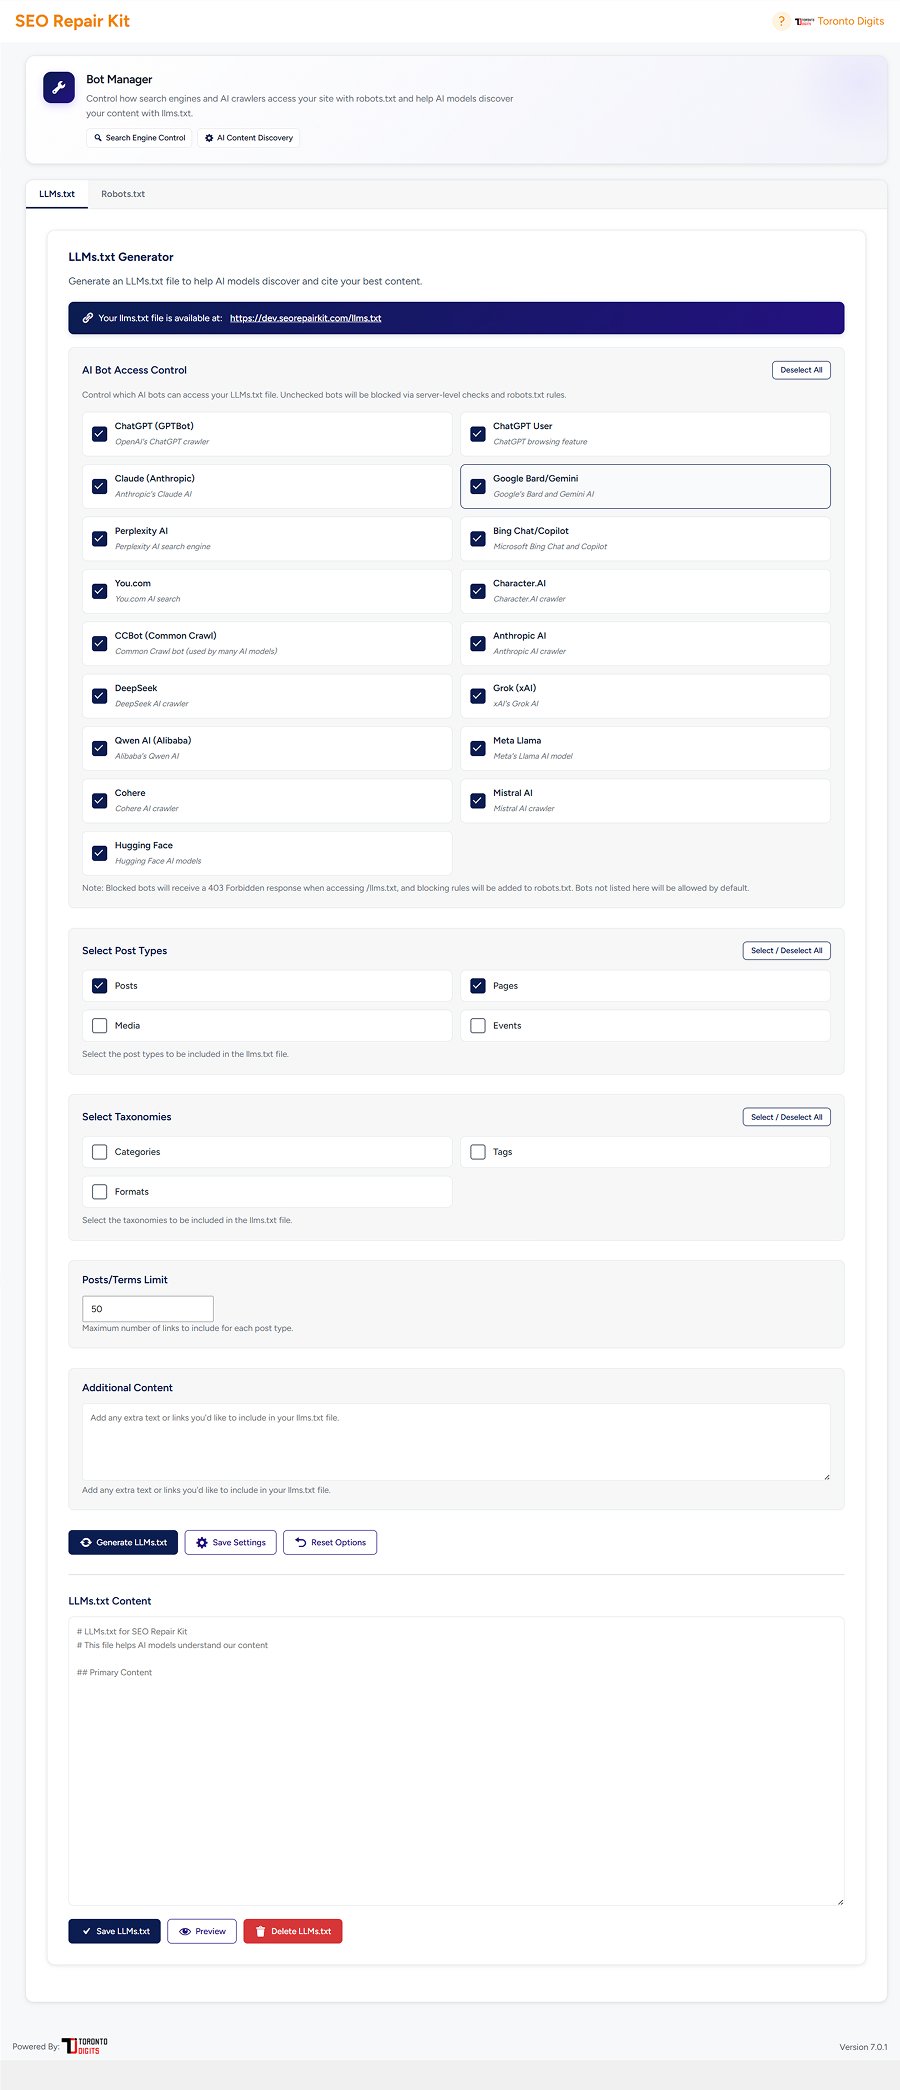
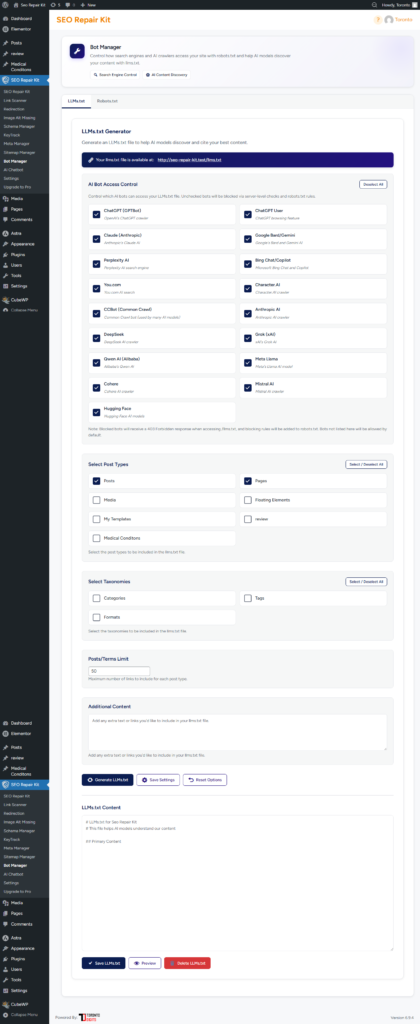
Step 5: Generate LLMs.txt
Navigate to the LLMs.txt Generator.
Enable the generator with a single toggle
Select which post types to include (posts, pages, custom post types)
Select which taxonomies to include (categories, tags, etc.)
Preview the generated llms.txt file
Click Save & Generate
The file will be created at yoursite.com/llms.txt and automatically updated when you publish new content.
Step 6: Validate and Test
Click the Validate button to check for:
Syntax errors in robots.txt
Conflicts between rules
Missing directives
Use the Test Crawler tool to simulate how a specific bot (e.g., GPTBot) would see your site.
Step 7: Apply Server-Level Blocking (Optional)
For enhanced security, enable Server-Level Enforcement:
Go to Advanced Settings
Toggle on “Block unwanted bots at server level”
Choose which blocked bots should receive a 403 error
Bot Manager writes the necessary rules to .htaccess or nginx.conf
Step 8: Monitor Bot Activity
Visit the Bot Log section (if enabled) to see:
Which bots have accessed your site recently
How often they were blocked or allowed
Bandwidth usage by crawler
Use this data to refine your bot management strategy.
Step 9: Export Configuration (Optional)
Click Export Settings to download a JSON backup of your:
Robots.txt rules
AI bot blocklist
LLMs.txt settings
This is useful for migrating configurations to other sites or keeping a backup.
Step 10: Maintain Ongoing Bot Control
Regularly review:
New AI crawlers added to the known list (plugin updates bring them in)
Changes to your site structure that may need new robots.txt rules
LLMs.txt content after adding new post types or taxonomies
Set up automatic weekly scans to ensure your bot policies remain optimal.
Step-by-Step Guide
This guide explains how to use the 404 Monitor in the SEO Repair Kit plugin to identify and manage broken URLs on your website.
Follow the steps below to monitor and analyze 404 errors.
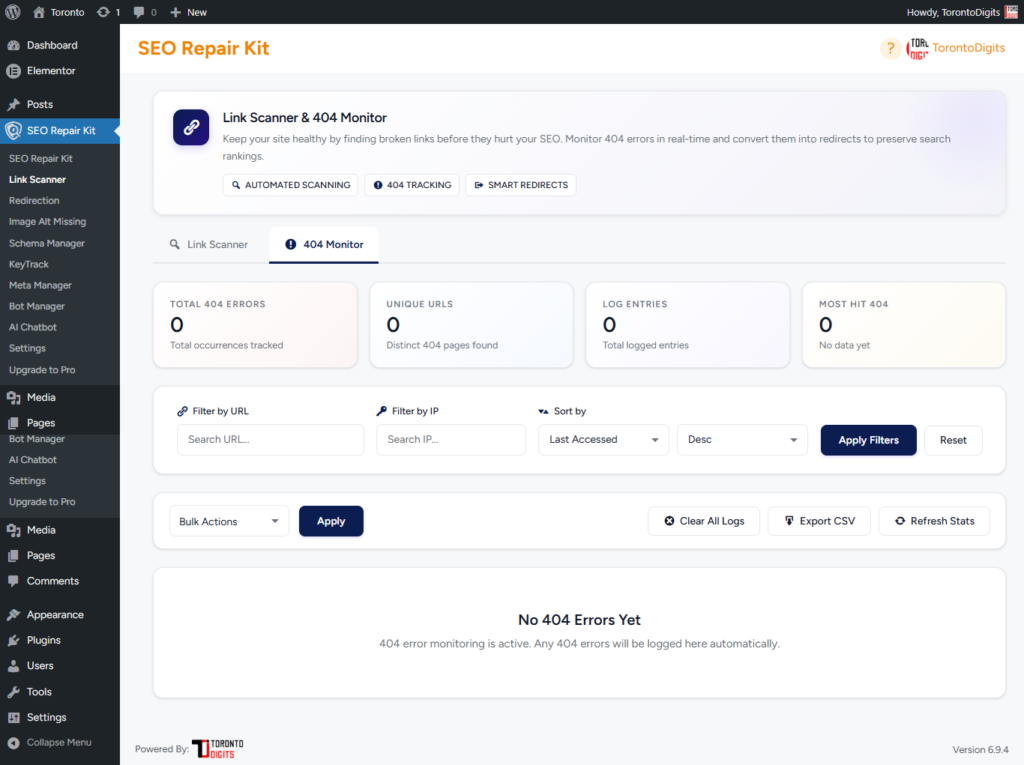
Step 1 – Access the 404 Monitor
Log in to your WordPress Admin Dashboard.
In the left navigation menu, locate SEO Repair Kit.
Click on 404 Monitor.
Navigation path: Dashboard → SEO Repair Kit → 404 Monitor
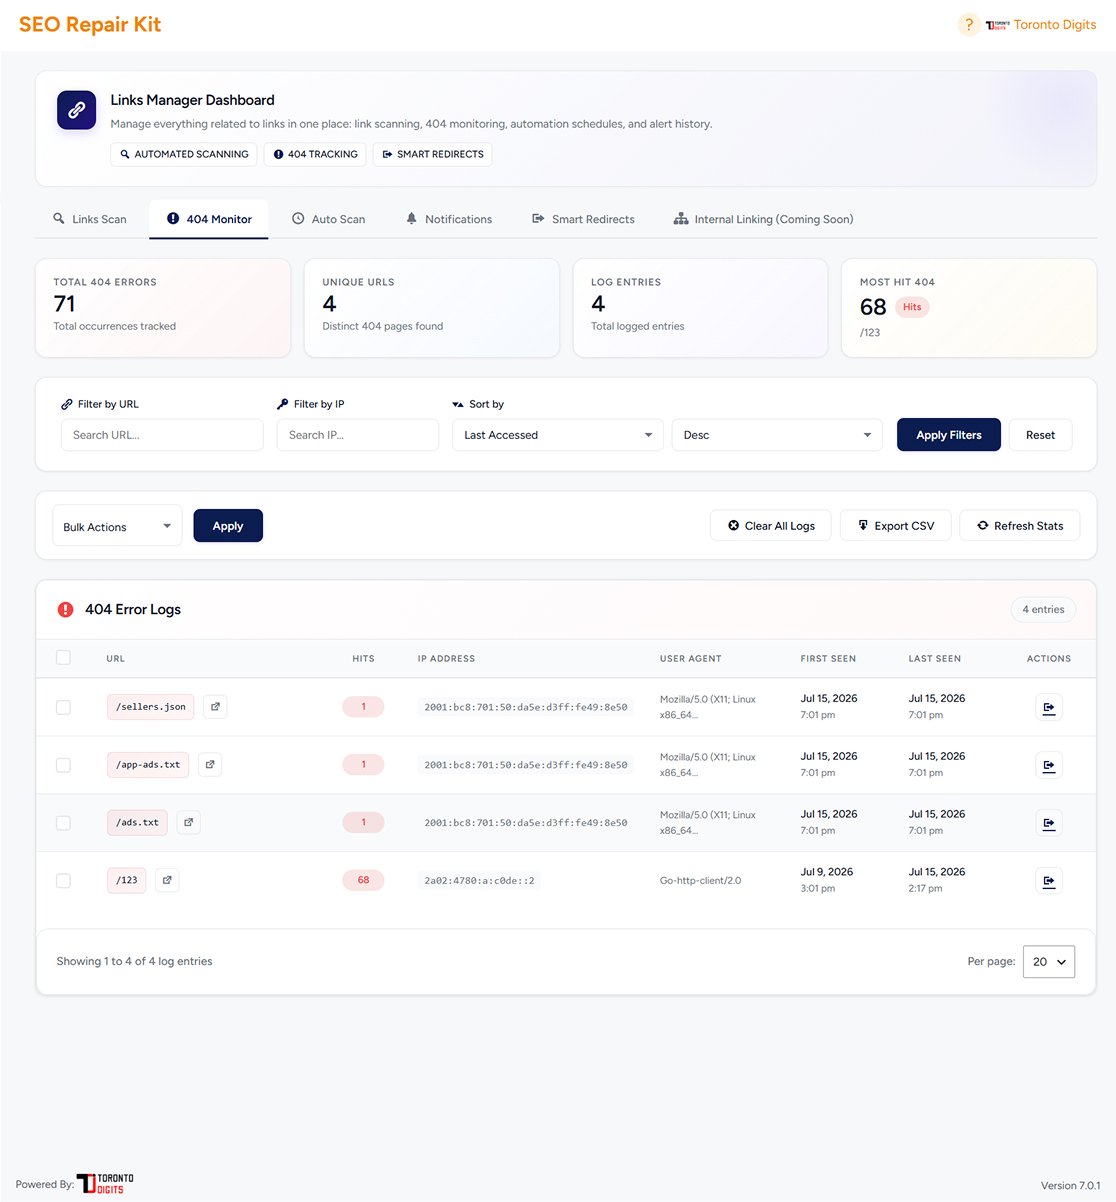
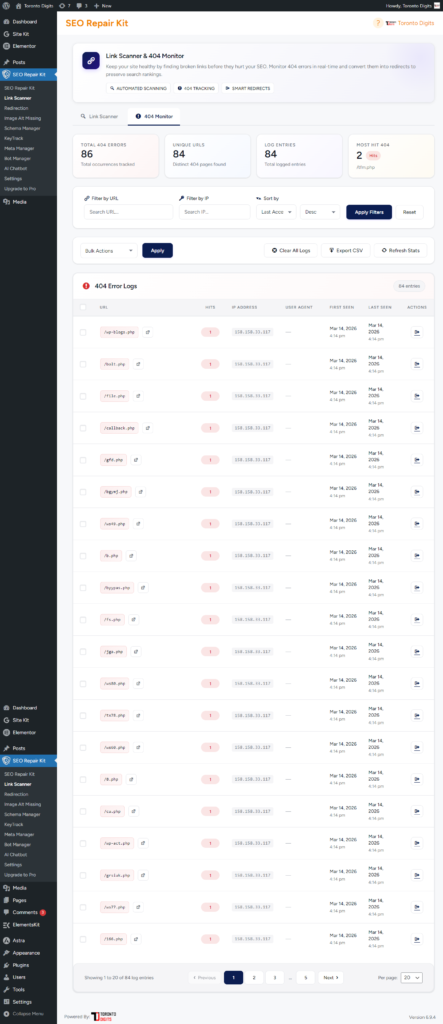
Step 2 – View the 404 Error Logs
The 404 Monitor dashboard displays a list of all detected broken URLs on your website.
Each entry in the list represents a 404 error request that has been recorded by the plugin when a user or search engine attempts to access a page that does not exist.
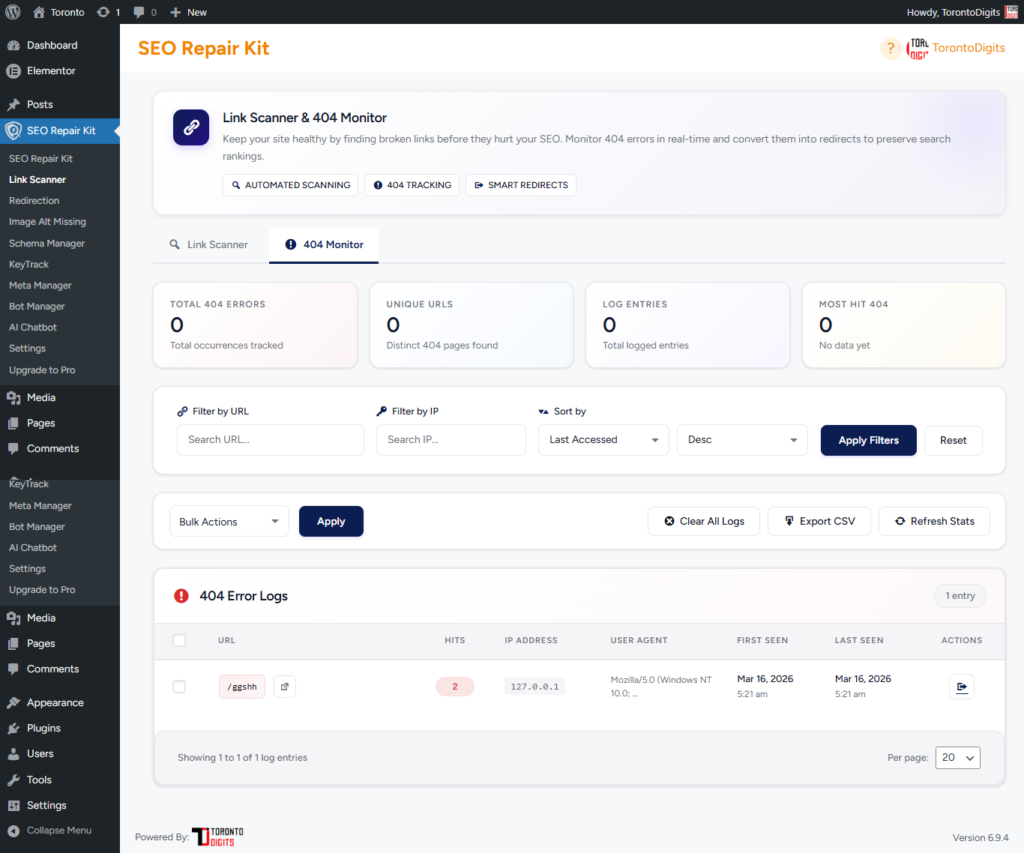
For every logged error, the system provides several important details to help you understand the issue.
The URL field shows the page address that returned the 404 error.
The Referrer indicates the page where the broken link originated. This helps identify whether the error is coming from an internal page on your website or an external source.
The Hits value represents how many times the broken URL has been accessed. A higher number of hits may indicate that the issue needs immediate attention.
The Last Accessed information shows the most recent time the error occurred.
Step 3 – Identify the Source of the Error
After reviewing the error logs, the next step is to determine why the 404 error is occurring.
You can identify the source of the problem by checking the Referrer information and the requested URL. This helps you understand where the broken link originated and what might be causing the issue.
In many cases, 404 errors occur because a page has been deleted, the URL structure has changed, or a link was entered incorrectly.
Common causes of 404 errors include:
Internal links pointing to pages that no longer exist
External websites linking to incorrect URLs
Pages that were moved without setting up a redirect
Typographical errors in URLs
Old URLs still indexed by search engines
Step 4 – Fix the Broken URL
Once you understand the cause of the error, you can take the appropriate action to resolve it.
If the broken link is coming from inside your website, you can edit the content and update the link with the correct URL.
If the page has been moved or renamed, it is recommended to create a redirect from the old URL to the new one. Redirects ensure that visitors and search engines are automatically sent to the correct page.
In some cases, the page may have been deleted accidentally. If the content is still important, you may choose to restore or recreate the page.
Taking the correct action will help prevent visitors from encountering broken pages and will maintain a better user experience.
Step 5 – Monitor and Maintain
After fixing the issue, it is important to continue monitoring the 404 Monitor logs.
Regularly checking the logs allows you to detect new broken links and resolve them quickly. This practice helps maintain the overall health of your website.
By monitoring 404 errors consistently, you can:
Improve user experience
Maintain better SEO performance
Prevent search engines from indexing broken pages
Keep your website structure clean and organized
FAQs
1. What is the difference between 301 and 302 redirects?
301 redirects are permanent and pass SEO value, while 302 redirects are temporary and do not fully transfer link equity.
2. Will redirects affect my SEO?
Yes—in a positive way. Proper redirects protect rankings and prevent SEO loss.
3. Can I track how many times a redirect is used?
Yes. The Redirection Manager tracks hit counts and performance.
4. Do I need technical knowledge to use this feature?
No. The interface is beginner-friendly and requires no coding.
5. Can I disable a redirect without deleting it?
Yes. Redirects can be toggled between active and inactive status.
6. Does this support advanced redirects like regex?
Yes. Regex and position-based redirects are supported for advanced users.
FAQs
1. What data sources does KeyTrack Configuration use?
KeyTrack primarily uses data from Google Search Console and search engine results (like Google rankings). It collects metrics such as keyword position, impressions, and CTR directly from these sources.
2. How many keywords can I track simultaneously?
There is usually no strict fixed limit, but it depends on your plan or system capacity. In general:
Small setups: hundreds of keywords
Medium/large projects: thousands or even unlimited tracking
3. Can I receive alerts for keyword position drops?
Yes. Most keyword tracking systems (including setups like KeyTrack) allow:
Alerts for ranking drops or gains
Notifications when keywords move significantly This helps you react quickly to SEO changes.
4. How often is the data updated?
Data is typically updated:
Daily (every 24 hours) in most tracking tools
Sometimes at a scheduled time you choose
5. Can I track keywords in multiple languages?
Yes. KeyTrack Configuration supports:
Multiple languages
Different countries and locations
Separate tracking per language setting
Step by Step Guide
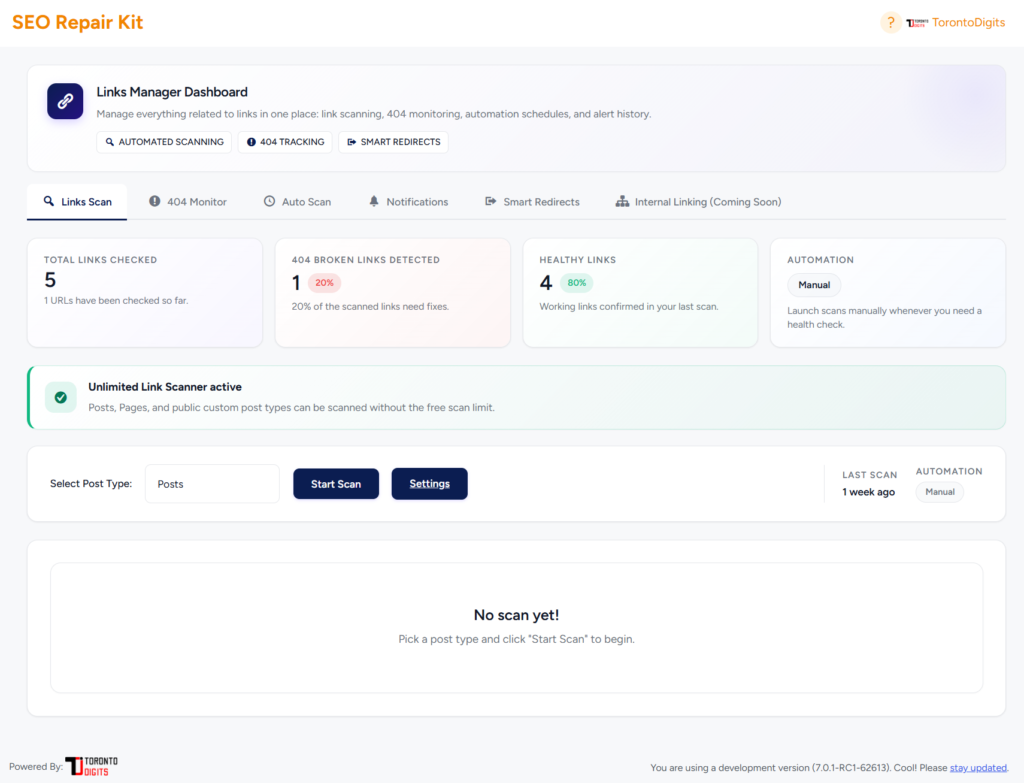
Using the Links Manager Dashboard
Step 1: Access Links Manager From your WordPress admin menu, go to SEO Repair Kit → Links Manager.
You will see five tabs at the top: Link Scan, 404 Monitor, Auto Scan, Notifications, and Smart Redirects.
Step 2: Run a Link Scan
Click the Link Scan tab
Review the overview cards showing total links checked, broken links detected, healthy links, and automation status
Use the Select Post Type dropdown to choose which content to scan (Posts, Pages, or custom post types)
Click Start Scan
Wait for the progress bar to complete
Scroll down to the Broken Links Found table to see results
For any broken link, click Edit (to fix in content) or Redirect (to create a 301 redirect)
Optional: Click Download CSV to export the report
Step 3: Monitor 404 Errors
Click the 404 Monitor tab
Review the table of all 404 errors with hit counts and last accessed timestamps
Click on the Hit Count column to sort by most frequent 404s first
For any 404 error, click Create Redirect
Enter the target URL (where visitors should go)
Select redirect type (301 Permanent or 302 Temporary)
Click Save
Step 4: Schedule Automatic Scans
Click the Auto Scan tab
Toggle Enable Automation to ON
Choose a scan interval: Daily, Every 3 days, Weekly, Biweekly, or Monthly
Configure scan settings:
Batch size (recommended: 20-50 for shared hosting)
Links per post
Request timeout (recommended: 5-10 seconds)
Select which post types to include
Toggle Email Alerts ON and enter recipient email address (optional)
Click Save Settings
Step 5: Review Notifications History
Click the Notifications tab
View the alert history table showing:
Date and time of each email sent
Scan trigger type (manual or automated)
Total links checked
Broken links found
Email status (sent/failed)
Use this history to track when issues were first detected
Step 6: Enable Smart Redirects
Click the Smart Redirects tab
Toggle ON for each post type you want to automatically redirect (e.g., Posts, Pages, custom post types)
View generated redirects in the table showing source URL and target archive URL
For individual redirects, toggle status (active/inactive) or delete
Optional: Use Reset All Records or Reset by Post Type to clear redirects
Step 7: Create Redirects from Scan Results
From either Link Scan or 404 Monitor:
Locate the problematic URL in the results table
Click the Redirect button
Enter the target URL
Select redirect type
Save — the redirect will appear in Redirection Manager
Step 8: Export Scan Reports
From the Link Scan tab after any scan:
Click Download CSV
The file includes: post title, broken link URL, HTTP status code, link text, and more
Use for team sharing, client reports, or audit records
Step 9: Maintain Ongoing Link Health
Run manual scans after publishing new content
Check 404 Monitor weekly for frequent errors
Review Auto Scan history to confirm scans are running
Enable email alerts so you never miss broken links
Re-scan after fixing issues to verify resolution
FAQs
1. What sitemap does this feature control?
It controls only the default WordPress sitemap:
/wp-sitemap.xml
2. Will this affect my SEO?
Yes — positively.
It helps:
Remove low-quality URLs
Improve crawl efficiency
Focus indexing on important pages
3. Can I exclude specific pages only?
Currently, control is based on:
Post types
Taxonomies
(Not individual URLs)
4. Why do I still see unwanted URLs?
Possible reasons:
Another SEO plugin is generating a different sitemap
Cache is not cleared
Sitemap Control is not enabled
5. Do I need technical knowledge?
No.
The feature is designed to be:
Beginner-friendly
Fully UI-based
No coding required
Step By Step Guide
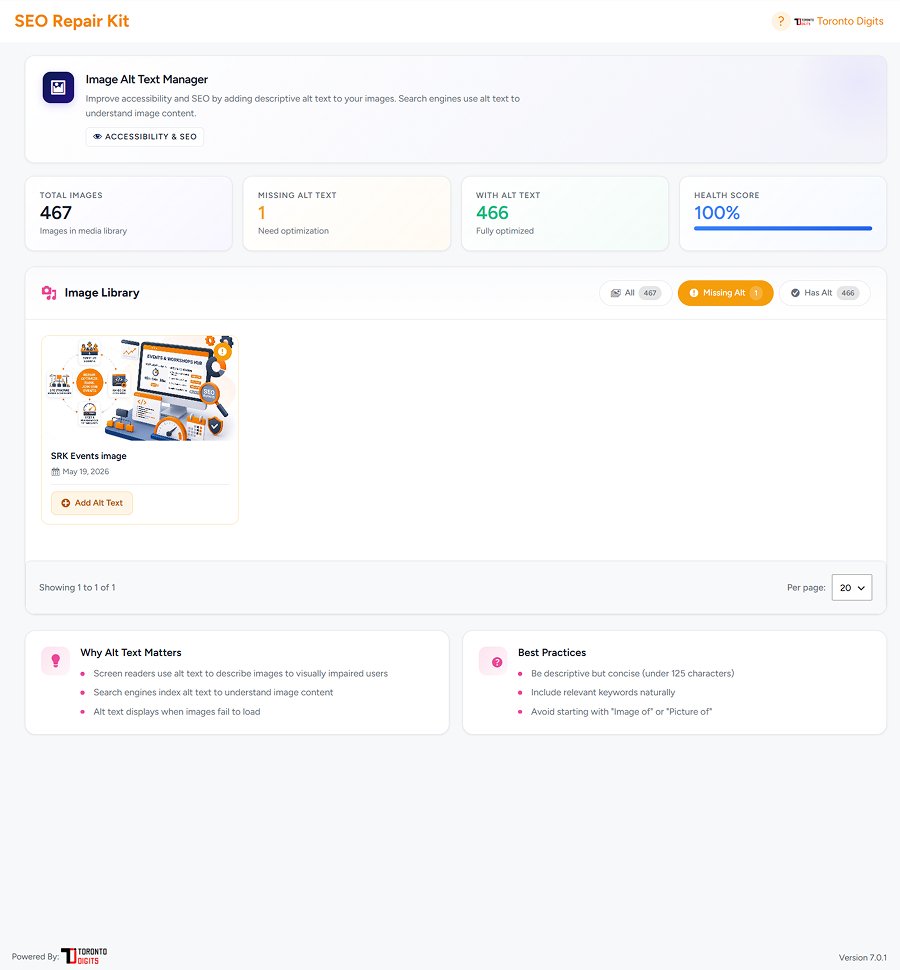
Step 1: Open the Image ALT Text Manager
From the WordPress admin panel, go to:
SEO Repair Kit → Image Alt Missing
This opens the Image ALT Text dashboard.
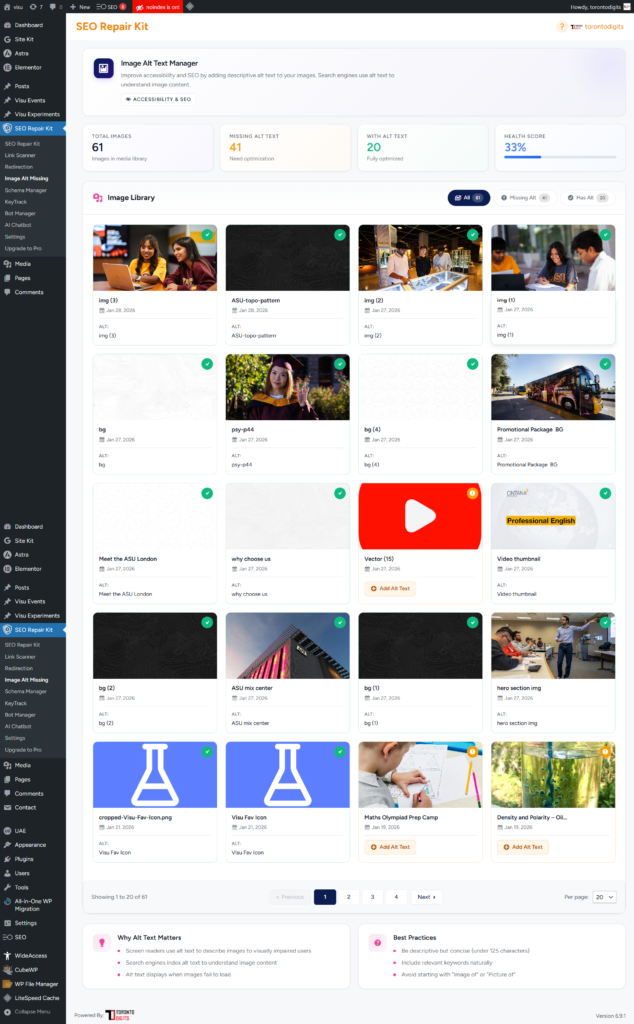
Step 2: Review the Overview Metrics
At the top of the dashboard, you’ll see key summary cards:
Total Images Displays the total number of images in your media library.
Missing ALT Text Shows how many images require optimization.
With ALT Text Confirms how many images are already optimized.
Health Score A percentage score representing your overall ALT text optimization status.
These metrics help you quickly assess image SEO health.
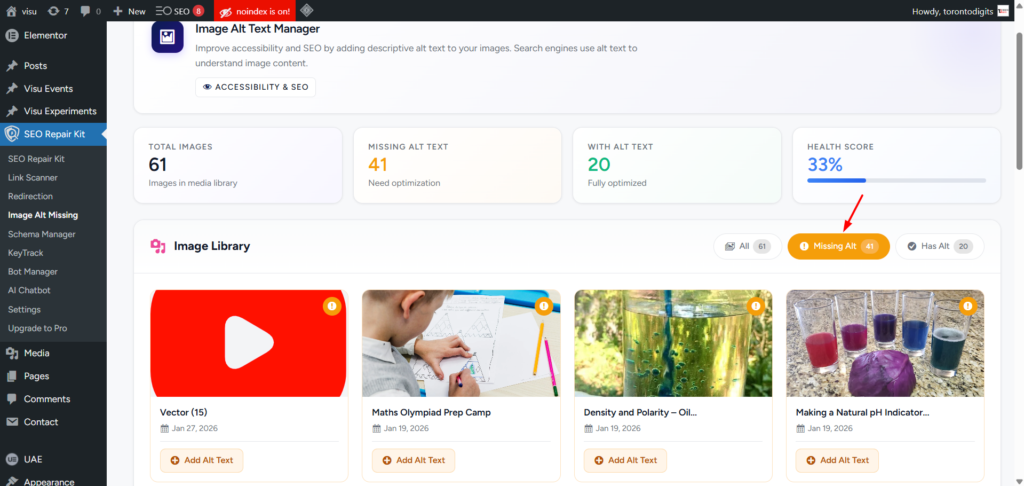
Step 3: Filter Images by ALT Status
Use the filter buttons to manage images efficiently:
All – View all images
Missing Alt – Show only images without ALT text
Has Alt – Display images already optimized
This allows you to focus only on images that need attention.
Step 4: Browse the Image Library
Scroll through the image cards in the Image Library section. Each image card shows:
Image preview
Image title
Upload date
ALT text status indicator
Images missing ALT text are clearly highlighted.
Step 5: Add ALT Text to an Individual Image
Click Add Alt Text on any image card.
Enter a clear, descriptive ALT text
Keep it concise and relevant
Include keywords naturally where appropriate
Save the changes to instantly update the image.
Step 6: Monitor Optimization Progress
As ALT text is added:
The Missing ALT Text count decreases
The count of ALT Text increases
The Health Score improves in real time
This provides immediate feedback on your optimization progress.
Step 7: Maintain Ongoing Image Optimization
Revisit the Image ALT Text Manager regularly—especially after uploading new images—to ensure all visuals remain optimized for SEO and accessibility.
FAQ's
1. Do I need SEO knowledge to use AI Chatbot? No, it’s beginner-friendly and explains everything simply.
2. Is the chatbot connected to my website data? Yes, it provides context-aware suggestions.
3. Can it fix issues automatically? No, it provides guidance—you apply changes manually.
4. What type of questions can I ask? Anything related to SEO, meta, schema, keywords, and errors.
5. Is it available in free version? No, it’s a Pro feature.
6. Does it replace SEO tools? It complements them but doesn’t fully replace advanced tools.
7. Can it help with ranking issues? Yes, it suggests optimization strategies.
8. Is the response always accurate? It is highly reliable but should be reviewed before implementation.
9. Can I use it for technical SEO? Yes, including schema, redirects, and indexing issues.
10. Does it support multiple languages? Depends on implementation, but primarily optimized for English SEO queries.
Step By Step Guide
Using the Meta Manager Dashboard
Step 1: Access Meta Manager
Go to your WordPress dashboard and navigate to: SEO Repair Kit → Meta Manager
This ensures all content types are optimized automatically.
Step 4: Optimize Taxonomies
Open the Taxonomies tab:
Set SEO templates for categories and tags
Control indexing behavior
Apply robots directives
This improves SEO for archive-like pages.
Step 5: Configure Archive Settings
Go to the Archives tab:
Manage SEO for author pages
Set rules for date archives
Configure search result pages
You can also disable indexing for low-value pages.
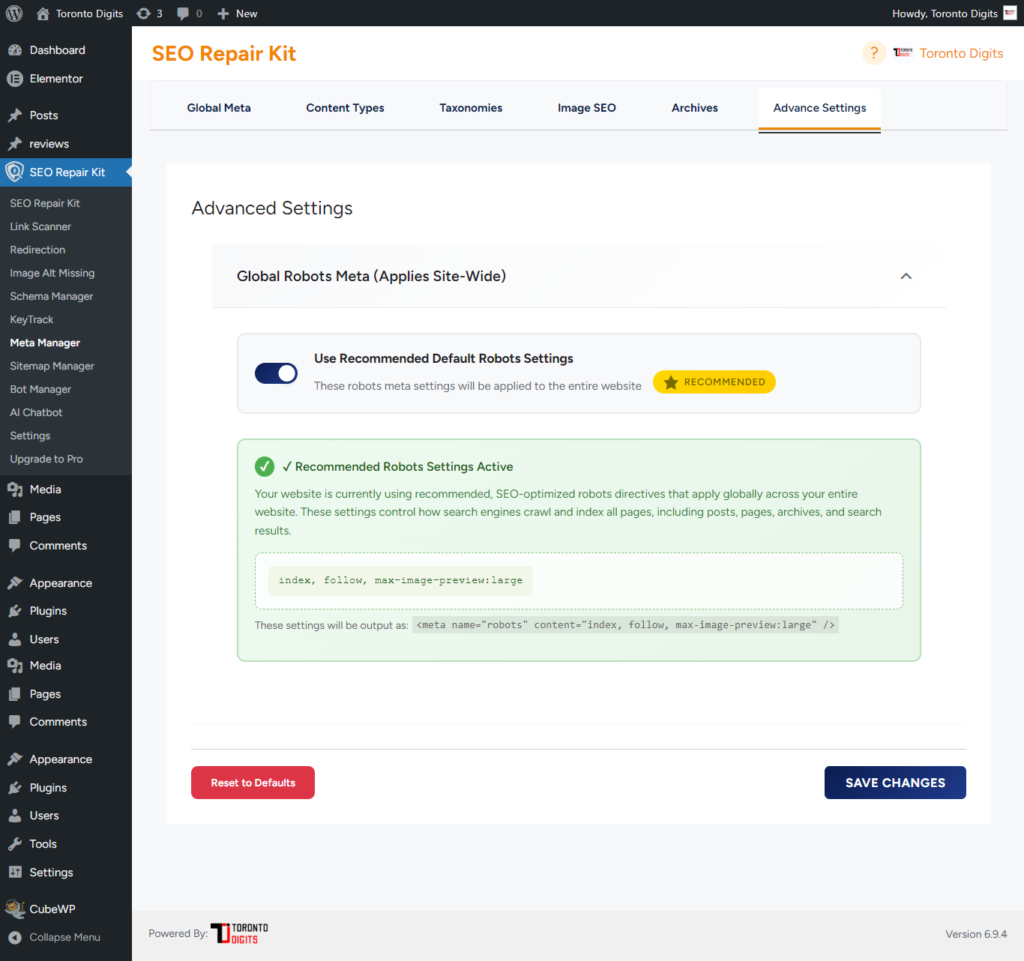
Step 6: Adjust Advanced Settings
Open Advanced Settings:
Set robots directives like:
noindex
nofollow
noarchive
Control preview limits:
max-snippet
max-image-preview
max-video-preview
These settings give deeper SEO control.
Meta manager Advance setting
Step 7: Save and Apply Settings
Click Save Settings to apply all configurations.
Meta Manager will now automatically generate metadata for your website.
Step 8: Customize Meta Per Page
While editing a post or page:
Scroll to the Meta Manager box
Add custom:
SEO title
Meta description
Canonical URL
Robots directives
Step 9: Use Search Preview
Check the search preview section:
See how your title and description appear
Adjust for better readability and CTR
Step 10: Maintain and Update SEO
Regularly update metadata when:
Publishing new content
Updating existing pages
Changing SEO strategy
This ensures consistent SEO performance.
Step By Step Guide
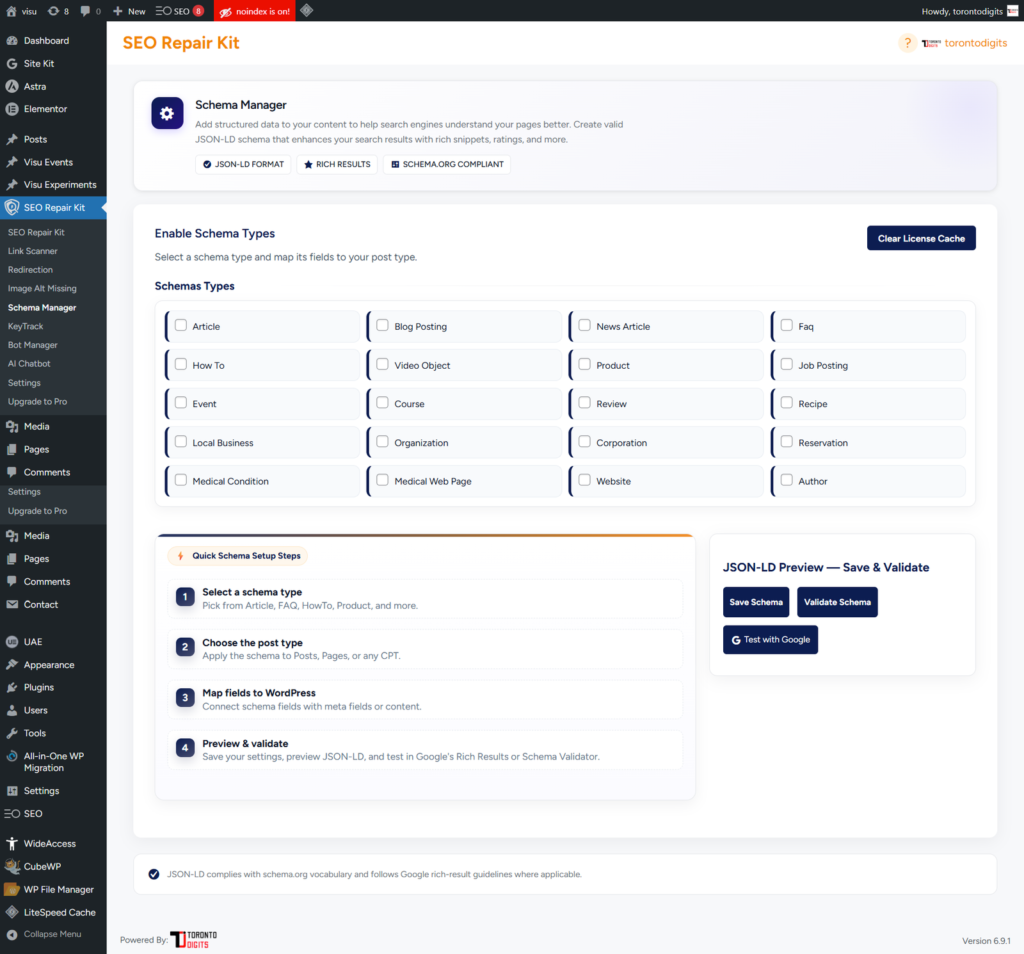
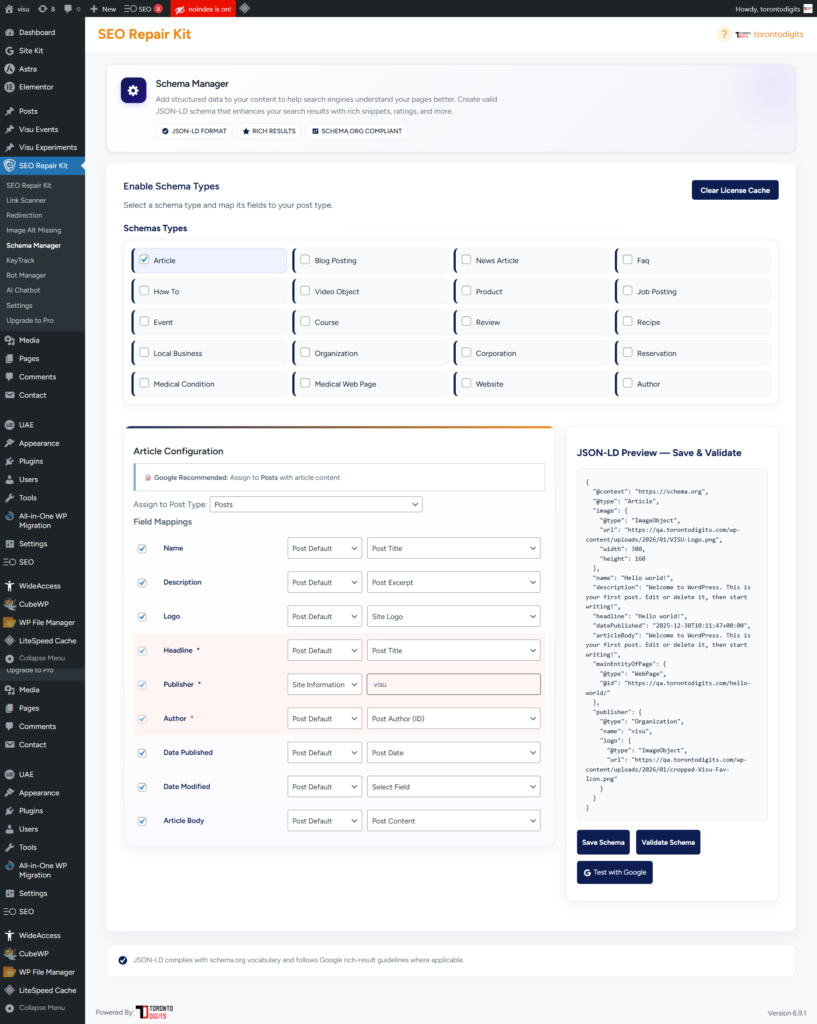
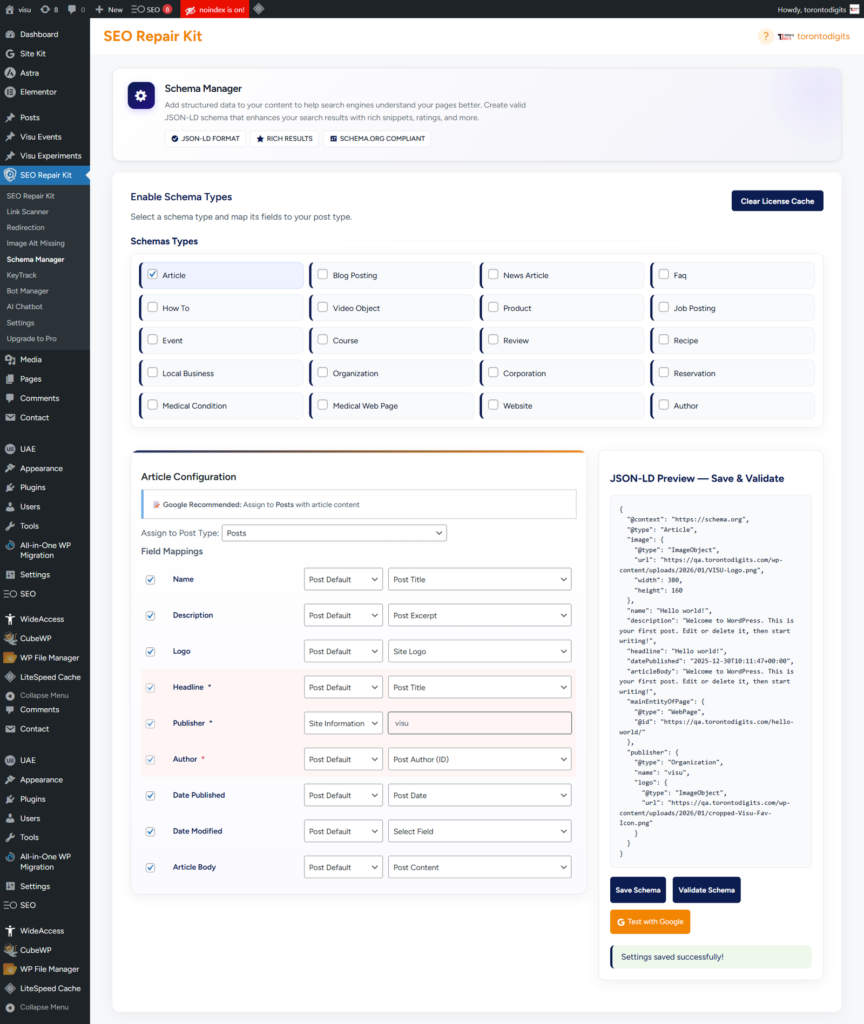
Step 1: Access the Schema Manager From your SEO Repair Kit dashboard, navigate to: SEO Repair Kit → Schema Manager This is your central workspace where you can create, manage, and deploy structured data (schema markup) across your website.
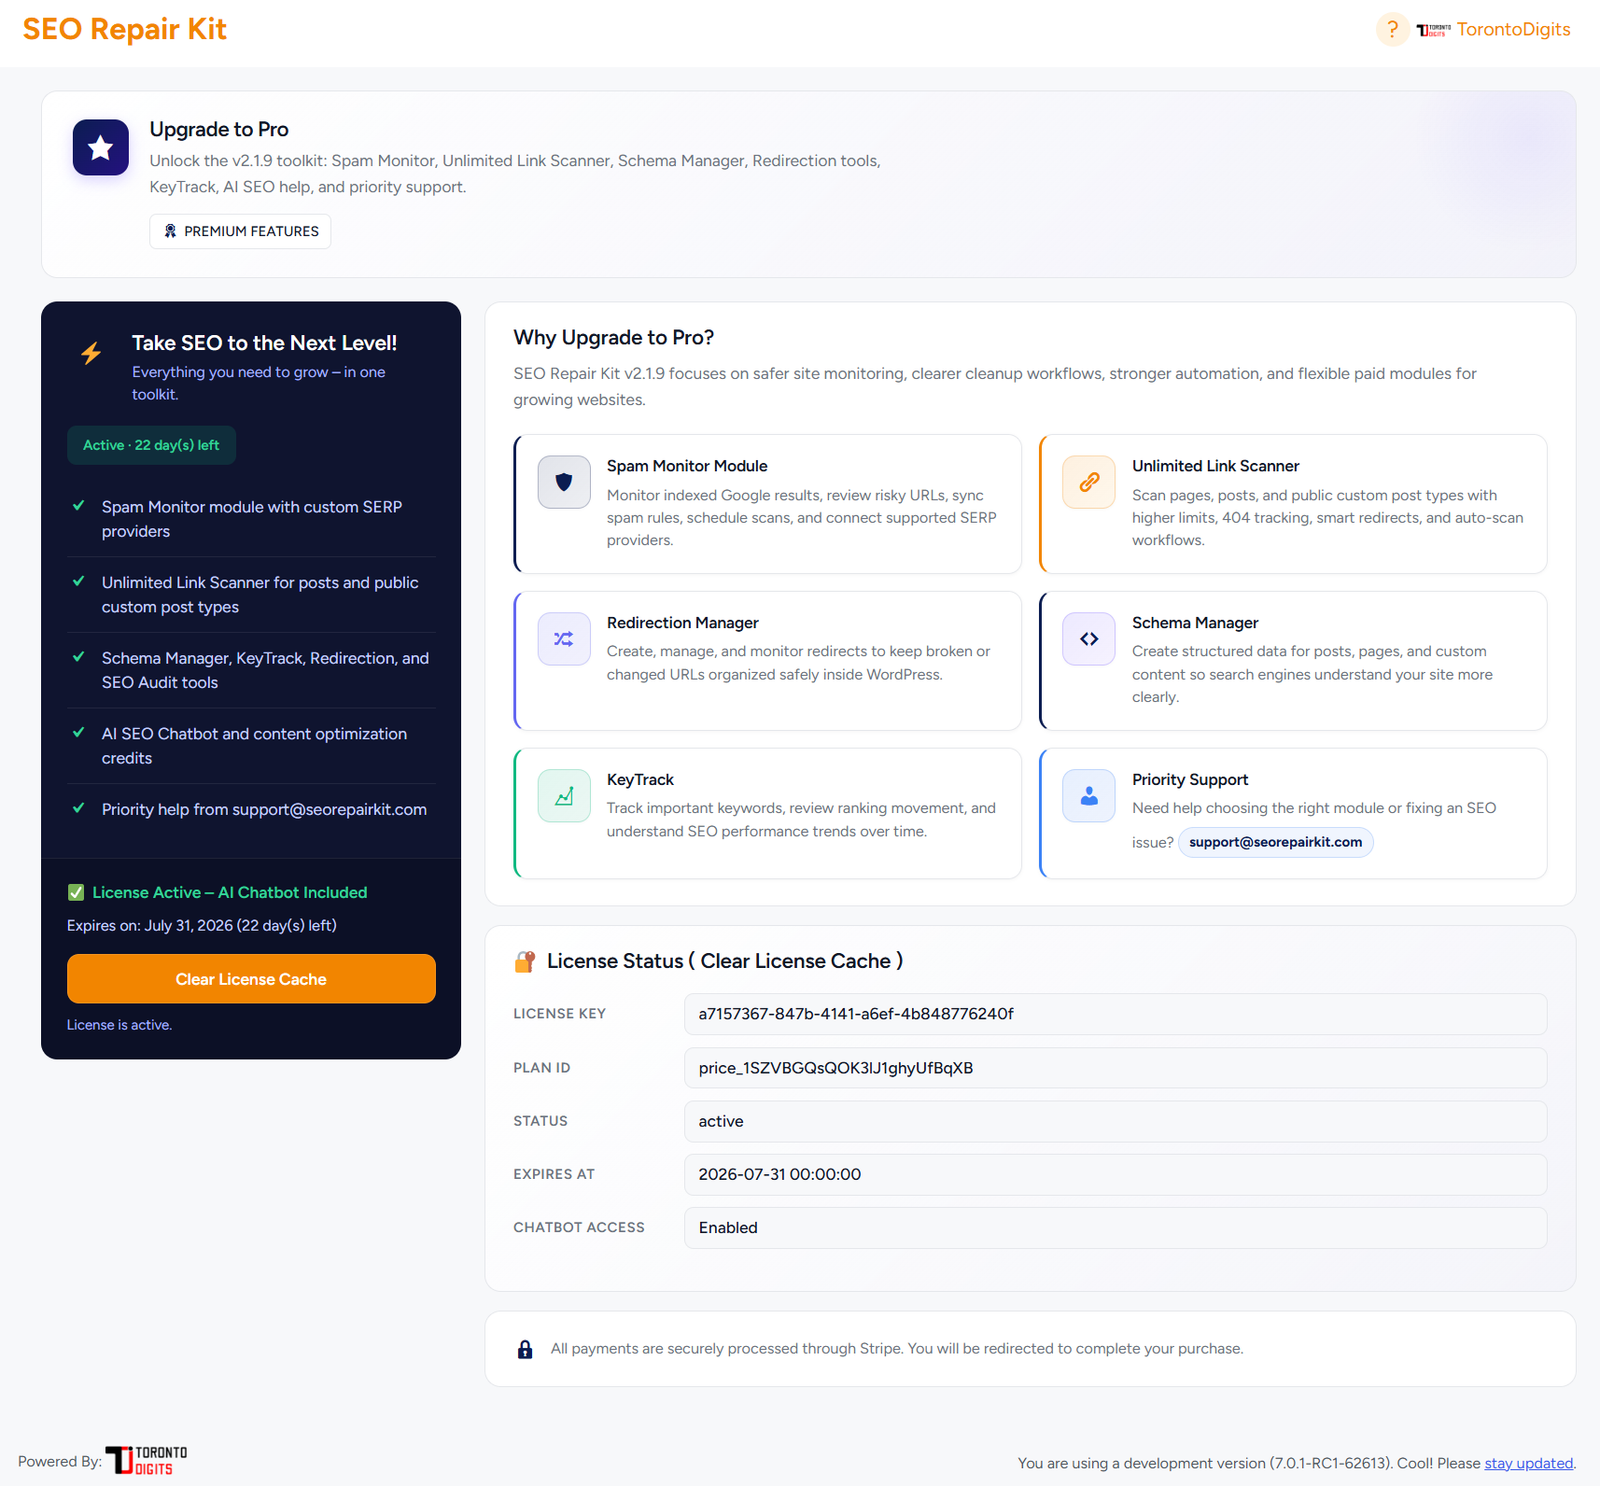
Step 2: Ensure Pro Feature is Active Schema Manager is a Pro feature, so make sure:
Your Pro license is activated
The feature is enabled in your plugin
Without activation, schema options will not be available.
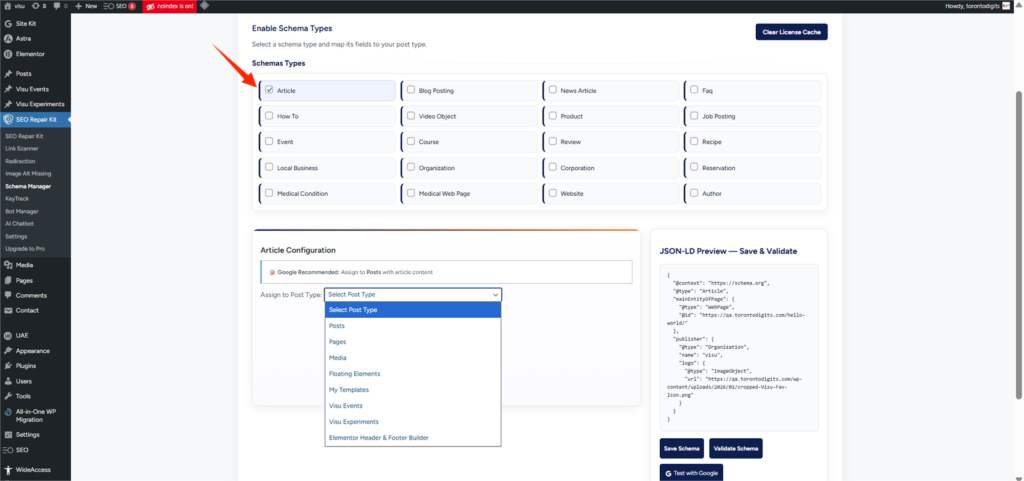
Step 3: Choose a Schema Type Click on “Add New Schema” or select an existing one. You’ll see 15+ supported schema types, such as:
Article FAQ Product Event Review Recipe Local Business Course Job Posting Video Object Select the schema type that best matches your content.
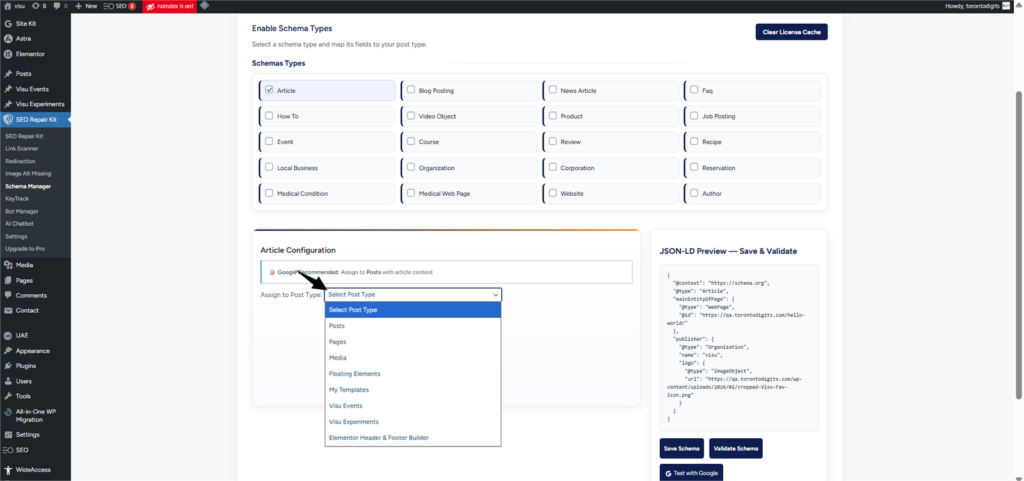
Step 4: Configure Schema Assignment Decide where the schema should be applied:
Posts
Pages
Custom Post Types
This ensures the correct schema appears only on relevant content.
Step 5: Map Content Fields Use the visual field mapper to connect your content with schema properties. For example:
Post Title → Headline
Featured Image → Image
Content → Description
This step ensures your schema pulls dynamic, accurate data automatically.
Step 6: Customize Schema Fields Enable or disable specific schema fields based on your needs:
Add custom values if required
Remove unnecessary fields
Adjust optional properties for better accuracy
This helps maintain clean and optimized structured data.
Step 7: Save Configuration Once everything is set:
Click Save Schema
The schema will now be automatically applied to selected content
No coding or manual insertion is required.
Step 8: Validate Your Schema After saving, test your schema using:
Google Rich Results Test
Schema validation tools
This confirms:
Your schema is eligible for rich results
No errors exist
Step by Step Guide
Using the Auto Scan Feature:
Step 1: Access the Auto Scan Tab From your SEO Repair Kit dashboard, navigate to the Auto Scan tab. This is where you configure and manage all automated scanning settings.
Step 2: Enable Automation Toggle the Enable Automation switch to ON.
Important: Automation must be enabled before any scheduled scans can run. Without this, no automatic scans will occur even if intervals are set.
Step 3: Choose Scan Interval Select how often you want Auto Scan to run
Daily – Scans every 24 hours
Every 3 days – Scans once every three days
Weekly – Scans once per week
Biweekly – Scans every two weeks
Monthly – Scans once per month
Choose based on how frequently your content changes or how often external links tend to break.
Step 4: Configure Scan Scope Select which content types to include in automated scans:
Posts – Include blog posts and articles
Pages – Include static pages
Other post types – Custom post types if supported
You can select one or multiple types. Scans will only check the content you specify.
Step 5: Set Scan Coverage & Batch Limits
Batch size – Number of links to process per batch (controls server load)
Links per post – Maximum links to scan per individual post/page
Request timeout – How long to wait for a link response before marking as failed
These settings help balance scan thoroughness with website performance.
Step 6: Enable Email Alerts (Optional) Toggle email alerts ON if you want to receive notifications when broken links are discovered. Enter the email address where alerts should be sent.
Step 7: Save Settings Click the Save Settings button. Your Auto Scan configuration is now active.
The system will begin running scans automatically based on your chosen interval from this point forward.
Step 8: Monitor Scan History After scans start running, return to the Auto Scan tab to review:
Last scan date and time – When the most recent scan completed
Scan history – List of all past automated scans with timestamps
Latest snapshot – Current link health summary from the most recent scan
Step 9: Review Broken Links Found When Auto Scan detects broken links, they appear in the broken links report (same as manual scan results). Each entry shows:
Post title and type
Broken link URL
HTTP status code (e.g., 404)
Link text
Options to fix or redirect
Step 10: Maintain Without Manual Effort Once configured, Auto Scan runs continuously on your selected schedule. You only need to:
Fix or redirect broken links when notified
Adjust settings if your scanning needs change
Otherwise, let automation handle the rest
Step By Step Guide
Open Spam Monitor.
Review the Dashboard.
Check Spam Rules.
Run a Google SERP Scan.
Review returned records and recent scans.
Use Search Console Cleanup for risky URLs.
Configure Alerts and Scheduled Spam Monitoring.
Step by Step Guide
Using the Link Scan
Step 1: Access Link Scan From your WordPress admin menu, go to SEO Repair Kit → Links Manager → Link Scan tab.
This is your main workspace for manually scanning, reviewing, and fixing broken links across your site.
Step 2: Review the Overview Cards At the top of the dashboard, you’ll see a quick summary of your site’s link health:
Card
What It Shows
Total Links Checked
How many links have been scanned during the current or last scan
Broken Links Detected
Total number and percentage of links returning errors (such as 404)
Healthy Links
Confirms how many links are working correctly
Automation Status
Indicates whether scans are being run manually or automatically
These cards give you an instant health check before diving into details.
Step 3: Select What You Want to Scan Use the Select Post Type dropdown to choose which content to scan, such as:
Posts
Pages
Custom post types (if available)
This lets you focus scans on specific areas of your website. For example, scan only Pages if that’s where you recently made changes.
Step 4: Start the Scan Click the Start Scan button to begin scanning the selected content.
During the scan:
The scanner checks internal and external links
Each link is tested for availability and error responses
Progress is shown in real time with a progress bar
Step 5: Monitor Scan Progress During the scan, a progress bar appears with status messages such as:
“Scanning… (45% complete)”
“Checking links in Posts…”
“Scan complete!”
Once finished, you’ll also see:
Total links scanned
Completion percentage
Time of the last scan
This confirms the scan has completed successfully.
Step 6: Review Broken Links Found Scroll down to the Broken Links Found table to see detailed results.
Each row includes:
Column
Description
Post Title
Where the broken link appears (click to edit)
Type
Content type (e.g., Post, Page)
Status
Publication status (Published, Draft, etc.)
Broken Link URL
The actual failing link address
HTTP Status Code
Error type (e.g., 404 Not Found)
Link Text
Anchor text used in the content
Redirect Action
Button to create a redirect for this link
Edit Icon
Quickly edit the source content
This table makes it easy to understand exactly where and why each issue exists.
Step 7: Fix or Redirect Broken Links
For each broken link, you can take action directly from the table:
Option 1: Edit the Link
Click the Edit icon (pencil) next to the broken link
You will be taken to the post/page editor
Update the broken URL to a correct working address
Save/Update the post
Option 2: Create a Redirect
Click the Redirect Action button
Enter the target URL (where visitors should go instead)
Select redirect type (301 Permanent or 302 Temporary)
Click Save — the redirect is created instantly
Option 3: Remove the Link
Click the Edit icon to go to the content
Delete or unlink the problematic URL
Save/Update the post
All actions are performed without writing any code.
Step 8: Export the Report (Optional) Click Download CSV to export the broken links report.
The CSV file includes:
Post title
Broken link URL
HTTP status code
Link text
And more
This is useful for:
Sharing with team members
Tracking fixes in a spreadsheet
Maintaining audit records for clients
Step 9: Re-scan to Confirm Fixes After fixing broken links, run another scan to confirm:
Errors are resolved
Your site is fully healthy
No new broken links exist
Regular re-scans help maintain strong SEO and user experience.
Step 10: Maintain Ongoing Link Health Run manual scans whenever you:
Publish new content
Update existing pages
Migrate or delete URLs
Before and after site migrations
This ensures broken links never silently damage your SEO again.
Step by Step Guide
Using the Smart Redirects
Step 1: Access Smart Redirects From your WordPress admin menu, go to SEO Repair Kit → Links Manager → Smart Redirects tab.
This is where you enable, manage, and monitor automatic redirects for broken content.
Step 2: Enable Smart Redirects for Post Types
In the Smart Redirects settings section, you’ll see a list of available post types:
Post Type
Toggle
What Happens When Enabled
Posts
ON/OFF
Deleted posts redirect to /blog/ (or your posts archive)
Pages
ON/OFF
Deleted pages redirect to page archive (if available)
Custom Post Types
ON/OFF
Deleted CPT items redirect to their archive page
To enable:
Locate the post type you want to protect
Toggle the switch to ON
Smart Redirects is now active for that content type
Example: If you enable Smart Redirects for Posts, whenever a blog post is deleted, visitors to that post’s URL will be automatically redirected to the main blog archive page.
Note: If a post type does not have an archive page, the toggle will be disabled or hidden.
Step 3: View Generated Redirect Records
Below the settings section, you’ll see a Generated Redirects table showing all automatically created Smart Redirects.
The table includes:
Column
Description
Source URL
The original broken URL (e.g., /blog/deleted-post/)
Target URL
Where visitors are redirected (e.g., /blog/)
Status
Active (working) or Inactive (paused)
Created Date
When the redirect was automatically generated
Actions
Buttons to edit, toggle, or delete
Step 4: Manage Individual Redirects
For each redirect in the table, you can perform these actions:
Toggle Status (Active/Inactive):
Click the Status toggle (or Active/Inactive button)
When Active – Redirect works normally
When Inactive – Redirect is paused; visitors see 404 instead
Use this to temporarily disable a redirect without deleting it
Delete a Redirect:
Click the Delete button (trash icon) next to the redirect
Confirm deletion
This removes the redirect record AND deletes the linked redirect from Redirection Manager
The redirect will no longer work
Step 5: Reset All Records
If you want to delete ALL Smart Redirects at once:
Click the Reset All Records button
Confirm that you want to delete every Smart Redirect
All redirect records are permanently removed
Smart Redirects will stop working for all post types until re-enabled or new redirects are generated
Use this when:
You’re restructuring your entire website
You want a fresh start with redirects
You’re migrating to a new URL structure
Step 6: Reset Records by Selected Post Type
If you want to delete Smart Redirects for only ONE content type:
Click the Reset by Post Type button
Select which post type from the dropdown (e.g., Posts only)
Confirm deletion
Only redirects for that specific post type are removed
Other post types’ Smart Redirects remain intact
Example: If you reset by “Posts”, all /blog/old-post/ → /blog/ redirects are deleted, but Product redirects still work.
Step 7: Manage Redirects in Redirection Manager
All Smart Redirects also appear in the main Redirection Manager:
Go to SEO Repair Kit → Redirection
You will see all Smart Redirects listed alongside your manual redirects
Smart Redirects are labeled or identifiable by their source/target pattern
From here, you can:
Edit the target URL
Change redirect type (301 to 302, etc.)
View hit counts and analytics
Delete or modify as needed
Note: Changes made in Redirection Manager will reflect back in Smart Redirects tab.
Step 8: Test That Smart Redirects Are Working
To verify Smart Redirects is functioning:
Delete a test post (or use an already deleted post)
Open an incognito/private browser window
Visit the deleted post’s URL directly (e.g., yoursite.com/blog/test-post/)
You should be automatically redirected to the archive page (yoursite.com/blog/)
Check that the redirect is a 301 (permanent) redirect
Step 9: Monitor and Maintain
Regular Checks: Periodically review the Generated Redirects table to see which redirects have been created
Clean Up: If you permanently remove an archive page, consider resetting redirects for that post type
Manual Overrides: If an automatic redirect isn’t appropriate for a specific URL, toggle it inactive or create a manual redirect instead
FAQs
Q1: What is a Bot Manager?
Bot Manager is a tool that lets you control how search engines and AI crawlers access your website — without editing files manually.
Q2: What is robots.txt?
robots.txt tells search engines which pages they can or cannot crawl. Bot Manager lets you manage it visually with SEO and security best practices.
Q3: What is llms.txt?
llms.txt is a discovery file for AI models, helping them understand what content they’re allowed to access and learn from.
Q4: Can I block AI bots like ChatGPT or Claude?
Yes. You can block or allow individual AI crawlers with one click — including ChatGPT, Claude, Google Bard, and more.
Q5: Does blocking bots affect SEO?
No. Blocking AI bots does not affect Google rankings. Bot Manager ensures search engines and AI crawlers are handled separately.
Q6: How does server-level blocking work?
Blocked bots receive a 403 Forbidden response, stopping them before they access your content — faster and more secure than file-based blocking alone.
Q7: Is this safe for non-technical users?
Absolutely. Everything is handled through a visual interface with real-time validation to prevent mistakes.
Q8: Will changes apply immediately?
Yes. Once saved, changes are applied instantly at the server and file level.
FAQs
What is a 404 error?
A 404 error occurs when a user or search engine tries to access a page that does not exist on the website. This usually happens when a page has been deleted, moved, or the URL was entered incorrectly.
Why are 404 errors important for SEO?
404 errors can negatively affect user experience and SEO performance if they occur frequently. Broken pages may prevent users from accessing content and can reduce the overall quality of your website in the eyes of search engines.
How does the 404 Monitor detect errors?
The 404 Monitor automatically tracks requests made to pages that do not exist. When WordPress returns a 404 status response, the plugin records the request and stores the information in the 404 Monitor logs.
Where can I find the 404 error logs?
You can view the detected 404 errors in your WordPress Dashboard by navigating to:
Dashboard → SEO Repair Kit → 404 Monitor
This page displays all logged 404 error requests.
What should I do when I find a 404 error?
When you detect a 404 error, you should first identify the cause. If the page has moved, you can create a redirect to the correct URL. If the link is incorrect, update it within your content. In some cases, restoring the missing page may also solve the issue.
How often should I check the 404 Monitor?
It is recommended to review the 404 Monitor logs regularly, especially after making major changes to your website such as updating URLs, removing pages, or restructuring content.
Regular monitoring helps ensure that broken links are resolved quickly.
Will fixing 404 errors improve my website?
Yes. Resolving broken links improves user experience, helps search engines crawl your website more efficiently, and supports better SEO performance.
FAQs
What is the difference between Links Manager and Link Scan? Link Manager is the parent section containing five tabs — Link Scan is just one of those tabs. Think of Links Manager as the hub and Link Scan as one tool inside it.
Do I need to use all five tabs in Links Manager? No. Use only what you need. If you only want manual scans, just use Link Scan. If you want automation, use Auto Scan. Each tab works independently.
Can I create redirects directly from Links Manager? Yes. Both the Link Scan tab and 404 Monitor tab allow you to create redirects with one click from problematic URLs.
How do I export broken links data? Go to the Link Scan tab, run a scan, then click the Download CSV button. The export includes all broken links found in that scan.
Does Links Manager scan external links as well as internal links? Yes. Link Scan checks both internal links (within your site) and external links (to other websites).
What is the difference between 404 Monitor and Link Scan? Link Scan proactively checks all links on your site for issues. 404 Monitor passively logs real visitor 404 errors as they happen. Use both for complete visibility.
How often should I check Links Manager? If Auto Scan and email alerts are enabled, you only need to check when you receive a broken link notification. Otherwise, check weekly or after publishing new content.
Can I access Redirection Manager from Links Manager? Links Manager allows you to create redirects, but for full redirect management (viewing all redirects, editing, deleting, tracking hits), go to SEO Repair Kit → Redirection.
Do Smart Redirects work automatically? Yes. Once enabled for a post type, Smart Redirects automatically create 301 redirects when posts are deleted — no manual action needed.
What happens to my data if I deactivate the plugin? Scan history, 404 logs, and notification records are stored in your database. They will remain if you deactivate and re-activate the plugin, unless you uninstall completely.
FAQs
1: What is Image ALT text?
ALT text is a description added to images that helps search engines and screen readers understand image content.
2: Does this feature scan all images automatically?
Yes. The system automatically scans your entire media library to detect images missing ALT attributes.
3: Will adding ALT text improve SEO?
Absolutely. ALT text improves image search visibility, strengthens page relevance, and enhances accessibility.
4: Do I need technical skills to use this feature?
No. The dashboard is designed for non-technical users and requires no coding.
5: Does the health score update automatically?
Yes. The health score updates in real time as images are optimized.
FAQ's
Do I need coding knowledge to use Meta Manager?
No. The feature is designed for beginners and requires no coding skills.
What happens if I don’t add custom metadata?
Meta Manager automatically applies global templates as fallback.
Can I set different SEO settings for posts and pages?
Yes. You can configure separate templates for each content type.
Does Meta Manager support custom post types?
Yes. It works with all supported post types in WordPress.
Can I control indexing of my pages?
Yes. You can set robots directives like index, noindex, follow, and nofollow.
Is there a preview of search results?
Yes. You can see a live preview of how your page appears in search engines.
Can I override settings for individual pages?
Absolutely. Each post/page can have custom SEO metadata.
Does it work with page builders like Elementor?
Yes. Meta Manager integrates with Elementor and Gutenberg editors.
What are dynamic variables in Meta Manager?
They are placeholders like %title% and %site_title% used to automatically generate metadata.
Why is Meta Manager important for SEO?
It ensures your website has optimized, consistent metadata, improving rankings and visibility.
FAQ's
1. What is schema markup? Structured data for search engines.
2. Do I need coding knowledge? No.
3. What formats are supported? JSON-LD.
4. Can I use multiple schemas? Yes.
5. Does it improve rankings? Indirectly through better visibility.
6. What is FAQ schema? Displays questions in search results.
7. Can I edit schema later? Yes.
8. Is validation required? Highly recommended.
9. Does it support all post types? Yes.
10. Is it automatic? Yes, after configuration.
FAQs
Do I need to manually start scans with Auto Scan? No. Once you enable automation and save your settings, scans run automatically according to your chosen interval. No manual intervention is required.
What happens if I don’t enable automation? Scheduled scans will not run. Automation must be turned ON for Auto Scan to function. You can still run manual scans from the Link Scanner tab.
Can I change the scan interval after saving settings? Yes. You can return to the Auto Scan tab anytime to adjust the interval, scope, batch limits, or any other setting. Just save again after making changes.
Will Auto Scan slow down my website? No. Auto Scan processes links in batches with configurable limits. You can adjust batch size and request timeout to minimize server load.
How do I know if broken links were found? You can check the broken links report in the dashboard. If you enabled email alerts, you will also receive notifications when broken links are detected.
Does Auto Scan store past scan results? Yes. Scan history is stored so you can see when previous scans ran and review their results. The latest scan snapshot is also kept for quick reference.
Can I run manual scans while Auto Scan is enabled? Absolutely. Auto Scan does not prevent you from running manual scans anytime you want. Both can work alongside each other.
What if I don’t want to scan everything automatically? You can limit the scan scope to specific post types (e.g., only Pages, not Posts). This gives you control over exactly what content is scanned automatically.
FAQs
Q: Is Spam Monitor a security scanner? A: It is an indexed-spam and SERP risk monitoring tool, not a full malware scanner.
Q: Does it delete spam automatically? A: No. It helps you detect and review risky indexed URLs.
Q: Is Spam Monitor free? A: Free users may use trial provider access. Full module features may require a paid plan.
FAQs
Do I need technical knowledge to use Link Scan? No. Link Scan is built for non-technical users and requires no coding or advanced setup. Just click buttons and follow the on-screen instructions.
Does Link Scan check both internal and external links? Yes. It scans and reports both internal links (within your website) and external links (to other websites).
Will broken links affect my SEO? Yes. Broken links can negatively impact search engine rankings and user experience. Fixing them helps maintain strong SEO performance.
How long does a scan take? Scan time depends on your site size. Small sites (under 100 links) take seconds. Large sites with thousands of links may take a few minutes.
How often should I run a scan? You can run scans anytime, but it’s recommended to scan regularly — especially after updating content or publishing new pages. A weekly manual scan is a good habit.
Can I fix links directly from the report? Absolutely. The report allows you to quickly edit, update, or redirect broken links in just a few clicks.
What HTTP status codes are considered broken? Link Scan marks any link returning an error code as broken, including:
404 (Not Found)
403 (Forbidden)
500 (Internal Server Error)
502 (Bad Gateway)
Any other error outside the 200-399 range
What is the difference between fixing and redirecting a link?
Fixing – You edit the content and change the URL to a working address
Redirecting – You keep the content as-is but create a redirect that sends visitors from the broken URL to a working URL
Can I scan only specific content types? Yes. Use the Select Post Type dropdown to focus scans on Posts, Pages, or custom post types.
Will scanning slow down my website? No. Link Scan processes links in batches and has minimal impact on site performance.
What is the CSV export for? The CSV export allows you to share broken link reports with team members, track fixes in a spreadsheet, or maintain audit records for client reporting.
What if no broken links are found? That’s good news! The table will be empty, and you’ll see 0 broken links in the overview cards.
FAQs
What happens when I delete a post with Smart Redirects enabled? Smart Redirects automatically creates a 301 redirect from the deleted post URL to its post type archive page (e.g., /blog/deleted-post/ → /blog/). Visitors never see a 404 error.
Can Smart Redirects work with pages? Yes, but only if your theme has a page archive page. Most WordPress themes do NOT have page archives by default. If page archive doesn’t exist, Smart Redirects cannot be enabled for pages.
What if my post type doesn’t have an archive? Post types without archive pages cannot use Smart Redirects. You’ll need to create manual redirects for those content types instead.
What type of redirect does Smart Redirects use? Smart Redirects uses 301 (Permanent) redirects. This is the SEO-friendly redirect type that passes link equity (PageRank) to the target URL.
Can I manually override a Smart Redirect? Yes. You have several options:
Toggle the redirect to Inactive (pauses it)
Delete the redirect record entirely
Create a manual redirect in Redirection Manager that overrides it
Edit the target URL in Redirection Manager
Will Smart Redirects redirect to the exact archive page of the deleted post? Yes. If you delete a post in the “News” category, it redirects to the main news archive (/news/), not to a category-specific archive.
Do Smart Redirects work for posts that were deleted before enabling the feature? No. Smart Redirects only works for URLs that become broken AFTER the feature is enabled. Already-deleted posts will not automatically get redirects.
How do I stop Smart Redirects from creating a specific redirect? Go to the Generated Redirects table, find that redirect, and either:
Toggle its status to Inactive (keeps record but stops redirect)
Delete the redirect record (permanently removes it)
Can I see how many people use a Smart Redirect? Yes. Go to SEO Repair Kit → Redirection and view the hit count column for each redirect. This shows how many times each Smart Redirect has been used.
What happens to Smart Redirects if I uninstall the plugin? Smart Redirects are stored in your WordPress database. If you uninstall the plugin, the redirects will stop working. If you reinstall, they should work again (unless you chose to delete all data during uninstall).
Can I use Smart Redirects AND manual redirects for the same URL? Yes, but the redirect that executes first (usually the most specific match) will take priority. It’s best to avoid duplicate redirects.
What is the difference between Reset All Records and Reset by Post Type?
Reset All Records – Deletes EVERY Smart Redirect for ALL post types
Reset by Post Type – Deletes Smart Redirects for only ONE specific post type (e.g., only Posts, leaving Products untouched)
Will resetting records delete the redirects? Yes. Reset actions permanently delete Smart Redirect records AND remove the corresponding redirects from Redirection Manager. These actions cannot be undone.
Does Smart Redirects work with custom post types? Yes, as long as the custom post type has has_archive set to true when it was registered. Most custom post types support archives.
What should I do if my archive page URL changes? If you change your archive page URL (e.g., from /blog/ to /news/), existing Smart Redirects will still point to the old URL. You’ll need to either:
Reset and regenerate redirects
Manually update target URLs in Redirection Manager
Step 1: Access Links Manager From your WordPress admin menu, go to SEO Repair Kit → Links Manager.
You will see five tabs at the top: Link Scan, 404 Monitor, Auto Scan, Notifications, and Smart Redirects.
Step 2: Run a Link Scan
Click the Link Scan tab
Review the overview cards showing total links checked, broken links detected, healthy links, and automation status
Use the Select Post Type dropdown to choose which content to scan (Posts, Pages, or custom post types)
Click Start Scan
Wait for the progress bar to complete
Scroll down to the Broken Links Found table to see results
For any broken link, click Edit (to fix in content) or Redirect (to create a 301 redirect)
Optional: Click Download CSV to export the report
Step 3: Monitor 404 Errors
Click the 404 Monitor tab
Review the table of all 404 errors with hit counts and last accessed timestamps
Click on the Hit Count column to sort by most frequent 404s first
For any 404 error, click Create Redirect
Enter the target URL (where visitors should go)
Select redirect type (301 Permanent or 302 Temporary)
Click Save
Step 4: Schedule Automatic Scans
Click the Auto Scan tab
Toggle Enable Automation to ON
Choose a scan interval: Daily, Every 3 days, Weekly, Biweekly, or Monthly
Configure scan settings:
Batch size (recommended: 20-50 for shared hosting)
Links per post
Request timeout (recommended: 5-10 seconds)
Select which post types to include
Toggle Email Alerts ON and enter recipient email address (optional)
Click Save Settings
Step 5: Review Notifications History
Click the Notifications tab
View the alert history table showing:
Date and time of each email sent
Scan trigger type (manual or automated)
Total links checked
Broken links found
Email status (sent/failed)
Use this history to track when issues were first detected
Step 6: Enable Smart Redirects
Click the Smart Redirects tab
Toggle ON for each post type you want to automatically redirect (e.g., Posts, Pages, custom post types)
View generated redirects in the table showing source URL and target archive URL
For individual redirects, toggle status (active/inactive) or delete
Optional: Use Reset All Records or Reset by Post Type to clear redirects
Step 7: Create Redirects from Scan Results
From either Link Scan or 404 Monitor:
Locate the problematic URL in the results table
Click the Redirect button
Enter the target URL
Select redirect type
Save — the redirect will appear in Redirection Manager
Step 8: Export Scan Reports
From the Link Scan tab after any scan:
Click Download CSV
The file includes: post title, broken link URL, HTTP status code, link text, and more
Use for team sharing, client reports, or audit records
Step 9: Maintain Ongoing Link Health
Run manual scans after publishing new content
Check 404 Monitor weekly for frequent errors
Review Auto Scan history to confirm scans are running
Enable email alerts so you never miss broken links
Re-scan after fixing issues to verify resolution
FAQs
What is the difference between Links Manager and Link Scan? Link Manager is the parent section containing five tabs — Link Scan is just one of those tabs. Think of Links Manager as the hub and Link Scan as one tool inside it.
Do I need to use all five tabs in Links Manager? No. Use only what you need. If you only want manual scans, just use Link Scan. If you want automation, use Auto Scan. Each tab works independently.
Can I create redirects directly from Links Manager? Yes. Both the Link Scan tab and 404 Monitor tab allow you to create redirects with one click from problematic URLs.
How do I export broken links data? Go to the Link Scan tab, run a scan, then click the Download CSV button. The export includes all broken links found in that scan.
Does Links Manager scan external links as well as internal links? Yes. Link Scan checks both internal links (within your site) and external links (to other websites).
What is the difference between 404 Monitor and Link Scan? Link Scan proactively checks all links on your site for issues. 404 Monitor passively logs real visitor 404 errors as they happen. Use both for complete visibility.
How often should I check Links Manager? If Auto Scan and email alerts are enabled, you only need to check when you receive a broken link notification. Otherwise, check weekly or after publishing new content.
Can I access Redirection Manager from Links Manager? Links Manager allows you to create redirects, but for full redirect management (viewing all redirects, editing, deleting, tracking hits), go to SEO Repair Kit → Redirection.
Do Smart Redirects work automatically? Yes. Once enabled for a post type, Smart Redirects automatically create 301 redirects when posts are deleted — no manual action needed.
What happens to my data if I deactivate the plugin? Scan history, 404 logs, and notification records are stored in your database. They will remain if you deactivate and re-activate the plugin, unless you uninstall completely.
Alt Text Manager helps find images without alt text.
Use it to:
Identify missing alt text
Review images
Update alt text
Improve accessibility and image SEO
Introduction
Image Alt Text is an essential feature for improving both the accessibility and SEO of your website. By adding descriptive alternative text to your images, you help search engines index your content more effectively and ensure that users with visual impairments can understand what the images represent.
In the SEO Repair Kit plugin, you can easily review images that lack alt text and manually assign descriptive text to them, making sure your website adheres to SEO best practices.
How to use
Open Alt Text Manager.
Filter images by missing alt text.
Add clear, descriptive alt text.
Save updates.
Best practice
Describe the image naturally. Avoid keyword stuffing.
Step By Step Guide
Step 1: Open the Image ALT Text Manager
From the WordPress admin panel, go to:
SEO Repair Kit → Image Alt Missing
This opens the Image ALT Text dashboard.
Step 2: Review the Overview Metrics
At the top of the dashboard, you’ll see key summary cards:
Total Images Displays the total number of images in your media library.
Missing ALT Text Shows how many images require optimization.
With ALT Text Confirms how many images are already optimized.
Health Score A percentage score representing your overall ALT text optimization status.
These metrics help you quickly assess image SEO health.
Step 3: Filter Images by ALT Status
Use the filter buttons to manage images efficiently:
All – View all images
Missing Alt – Show only images without ALT text
Has Alt – Display images already optimized
This allows you to focus only on images that need attention.
Step 4: Browse the Image Library
Scroll through the image cards in the Image Library section. Each image card shows:
Image preview
Image title
Upload date
ALT text status indicator
Images missing ALT text are clearly highlighted.
Step 5: Add ALT Text to an Individual Image
Click Add Alt Text on any image card.
Enter a clear, descriptive ALT text
Keep it concise and relevant
Include keywords naturally where appropriate
Save the changes to instantly update the image.
Step 6: Monitor Optimization Progress
As ALT text is added:
The Missing ALT Text count decreases
The count of ALT Text increases
The Health Score improves in real time
This provides immediate feedback on your optimization progress.
Step 7: Maintain Ongoing Image Optimization
Revisit the Image ALT Text Manager regularly—especially after uploading new images—to ensure all visuals remain optimized for SEO and accessibility.
FAQs
1: What is Image ALT text?
ALT text is a description added to images that helps search engines and screen readers understand image content.
2: Does this feature scan all images automatically?
Yes. The system automatically scans your entire media library to detect images missing ALT attributes.
3: Will adding ALT text improve SEO?
Absolutely. ALT text improves image search visibility, strengthens page relevance, and enhances accessibility.
4: Do I need technical skills to use this feature?
No. The dashboard is designed for non-technical users and requires no coding.
5: Does the health score update automatically?
Yes. The health score updates in real time as images are optimized.
This guide explains how to use the 404 Monitor in the SEO Repair Kit plugin to identify and manage broken URLs on your website.
Follow the steps below to monitor and analyze 404 errors.
Step 1 – Access the 404 Monitor
Log in to your WordPress Admin Dashboard.
In the left navigation menu, locate SEO Repair Kit.
Click on 404 Monitor.
Navigation path: Dashboard → SEO Repair Kit → 404 Monitor
Step 2 – View the 404 Error Logs
The 404 Monitor dashboard displays a list of all detected broken URLs on your website.
Each entry in the list represents a 404 error request that has been recorded by the plugin when a user or search engine attempts to access a page that does not exist.
For every logged error, the system provides several important details to help you understand the issue.
The URL field shows the page address that returned the 404 error.
The Referrer indicates the page where the broken link originated. This helps identify whether the error is coming from an internal page on your website or an external source.
The Hits value represents how many times the broken URL has been accessed. A higher number of hits may indicate that the issue needs immediate attention.
The Last Accessed information shows the most recent time the error occurred.
Step 3 – Identify the Source of the Error
After reviewing the error logs, the next step is to determine why the 404 error is occurring.
You can identify the source of the problem by checking the Referrer information and the requested URL. This helps you understand where the broken link originated and what might be causing the issue.
In many cases, 404 errors occur because a page has been deleted, the URL structure has changed, or a link was entered incorrectly.
Common causes of 404 errors include:
Internal links pointing to pages that no longer exist
External websites linking to incorrect URLs
Pages that were moved without setting up a redirect
Typographical errors in URLs
Old URLs still indexed by search engines
Step 4 – Fix the Broken URL
Once you understand the cause of the error, you can take the appropriate action to resolve it.
If the broken link is coming from inside your website, you can edit the content and update the link with the correct URL.
If the page has been moved or renamed, it is recommended to create a redirect from the old URL to the new one. Redirects ensure that visitors and search engines are automatically sent to the correct page.
In some cases, the page may have been deleted accidentally. If the content is still important, you may choose to restore or recreate the page.
Taking the correct action will help prevent visitors from encountering broken pages and will maintain a better user experience.
Step 5 – Monitor and Maintain
After fixing the issue, it is important to continue monitoring the 404 Monitor logs.
Regularly checking the logs allows you to detect new broken links and resolve them quickly. This practice helps maintain the overall health of your website.
By monitoring 404 errors consistently, you can:
Improve user experience
Maintain better SEO performance
Prevent search engines from indexing broken pages
Keep your website structure clean and organized
FAQs
What is a 404 error?
A 404 error occurs when a user or search engine tries to access a page that does not exist on the website. This usually happens when a page has been deleted, moved, or the URL was entered incorrectly.
Why are 404 errors important for SEO?
404 errors can negatively affect user experience and SEO performance if they occur frequently. Broken pages may prevent users from accessing content and can reduce the overall quality of your website in the eyes of search engines.
How does the 404 Monitor detect errors?
The 404 Monitor automatically tracks requests made to pages that do not exist. When WordPress returns a 404 status response, the plugin records the request and stores the information in the 404 Monitor logs.
Where can I find the 404 error logs?
You can view the detected 404 errors in your WordPress Dashboard by navigating to:
Dashboard → SEO Repair Kit → 404 Monitor
This page displays all logged 404 error requests.
What should I do when I find a 404 error?
When you detect a 404 error, you should first identify the cause. If the page has moved, you can create a redirect to the correct URL. If the link is incorrect, update it within your content. In some cases, restoring the missing page may also solve the issue.
How often should I check the 404 Monitor?
It is recommended to review the 404 Monitor logs regularly, especially after making major changes to your website such as updating URLs, removing pages, or restructuring content.
Regular monitoring helps ensure that broken links are resolved quickly.
Will fixing 404 errors improve my website?
Yes. Resolving broken links improves user experience, helps search engines crawl your website more efficiently, and supports better SEO performance.
Click on Sign in with Google for Connect with Site Kit.
Step 3: Email Selection
Set up Email alerts if you want to be notified of any significant changes.
Now select Email and continue to the next step.
Step 4: KeyTrack Configuration
Select all 3 Checkboxes to Configure.
Now Allow us to go another Step.
Now select the Next button.
Now Select Go to my Dashboard.
Now you can select Go to SEO Kit KeyTrack.
Now you’ll enter in the KeyTrack Feature.
Step 5: KeyTrack Dashboard
The KeyTrack Dashboard helps you see how your website performs on Google Search in a single screen. It shows your clicks, traffic, keywords, and rankings in easy charts and tables.
Follow these steps to view and understand your dashboard.
Open the Dashboard
Go to your WordPress Admin
Click SEO Repair Kit → KeyTrack → Overview
This will open the main KeyTrack dashboard.
Check the Performance Summary At the top, you will see 4 important numbers:
Total Clicks → How many people visited your site from Google
Total Impressions → How many times your site appeared in search results
Average CTR → Percentage of people who clicked your site
Average Position → Your average ranking on Google
These numbers give you a quick overview of your SEO performance.
View the Performance Chart Below the summary, you’ll see a graph. This chart shows:
Clicks
Impressions
CTR
Position
Use it to:
Track traffic growth
Notice drops
Find spikes after updates or changes
You can also change the date range (like last 7 days or 28 days) to compare results.
Check Top Pages Scroll down to Top Pages. Here you can see:
Which pages get the most clicks
How many impressions they have
Their ranking position
This helps you:
Find your best pages
Improve low-performing pages
Check Top Queries (Keywords) Next, go to Top Queries. This shows:
Keywords people search for
How many clicks each keyword gets
Their rankings
Use this to:
Discover popular keywords
Optimize your content
Target new keyword opportunities
That’s it!
The KeyTrack Dashboard makes it easy to monitor your SEO without leaving WordPress.
Check it regularly to track progress and improve your ranking
FAQs
1. What data sources does KeyTrack Configuration use?
KeyTrack primarily uses data from Google Search Console and search engine results (like Google rankings). It collects metrics such as keyword position, impressions, and CTR directly from these sources.
2. How many keywords can I track simultaneously?
There is usually no strict fixed limit, but it depends on your plan or system capacity. In general:
Small setups: hundreds of keywords
Medium/large projects: thousands or even unlimited tracking
3. Can I receive alerts for keyword position drops?
Yes. Most keyword tracking systems (including setups like KeyTrack) allow:
Alerts for ranking drops or gains
Notifications when keywords move significantly This helps you react quickly to SEO changes.
Schema Manager helps you create structured data for search engines.
Use it to create schema such as:
Article
News Article
Blog Posting
FAQ
Product
Event
Course
JobPosting
Review
Recipe
Local Business
Organization
Website
Author
Medical Condition
How it Work
Open Schema Manager.
Choose schema type.
Fill required fields.
Map fields to content where needed.
Preview the schema.
Validate with Google Rich Results or Schema Validator.
Save.
Best practice
Only add schema that matches visible page content. Incorrect schema can hurt trust and rich result eligibility.
Step By Step Guide
Step 1: Access the Schema Manager From your SEO Repair Kit dashboard, navigate to: SEO Repair Kit → Schema Manager This is your central workspace where you can create, manage, and deploy structured data (schema markup) across your website.
Step 2: Ensure Pro Feature is Active Schema Manager is a Pro feature, so make sure:
Your Pro license is activated
The feature is enabled in your plugin
Without activation, schema options will not be available.
Step 3: Choose a Schema Type Click on “Add New Schema” or select an existing one. You’ll see 15+ supported schema types, such as:
Article FAQ Product Event Review Recipe Local Business Course Job Posting Video Object Select the schema type that best matches your content.
Step 4: Configure Schema Assignment Decide where the schema should be applied:
Posts
Pages
Custom Post Types
This ensures the correct schema appears only on relevant content.
Step 5: Map Content Fields Use the visual field mapper to connect your content with schema properties. For example:
Post Title → Headline
Featured Image → Image
Content → Description
This step ensures your schema pulls dynamic, accurate data automatically.
Step 6: Customize Schema Fields Enable or disable specific schema fields based on your needs:
Add custom values if required
Remove unnecessary fields
Adjust optional properties for better accuracy
This helps maintain clean and optimized structured data.
Step 7: Save Configuration Once everything is set:
Click Save Schema
The schema will now be automatically applied to selected content
No coding or manual insertion is required.
Step 8: Validate Your Schema After saving, test your schema using:
Google Rich Results Test
Schema validation tools
This confirms:
Your schema is eligible for rich results
No errors exist
FAQ's
1. What is schema markup? Structured data for search engines.
2. Do I need coding knowledge? No.
3. What formats are supported? JSON-LD.
4. Can I use multiple schemas? Yes.
5. Does it improve rankings? Indirectly through better visibility.
6. What is FAQ schema? Displays questions in search results.
Auto Scan lets SEO Repair Kit scan links automatically on a schedule.
Use it to:
Schedule recurring link scans
Choose scan frequency
Choose scan scope
Choose post types
Set batch size and request timeout
Send automatic email reports
How to use
Open Links Manager.
Go to Auto Scan.
Enable automatic scans.
Select frequency, such as daily, every 3 days, weekly, biweekly, or monthly.
Choose what content should be scanned.
Save settings.
Free access note
Free Link Scanner access may be limited to Pages and a limited number of links per run.
Step by Step Guide
Using the Auto Scan Feature:
Step 1: Access the Auto Scan Tab From your SEO Repair Kit dashboard, navigate to the Auto Scan tab. This is where you configure and manage all automated scanning settings.
Step 2: Enable Automation Toggle the Enable Automation switch to ON.
Important: Automation must be enabled before any scheduled scans can run. Without this, no automatic scans will occur even if intervals are set.
Step 3: Choose Scan Interval Select how often you want Auto Scan to run
Daily – Scans every 24 hours
Every 3 days – Scans once every three days
Weekly – Scans once per week
Biweekly – Scans every two weeks
Monthly – Scans once per month
Choose based on how frequently your content changes or how often external links tend to break.
Step 4: Configure Scan Scope Select which content types to include in automated scans:
Posts – Include blog posts and articles
Pages – Include static pages
Other post types – Custom post types if supported
You can select one or multiple types. Scans will only check the content you specify.
Step 5: Set Scan Coverage & Batch Limits
Batch size – Number of links to process per batch (controls server load)
Links per post – Maximum links to scan per individual post/page
Request timeout – How long to wait for a link response before marking as failed
These settings help balance scan thoroughness with website performance.
Step 6: Enable Email Alerts (Optional) Toggle email alerts ON if you want to receive notifications when broken links are discovered. Enter the email address where alerts should be sent.
Step 7: Save Settings Click the Save Settings button. Your Auto Scan configuration is now active.
The system will begin running scans automatically based on your chosen interval from this point forward.
Step 8: Monitor Scan History After scans start running, return to the Auto Scan tab to review:
Last scan date and time – When the most recent scan completed
Scan history – List of all past automated scans with timestamps
Latest snapshot – Current link health summary from the most recent scan
Step 9: Review Broken Links Found When Auto Scan detects broken links, they appear in the broken links report (same as manual scan results). Each entry shows:
Post title and type
Broken link URL
HTTP status code (e.g., 404)
Link text
Options to fix or redirect
Step 10: Maintain Without Manual Effort Once configured, Auto Scan runs continuously on your selected schedule. You only need to:
Fix or redirect broken links when notified
Adjust settings if your scanning needs change
Otherwise, let automation handle the rest
FAQs
Do I need to manually start scans with Auto Scan? No. Once you enable automation and save your settings, scans run automatically according to your chosen interval. No manual intervention is required.
What happens if I don’t enable automation? Scheduled scans will not run. Automation must be turned ON for Auto Scan to function. You can still run manual scans from the Link Scanner tab.
Can I change the scan interval after saving settings? Yes. You can return to the Auto Scan tab anytime to adjust the interval, scope, batch limits, or any other setting. Just save again after making changes.
Will Auto Scan slow down my website? No. Auto Scan processes links in batches with configurable limits. You can adjust batch size and request timeout to minimize server load.
How do I know if broken links were found? You can check the broken links report in the dashboard. If you enabled email alerts, you will also receive notifications when broken links are detected.
Does Auto Scan store past scan results? Yes. Scan history is stored so you can see when previous scans ran and review their results. The latest scan snapshot is also kept for quick reference.
Can I run manual scans while Auto Scan is enabled? Absolutely. Auto Scan does not prevent you from running manual scans anytime you want. Both can work alongside each other.
What if I don’t want to scan everything automatically? You can limit the scan scope to specific post types (e.g., only Pages, not Posts). This gives you control over exactly what content is scanned automatically.
Link Scan checks all internal and external links on your website to identify broken, redirected, or problematic URLs. It gives you a complete view of your site’s link health from one place — inside the Links Manager tab.
Introduction to Link Scan: As your website grows, links naturally break or become outdated. Pages get deleted, URLs change, and external websites shut down. Manually checking every link is impossible for larger sites. Link Scan automates this process, scanning all your content and presenting results in an easy-to-understand report.
Why It Matters: Broken links frustrate visitors, increase bounce rates, and harm SEO rankings. Link Scan helps you find and fix these issues before they damage your site’s reputation or search visibility. By identifying broken links early, you create a smoother browsing experience and maintain a healthy, professional website.
What You Can Do with Link Scan:
Scan selected post types (Posts, Pages, custom post types)
Review link URLs, HTTP status codes, and link context
See where each broken link appears (post title, link text)
Export broken links report to CSV
Create redirects directly from scan results
Edit source content to fix broken links
Requirements:
SEO Repair Kit plugin installed and activated
Post types selected for scanning in Settings
Active internet connection for external link checking
No coding skills required
How it Works
Link Scanning: When you click Start Scan, Link Scan examines every link across your selected post types — including pages, posts, and embedded links. It checks each link’s HTTP status to determine whether it’s active, redirected, or broken — covering both internal and external URLs.
Status Detection: Each link is tested and categorized as:
Status
Description
HTTP Codes
Healthy
Link works properly
200 OK
Broken
Link returns an error
404, 403, 500, etc.
Redirected
Link points to different URL
301, 302
Link Reporting: Once the scan is complete, all detected broken links are organized into a clear, easy-to-read table. Each entry shows:
Post Title – Where the broken link appears
Type – Content type (Post, Page, etc.)
Status – Publication status (Published, Draft, etc.)
Broken Link URL – The actual failing link
HTTP Status Code – Error type (e.g., 404 Not Found)
Link Text – Anchor text used in the content
Redirect Action – Option to redirect the broken link
Edit Icon – Quickly edit the source content
Manual Detection: You can manually trigger a scan at any time. This is especially useful after publishing new content or making major updates, ensuring broken links are caught immediately.
Fixing Broken Links: From the report dashboard, you can fix broken links in just a few clicks:
Edit the link to update it with a correct URL
Redirect the link to a relevant working page
Remove the link if it’s no longer needed
Export Capability: Click Download CSV to export the broken links report. This is useful for sharing with team members, tracking fixes, or maintaining audit records.
Proactive Monitoring: Regular manual scans help prevent future issues. By scanning after content changes, you ensure new broken links are identified early — keeping your website healthy, user-friendly, and SEO-optimized.
Step by Step Guide
Using the Link Scan
Step 1: Access Link Scan From your WordPress admin menu, go to SEO Repair Kit → Links Manager → Link Scan tab.
This is your main workspace for manually scanning, reviewing, and fixing broken links across your site.
Step 2: Review the Overview Cards At the top of the dashboard, you’ll see a quick summary of your site’s link health:
Card
What It Shows
Total Links Checked
How many links have been scanned during the current or last scan
Broken Links Detected
Total number and percentage of links returning errors (such as 404)
Healthy Links
Confirms how many links are working correctly
Automation Status
Indicates whether scans are being run manually or automatically
These cards give you an instant health check before diving into details.
Step 3: Select What You Want to Scan Use the Select Post Type dropdown to choose which content to scan, such as:
Posts
Pages
Custom post types (if available)
This lets you focus scans on specific areas of your website. For example, scan only Pages if that’s where you recently made changes.
Step 4: Start the Scan Click the Start Scan button to begin scanning the selected content.
During the scan:
The scanner checks internal and external links
Each link is tested for availability and error responses
Progress is shown in real time with a progress bar
Step 5: Monitor Scan Progress During the scan, a progress bar appears with status messages such as:
“Scanning… (45% complete)”
“Checking links in Posts…”
“Scan complete!”
Once finished, you’ll also see:
Total links scanned
Completion percentage
Time of the last scan
This confirms the scan has completed successfully.
Step 6: Review Broken Links Found Scroll down to the Broken Links Found table to see detailed results.
Each row includes:
Column
Description
Post Title
Where the broken link appears (click to edit)
Type
Content type (e.g., Post, Page)
Status
Publication status (Published, Draft, etc.)
Broken Link URL
The actual failing link address
HTTP Status Code
Error type (e.g., 404 Not Found)
Link Text
Anchor text used in the content
Redirect Action
Button to create a redirect for this link
Edit Icon
Quickly edit the source content
This table makes it easy to understand exactly where and why each issue exists.
Step 7: Fix or Redirect Broken Links
For each broken link, you can take action directly from the table:
Option 1: Edit the Link
Click the Edit icon (pencil) next to the broken link
You will be taken to the post/page editor
Update the broken URL to a correct working address
Save/Update the post
Option 2: Create a Redirect
Click the Redirect Action button
Enter the target URL (where visitors should go instead)
Select redirect type (301 Permanent or 302 Temporary)
Click Save — the redirect is created instantly
Option 3: Remove the Link
Click the Edit icon to go to the content
Delete or unlink the problematic URL
Save/Update the post
All actions are performed without writing any code.
Step 8: Export the Report (Optional) Click Download CSV to export the broken links report.
The CSV file includes:
Post title
Broken link URL
HTTP status code
Link text
And more
This is useful for:
Sharing with team members
Tracking fixes in a spreadsheet
Maintaining audit records for clients
Step 9: Re-scan to Confirm Fixes After fixing broken links, run another scan to confirm:
Errors are resolved
Your site is fully healthy
No new broken links exist
Regular re-scans help maintain strong SEO and user experience.
Step 10: Maintain Ongoing Link Health Run manual scans whenever you:
Publish new content
Update existing pages
Migrate or delete URLs
Before and after site migrations
This ensures broken links never silently damage your SEO again.
FAQs
Do I need technical knowledge to use Link Scan? No. Link Scan is built for non-technical users and requires no coding or advanced setup. Just click buttons and follow the on-screen instructions.
Does Link Scan check both internal and external links? Yes. It scans and reports both internal links (within your website) and external links (to other websites).
Will broken links affect my SEO? Yes. Broken links can negatively impact search engine rankings and user experience. Fixing them helps maintain strong SEO performance.
How long does a scan take? Scan time depends on your site size. Small sites (under 100 links) take seconds. Large sites with thousands of links may take a few minutes.
How often should I run a scan? You can run scans anytime, but it’s recommended to scan regularly — especially after updating content or publishing new pages. A weekly manual scan is a good habit.
Can I fix links directly from the report? Absolutely. The report allows you to quickly edit, update, or redirect broken links in just a few clicks.
What HTTP status codes are considered broken? Link Scan marks any link returning an error code as broken, including:
404 (Not Found)
403 (Forbidden)
500 (Internal Server Error)
502 (Bad Gateway)
Any other error outside the 200-399 range
What is the difference between fixing and redirecting a link?
Fixing – You edit the content and change the URL to a working address
Redirecting – You keep the content as-is but create a redirect that sends visitors from the broken URL to a working URL
Can I scan only specific content types? Yes. Use the Select Post Type dropdown to focus scans on Posts, Pages, or custom post types.
Will scanning slow down my website? No. Link Scan processes links in batches and has minimal impact on site performance.
What is the CSV export for? The CSV export allows you to share broken link reports with team members, track fixes in a spreadsheet, or maintain audit records for client reporting.
What if no broken links are found? That’s good news! The table will be empty, and you’ll see 0 broken links in the overview cards.
Smart Redirects can automatically create safer redirects for broken internal URLs.
Use it to:
Redirect broken singular content URLs
Redirect deleted post URLs to relevant archive pages
Enable or disable Smart Redirects per post type
Review generated redirect records
Reset Smart Redirect records if needed
How to use
Open Links Manager.
Go to Smart Redirects.
Enable Smart Redirects.
Select the post types you want to protect.
Save settings.
Review generated redirect records.
Best practice
Use Smart Redirects for clear, predictable cases. For important pages, manually confirm the best target URL.
Step by Step Guide
Using the Smart Redirects
Step 1: Access Smart Redirects From your WordPress admin menu, go to SEO Repair Kit → Links Manager → Smart Redirects tab.
This is where you enable, manage, and monitor automatic redirects for broken content.
Step 2: Enable Smart Redirects for Post Types
In the Smart Redirects settings section, you’ll see a list of available post types:
Post Type
Toggle
What Happens When Enabled
Posts
ON/OFF
Deleted posts redirect to /blog/ (or your posts archive)
Pages
ON/OFF
Deleted pages redirect to page archive (if available)
Custom Post Types
ON/OFF
Deleted CPT items redirect to their archive page
To enable:
Locate the post type you want to protect
Toggle the switch to ON
Smart Redirects is now active for that content type
Example: If you enable Smart Redirects for Posts, whenever a blog post is deleted, visitors to that post’s URL will be automatically redirected to the main blog archive page.
Note: If a post type does not have an archive page, the toggle will be disabled or hidden.
Step 3: View Generated Redirect Records
Below the settings section, you’ll see a Generated Redirects table showing all automatically created Smart Redirects.
The table includes:
Column
Description
Source URL
The original broken URL (e.g., /blog/deleted-post/)
Target URL
Where visitors are redirected (e.g., /blog/)
Status
Active (working) or Inactive (paused)
Created Date
When the redirect was automatically generated
Actions
Buttons to edit, toggle, or delete
Step 4: Manage Individual Redirects
For each redirect in the table, you can perform these actions:
Toggle Status (Active/Inactive):
Click the Status toggle (or Active/Inactive button)
When Active – Redirect works normally
When Inactive – Redirect is paused; visitors see 404 instead
Use this to temporarily disable a redirect without deleting it
Delete a Redirect:
Click the Delete button (trash icon) next to the redirect
Confirm deletion
This removes the redirect record AND deletes the linked redirect from Redirection Manager
The redirect will no longer work
Step 5: Reset All Records
If you want to delete ALL Smart Redirects at once:
Click the Reset All Records button
Confirm that you want to delete every Smart Redirect
All redirect records are permanently removed
Smart Redirects will stop working for all post types until re-enabled or new redirects are generated
Use this when:
You’re restructuring your entire website
You want a fresh start with redirects
You’re migrating to a new URL structure
Step 6: Reset Records by Selected Post Type
If you want to delete Smart Redirects for only ONE content type:
Click the Reset by Post Type button
Select which post type from the dropdown (e.g., Posts only)
Confirm deletion
Only redirects for that specific post type are removed
Other post types’ Smart Redirects remain intact
Example: If you reset by “Posts”, all /blog/old-post/ → /blog/ redirects are deleted, but Product redirects still work.
Step 7: Manage Redirects in Redirection Manager
All Smart Redirects also appear in the main Redirection Manager:
Go to SEO Repair Kit → Redirection
You will see all Smart Redirects listed alongside your manual redirects
Smart Redirects are labeled or identifiable by their source/target pattern
From here, you can:
Edit the target URL
Change redirect type (301 to 302, etc.)
View hit counts and analytics
Delete or modify as needed
Note: Changes made in Redirection Manager will reflect back in Smart Redirects tab.
Step 8: Test That Smart Redirects Are Working
To verify Smart Redirects is functioning:
Delete a test post (or use an already deleted post)
Open an incognito/private browser window
Visit the deleted post’s URL directly (e.g., yoursite.com/blog/test-post/)
You should be automatically redirected to the archive page (yoursite.com/blog/)
Check that the redirect is a 301 (permanent) redirect
Step 9: Monitor and Maintain
Regular Checks: Periodically review the Generated Redirects table to see which redirects have been created
Clean Up: If you permanently remove an archive page, consider resetting redirects for that post type
Manual Overrides: If an automatic redirect isn’t appropriate for a specific URL, toggle it inactive or create a manual redirect instead
FAQs
What happens when I delete a post with Smart Redirects enabled? Smart Redirects automatically creates a 301 redirect from the deleted post URL to its post type archive page (e.g., /blog/deleted-post/ → /blog/). Visitors never see a 404 error.
Can Smart Redirects work with pages? Yes, but only if your theme has a page archive page. Most WordPress themes do NOT have page archives by default. If page archive doesn’t exist, Smart Redirects cannot be enabled for pages.
What if my post type doesn’t have an archive? Post types without archive pages cannot use Smart Redirects. You’ll need to create manual redirects for those content types instead.
What type of redirect does Smart Redirects use? Smart Redirects uses 301 (Permanent) redirects. This is the SEO-friendly redirect type that passes link equity (PageRank) to the target URL.
Can I manually override a Smart Redirect? Yes. You have several options:
Toggle the redirect to Inactive (pauses it)
Delete the redirect record entirely
Create a manual redirect in Redirection Manager that overrides it
Edit the target URL in Redirection Manager
Will Smart Redirects redirect to the exact archive page of the deleted post? Yes. If you delete a post in the “News” category, it redirects to the main news archive (/news/), not to a category-specific archive.
Do Smart Redirects work for posts that were deleted before enabling the feature? No. Smart Redirects only works for URLs that become broken AFTER the feature is enabled. Already-deleted posts will not automatically get redirects.
How do I stop Smart Redirects from creating a specific redirect? Go to the Generated Redirects table, find that redirect, and either:
Toggle its status to Inactive (keeps record but stops redirect)
Delete the redirect record (permanently removes it)
Can I see how many people use a Smart Redirect? Yes. Go to SEO Repair Kit → Redirection and view the hit count column for each redirect. This shows how many times each Smart Redirect has been used.
What happens to Smart Redirects if I uninstall the plugin? Smart Redirects are stored in your WordPress database. If you uninstall the plugin, the redirects will stop working. If you reinstall, they should work again (unless you chose to delete all data during uninstall).
Can I use Smart Redirects AND manual redirects for the same URL? Yes, but the redirect that executes first (usually the most specific match) will take priority. It’s best to avoid duplicate redirects.
What is the difference between Reset All Records and Reset by Post Type?
Reset All Records – Deletes EVERY Smart Redirect for ALL post types
Reset by Post Type – Deletes Smart Redirects for only ONE specific post type (e.g., only Posts, leaving Products untouched)
Will resetting records delete the redirects? Yes. Reset actions permanently delete Smart Redirect records AND remove the corresponding redirects from Redirection Manager. These actions cannot be undone.
Does Smart Redirects work with custom post types? Yes, as long as the custom post type has has_archive set to true when it was registered. Most custom post types support archives.
What should I do if my archive page URL changes? If you change your archive page URL (e.g., from /blog/ to /news/), existing Smart Redirects will still point to the old URL. You’ll need to either:
Reset and regenerate redirects
Manually update target URLs in Redirection Manager
Spam Monitor helps you check indexed Google results for suspicious URLs, spam signals, language mismatch, and risky pages.
Open:
SEO Repair Kit → Spam Monitor
Spam Monitor contains these tabs:
Dashboard
Spam Rules
Google SERP Scan
Search Console Cleanup
Alerts
Settings
Spam Monitor Dashboard
The dashboard summarizes Spam Monitor activity.
Use it to see:
Total SERP scans
Google results checked
Critical indexed spam
Cleanup queue
Critical/spam/suspicious SERP counts
Requests used
Cleaned URLs
Monitoring status
Resolved URLs
Sitemap issues
Last scan
Python engine status
Spam Rules sync status
Spam Rules
Spam Rules control how Spam Monitor scores suspicious Google results.
Use it to configure:
Expected spam languages
Website allowed languages
Language mismatch score
Spam keyword categories
Custom blocked keywords
Suspicious URL patterns
URL pattern score
Clean/suspicious/spam/critical thresholds
Google SERP Scan
Google SERP Scan checks Google indexed results for a domain.
Use it to:
Run manual SERP scans
Choose scan depth
Include or exclude subdomains
Review returned Google SERP records
Review recent scan history
Check provider status
Sync Spam Rules
Search Console Cleanup
Search Console Cleanup helps you review risky indexed URLs and organize cleanup actions.
Use it to:
Detect risky URLs
Review URL status
Mark cleanup status
Check sitemap presence
Open Search Console links
Track cleanup progress
Spam Monitor Alerts
Alerts help you receive and review Spam Monitor notifications.
Use it to:
Enable alert emails
Choose recipients
Choose risk levels that trigger alerts
Send test emails
Review alert history
Scheduled Spam Monitoring
Scheduled Spam Monitoring runs Google SERP scans automatically.
Find it in:
Spam Monitor → Settings
Use it to:
Enable scheduled scans
Choose frequency
Choose scan depth
Set run time
Include subdomains
Run schedule manually for testing
Reset schedule settings
Spam Monitor Settings
Settings contains production and provider-related controls.
Use it to:
Review provider connection status
Review scheduled monitoring settings
Configure simple automation options
Reset schedule settings
How to use
Spam Monitor Dashboard
Open Spam Monitor.
Start on the Dashboard tab.
Review the KPI cards.
Check the stats graph for a quick visual summary.
Open risky records if something needs attention.
Spam Rules
Open Spam Monitor.
Go to Spam Rules.
Review language rules.
Select suspicious languages and allowed website languages.
Review spam keyword categories.
Add custom blocked keywords if needed.
Review URL pattern rules.
Adjust score thresholds carefully.
Save rules.
Sync rules if the interface shows they need syncing.
Best practice
Start with default rules first. Only adjust scores if you understand how the results are being classified.
Google SERP Scan
Open Spam Monitor.
Go to Google SERP Scan.
Enter your domain.
Select scan depth.
Choose whether to include subdomains.
Run the scan.
Review returned SERP records.
Review recent scan history.
Scan depth
Scan depth controls how many SERP requests/results are checked.
Examples:
1 request = up to 10 records
3 requests = up to 30 records
10 requests = up to 100 records
100 requests = up to 1,000 records
200 requests = up to 2,000 records
Use larger scan depths carefully because they consume more provider requests.
Search Console Cleanup
Suggested cleanup flow
Detect risky indexed URLs.
Review each URL manually.
Decide whether the URL is legitimate or suspicious.
Remove, fix, noindex, redirect, or clean the affected page.
Use Search Console to request removal or reindexing where needed.
Mark status in Spam Monitor.
Best practice
Spam Monitor is a risk signal tool. Always review unfamiliar URLs before taking destructive action.
Spam Monitor Alerts
Open Spam Monitor.
Go to Alerts.
Add recipient email addresses.
Select risk levels.
Send a test email.
Save settings.
Scheduled Spam Monitoring
Available frequency options
Every 10 minutes, testing only
Every day, recommended
Every 3 days
Every week
Every 2 weeks
Every month
Recommended setup
For most websites:
Frequency: Every day
Scan depth: 3 requests / up to 30 records
Include subdomains: enabled if your site uses subdomains
Alerts: enabled for spam and critical findings
Spam Monitor Settings
Provider note
Free users can use the SEO Repair Kit trial provider. Paid Spam Monitor users can connect supported SERP providers where supported by their plan, such as:
Serper.dev
SERP API
DataForSEO
Step By Step Guide
Open Spam Monitor.
Review the Dashboard.
Check Spam Rules.
Run a Google SERP Scan.
Review returned records and recent scans.
Use Search Console Cleanup for risky URLs.
Configure Alerts and Scheduled Spam Monitoring.
FAQs
Q: Is Spam Monitor a security scanner? A: It is an indexed-spam and SERP risk monitoring tool, not a full malware scanner.
Q: Does it delete spam automatically? A: No. It helps you detect and review risky indexed URLs.
Q: Is Spam Monitor free? A: Free users may use trial provider access. Full module features may require a paid plan.
To install the free SEO Repair Kit for WordPress plugin on your WordPress site by downloading the plugin through the Plugins menu, follow the steps below.
1.Navigate to the Plugin Directory:
Log in to your WordPress dashboard. From the left-hand menu, go to Plugins
Click toAdd Plugin
2.Search for SEO Repair Kit:
In the search bar located in the top right corner, type SEO Repair Kit. Look for the official plugin developed by TorontoDigits in the search results.
3.Install and Activate:
Click the Install Now button next to the SEO Repair Kit listing.
Once the installation is complete, the button will change to Activate. Click it to turn the plugin on.
4.Start the Setup Wizard:
Upon activation, you will be redirected to the welcome screen. Click the Let’s Get Started button to begin the guided configuration.
5.Configure the Link Scanner:
Choose which post types (Posts, Pages, or Media) you want the Link Scanner to automatically monitor for broken links. Once selected, click Next.
6.Connect Search Console Insights:
Authorize Google Search Console to pull clicks, impressions, CTR, and average position data directly into the KeyTrack dashboard. Click Next to proceed.
7.Enable Schema Templates:
Turn on the structured data templates that fit your content (such as Article, FAQ, Product, or Recipe schema). Click Next.
8.Set Up Notifications:
Select how you want to stay informed. You can opt-in for Weekly SEO reports, KeyTrack alerts, and Broken link alerts. Enter your preferred email address at the bottom and click Next.
9. Complete the Setup Wizard: The final screen introduces the premium AI Concierge designed for your SEO workflows. Click Finish in the bottom right corner to exit the wizard and complete the setup process.
Congratulations on installing the SEO Repair Kit plugin!
1. What SEO Repair Kit Does
SEO Repair Kit is a WordPress plugin that helps you find, monitor, and fix common SEO problems from one dashboard.
Spam Monitor helps you check indexed Google results for suspicious URLs, spam signals, language mismatch, and risky pages.
Open:
SEO Repair Kit → Spam Monitor
Spam Monitor contains these tabs:
Dashboard
Spam Rules
Google SERP Scan
Search Console Cleanup
Alerts
Settings
12. Spam Monitor Dashboard
The dashboard summarizes Spam Monitor activity.
Use it to see:
Total SERP scans
Google results checked
Critical indexed spam
Cleanup queue
Critical/spam/suspicious SERP counts
Requests used
Cleaned URLs
Monitoring status
Resolved URLs
Sitemap issues
Last scan
Python engine status
Spam Rules sync status
How to use
Open Spam Monitor.
Start on the Dashboard tab.
Review the KPI cards.
Check the stats graph for a quick visual summary.
Open risky records if something needs attention.
13. Spam Rules
Spam Rules control how Spam Monitor scores suspicious Google results.
Use it to configure:
Expected spam languages
Website allowed languages
Language mismatch score
Spam keyword categories
Custom blocked keywords
Suspicious URL patterns
URL pattern score
Clean/suspicious/spam/critical thresholds
How to use
Open Spam Monitor.
Go to Spam Rules.
Review language rules.
Select suspicious languages and allowed website languages.
Review spam keyword categories.
Add custom blocked keywords if needed.
Review URL pattern rules.
Adjust score thresholds carefully.
Save rules.
Sync rules if the interface shows they need syncing.
Best practice
Start with default rules first. Only adjust scores if you understand how the results are being classified.
14. Google SERP Scan
Google SERP Scan checks Google indexed results for a domain.
Use it to:
Run manual SERP scans
Choose scan depth
Include or exclude subdomains
Review returned Google SERP records
Review recent scan history
Check provider status
Sync Spam Rules
How to use
Open Spam Monitor.
Go to Google SERP Scan.
Enter your domain.
Select scan depth.
Choose whether to include subdomains.
Run the scan.
Review returned SERP records.
Review recent scan history.
Scan depth
Scan depth controls how many SERP requests/results are checked.
Examples:
1 request = up to 10 records
3 requests = up to 30 records
10 requests = up to 100 records
100 requests = up to 1,000 records
200 requests = up to 2,000 records
Use larger scan depths carefully because they consume more provider requests.
15. Search Console Cleanup
Search Console Cleanup helps you review risky indexed URLs and organize cleanup actions.
Use it to:
Detect risky URLs
Review URL status
Mark cleanup status
Check sitemap presence
Open Search Console links
Track cleanup progress
Suggested cleanup flow
Detect risky indexed URLs.
Review each URL manually.
Decide whether the URL is legitimate or suspicious.
Remove, fix, noindex, redirect, or clean the affected page.
Use Search Console to request removal or reindexing where needed.
Mark status in Spam Monitor.
Best practice
Spam Monitor is a risk signal tool. Always review unfamiliar URLs before taking destructive action.
16. Spam Monitor Alerts
Alerts help you receive and review Spam Monitor notifications.
Use it to:
Enable alert emails
Choose recipients
Choose risk levels that trigger alerts
Send test emails
Review alert history
How to use
Open Spam Monitor.
Go to Alerts.
Add recipient email addresses.
Select risk levels.
Send a test email.
Save settings.
17. Scheduled Spam Monitoring
Scheduled Spam Monitoring runs Google SERP scans automatically.
Find it in:
Spam Monitor → Settings
Use it to:
Enable scheduled scans
Choose frequency
Choose scan depth
Set run time
Include subdomains
Run schedule manually for testing
Reset schedule settings
Available frequency options
Every 10 minutes, testing only
Every day, recommended
Every 3 days
Every week
Every 2 weeks
Every month
Recommended setup
For most websites:
Frequency: Every day
Scan depth: 3 requests / up to 30 records
Include subdomains: enabled if your site uses subdomains
Alerts: enabled for spam and critical findings
18. Spam Monitor Settings
Settings contains production and provider-related controls.
Use it to:
Review provider connection status
Review scheduled monitoring settings
Configure simple automation options
Reset schedule settings
Provider note
Free users can use the SEO Repair Kit trial provider. Paid Spam Monitor users can connect supported SERP providers where supported by their plan, such as:
Serper.dev
SERP API
DataForSEO
19. Meta Manager
Meta Manager controls SEO titles, meta descriptions, robots settings, and canonical settings.
Open:
SEO Repair Kit → Meta Manager
Main areas:
Global settings
Content type settings
Taxonomy settings
Archive settings
Advanced robots settings
Per-post/page SEO controls
How to use
Open Meta Manager.
Configure global homepage SEO settings.
Set title separator.
Configure default templates for posts and pages.
Configure taxonomy templates.
Configure archive settings.
Save changes.
Dynamic tags
You can use template tags such as:
%title%
%excerpt%
%site_title%
%sep%
%current_date%
%current_day%
%month%
%year%
Best practice
Use templates for large sites, then manually override important pages.